In the article “How To Change Namespace In Kubernetes – A Guide”, you’ll gain an in-depth understanding of modifying namespaces in the prominent container orchestration tool, Kubernetes, known for its adaptability and comprehensive functionality. This guide explores various aspects, from the initial four namespaces— default, kube-system, kube-public, and kube-node-lease— to the dynamic concept of creating, switching, and deleting namespaces using command-line tools like ‘kubectl’. Kubernetes’s namespaces are crucial in demarcating and operating Kubernetes clusters, offering effective strategies for resource administration, access regulation, and enhancing resource efficiencies. This article also provides insights into the potential risks, such as the removal of all resources tied to a specific namespace upon its deletion. It also looks at various professional practices such as namespace-based scoping, kubectl commands, Kubernetes services, key considerations in namespace selection, and more.

Understanding Kubernetes Namespaces
Definition of Kubernetes namespaces
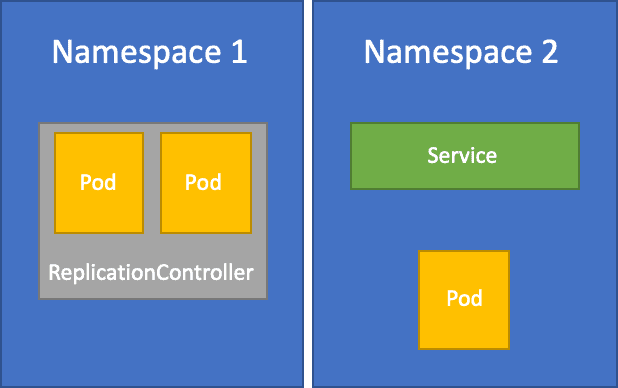
In Kubernetes, namespaces are an important concept, which provide a way to divide a single Kubernetes cluster into virtual sub-clusters, often referred to as “virtual clusters”. This allows several teams or projects to share a single Kubernetes cluster conveniently and securely. Essentially, namespaces allow for the logical isolation of resources by providing a scope for names of resources. However, it’s important to note that namespaces themselves cannot exist within other namespaces; they must be independent.
Understanding Namespaces in Kubernetes Clusters
In a Kubernetes cluster, each namespace must possess a unique name. If you try to create two namespaces sharing the same name, you will encounter an error. This is because namespaces serve as a way to segregate resources logically within a cluster, preventing any naming conflicts or ambiguity.
Why Unique Names Matter
• Logical Segregation: Namespaces help organize and manage resources effectively. Different applications or teams can use separate namespaces, ensuring their resources don’t mix.
• Avoiding Conflicts: Ensuring each namespace has a distinct name eliminates potential resource management conflicts. This clarity is crucial for maintaining an efficient Kubernetes environment.
Naming Best Practices
• Descriptive Naming: Choose names that reflect the purpose or team associated with the namespace. This enhances organization and aids in communication among team members.
• Consistent Naming Conventions: Stick to a naming convention across your Kubernetes environment. This consistency aids in automating and managing resources across various namespaces.
So, while you cannot have two namespaces with the same name in a Kubernetes cluster, employing thoughtful and distinct naming practices will keep your resources organized and your cluster running smoothly.
Importance of namespaces in Kubernetes
Namespaces are central to Kubernetes because they allow for greater organization and separation of concerns within a Kubernetes project. By providing an encapsulating layer for groups of resources, namespaces aid in managing and dividing the Kubernetes cluster efficiently, thereby improving resource management, access control, and overall system efficiency.
Default namespaces in Kubernetes
When you begin with Kubernetes, you’ll notice four default namespaces in place: default, kube-system, kube-public, and kube-node-lease. Each of these namespaces serves a specific purpose. The ‘default’ is where resources get created when no other namespace is assigned, ‘kube-system’ is for objects created by the Kubernetes system itself, ‘kube-public’ is for resources that need to be available publicly across the cluster, and ‘kube-node-lease’ for providing heartbeats information of nodes.
First, ensure you have access to the .kube directory where Kubernetes stores its configuration files. You can list all the hidden directories in your cluster with:
ls -a
Navigate to the .kube directory:
cd .kube
Inside, you’ll find a file named config—this is your target for modification.
Open the config file in your preferred text editor. Locate the section that defines contexts. It typically looks like this:
contexts:- context:cluster: kubernetes # Replace with your cluster’s nameuser: kubernetes-admin # Replace with your usernamenamespace:name: my-context
Adjust the namespace field to include the name of the namespace you wish to set as default. Here’s how you can structure it:
• Cluster: The name of your Kubernetes cluster.
• User: The username associated with your Kubernetes account.
• Namespace: The specific namespace you want to use by default.
Step 3: Save and Exit
After editing the config file with the desired namespace information, save the changes and exit the editor. This sets the specified namespace as your default whenever you interact with the cluster, ensuring a more efficient workflow and reducing the need to specify namespaces repeatedly in your command-line interactions.
Possible usage of namespaces
Namespaces can be utilized for various purposes such as isolating projects and microservices, sandboxing development and testing environments, designing roles that compile permissions under a singular name, and establishing resource quotas for the usage of CPU or memory.
Communication across different namespaces
Though namespaces are separate entities, Pods within them can communicate with each other across different namespaces. This inter-communication between namespaces takes place through the Kubernetes DNS service directory.
Crafting Namespaces in Kubernetes
Using ‘kubectl’ command to create namespaces
Creating a new namespace in Kubernetes is as easy as using the right ‘kubectl’ command. The command ‘kubectl create namespace [namespace-name]’ quickly creates a new namespace.
Setting up a new namespace through YAML files
In addition to using the ‘kubectl’ command, namespaces can also be set up using YAML files. This involves specifying the ‘Namespace’ kind in the YAML file, then running the file through the ‘kubectl’ command, which will subsequently create the namespace based on the specified instructions.
Role of resource quotas in creating namespaces
Resource quotas are crucial when creating namespaces because they provide a mechanism for managing resources within each namespace. By setting up quotas, one can control the amount of CPU or memory allocated to each namespace, thus preventing resource wastage and ensuring efficient use of cluster resources.
Best practices to follow while creating namespaces
While creating namespaces, it’s important to follow best practices for efficient management. This includes careful planning before setting up namespaces, proper naming conventions, and appropriate allocation of resources. It is not advisable to rename the namespace upon creation, hence it is imperative to choose names with discretion.
Namespace Switching in Kubernetes
Switching namespaces in a Kubernetes cluster is a common task for developers and administrators. This guide walks you through the process, combining practical steps with command syntax to ensure a smooth transition.
Examining the current namespace and context
To work within a desired namespace, it is often necessary to switch between various namespaces. To understand the current namespace and context, the ‘kubectl config current-context’ command can be instrumental.To work within a desired namespace, it is often necessary to switch between various namespaces. To understand the current namespace and context, the kubectl config current-context command can be instrumental. Start by listing all the available namespaces:
kubectl get namespaces
This command provides a comprehensive list of namespaces, allowing you to choose the one you wish to work in.
Using ‘kubectl’ command to ch namespaces
The ‘kubectl’ command provides an easy means to switch between different namespaces. The syntax is
'kubectl config set-context --current --namespace=[namespace-name]'
where the current active namespace is set to a new one as specified in the command. Once you’ve identified your target namespace, it’s time to switch using the kubectl command. The syntax is:
kubectl config set-context --current --namespace=[namespace-name]
In this command, replace [namespace-name] with the actual name of your target namespace. This sets your current active namespace to the one specified, streamlining your workflow.
Setup of ‘kubectl config set-context’ for active namespace
Updating the active namespace is a straightforward task, thanks to the ‘kubectl config set-context’ command.
This helps in setting the context for your kubectl client to your desired namespace. Updating the active namespace is a straightforward task, thanks to the kubectl config set-context command. This helps in setting the context for your kubectl client to your desired namespace. To verify the current namespace, use the following command:
kubectl config view grep namespace
This confirmation ensures that your kubectl client is correctly configured to operate within the intended namespace.
Namespace switch summarization
In essence, a namespace switch involves examining the current namespace, executing the ‘kubectl’ command to switch to the desired namespace, and setting up the context for the active namespace. This workflow ensures that your tasks and resources are appropriately confined to the target namespace.In essence, a namespace switch involves examining the current namespace, executing the kubectl command to switch to the desired namespace, and setting up the context for the active namespace. This workflow ensures that your tasks and resources are appropriately confined to the target namespace.
By following these steps, you can efficiently manage your cluster environments, ensuring seamless transitions and optimal resource management.

Viewing Available Namespaces and Resources
Listing all available namespaces using ‘kubectl get namespace’
To view all available namespaces, the simple command ‘kubectl get namespaces’ comes in handy. This quickly lists down all the namespaces within a given cluster.
How to view Kubernetes resources in a namespace
Each namespace comprises a set of Kubernetes resources. These can be viewed using the ‘kubectl get’ command followed by the type of resource and the name of the namespace.
Summarizing the resources of a specific namespace
To obtain a summary of resources for a specific namespace, use the ‘kubectl describe namespace [namespace-name]’ command. This gives you a detailed account of the resource allocation and usage within the particular namespace.
Viewing specific cluster resources within a namespace
If you wish to view specific resources within a namespace, you can use the ‘kubectl get [resource]’ command along with the namespace flag. This allows for focused management of resources within the namespace, enabling efficient resource use and monitoring.If you wish to view specific resources within a namespace, you can use the kubectl get [resource] command along with the namespace flag. This allows for focused management of resources within the namespace, enabling efficient resource use and monitoring.
To perform operations within a specific namespace, the kubectl command is used with the –namespace flag. This command-line tool is essential for interacting with Kubernetes clusters, providing a flexible way to manage resources.
Basic Syntax
The basic syntax to use the kubectl command with a namespace is as follows:
kubectl [command] --namespace=[namespace]
• kubectl: This is the command-line tool used for managing Kubernetes clusters.
• [command]: Represents the specific operation you wish to carry out, such as get, describe, create, or delete. For instance:
o Use get to retrieve information about resources.
o Use describe to get detailed information about a specific resource.
o Use create to build a new resource.
• –namespace=[namespace]: This flag specifies the namespace in which the command should be executed. By targeting a specific namespace, you ensure that the command only affects resources within that scope. This helps in organizing and segregating resources effectively within a cluster.
Example
For example, to view all pods within the kube-system namespace, you would use:
kubectl get pods --namespace=kube-system
This command retrieves a list of pods specifically within the kube-system namespace, allowing for precise monitoring and management. By using namespaces, you can streamline operations and maintain a clear organizational structure within your Kubernetes environment.
Management of Kubernetes Resources within a Namespace
Understanding namespaced objects and Kubernetes services
Namespaces contain “namespaced” objects or Kubernetes services, which are essentially a set of Pods that work together, such as a tier in a multi-tier application. The Kubernetes services within a namespace streamline communications between pods and manage functionalities.
Resource management within a namespace
Management of resources within a namespace revolves around tracking resource usage, setting-up of quotas, and optimum utilization of CPU or memory. Proper resource management ensures balanced consumption of resources across all existing namespaces, helping maintain the overall health of the Kubernetes system.
Working with resource names within a namespace
When naming resources within a namespace, it’s pivotal to use meaningful and concise names. This makes the management of resources easier as resource names are used to reference objects within a namespace.
Deletion of Kubernetes resources
Deleting Kubernetes resources is a simple task using the ‘kubectl’ command. However, observers need to use caution because deleting a namespace will result in erasing all the resources associated with it across the cluster.
Dealing with Namespace Deletion in Kubernetes
Reasons against renaming a namespace
Renaming a namespace isn’t advisable as it can lead to confusion and could result in the unintentional loss of Kubernetes objects associated with the namespace. Instead, carefully select namespace names at the beginning to avoid the need for renaming later on.
Procedure for namespace deletion
The namespace deletion process is straightforward. The ‘kubectl delete’ command is used followed by the ‘namespace’ keyword and the name of the namespace to be deleted.
Implication of namespace deletion on cluster resources
During namespace deletion, all the resources associated with the particular namespace across the cluster will also be deleted. Therefore, it’s crucial to ensure no necessary resources are still associated with the namespace before proceeding with the deletion.

Role-Based Access Control and Network Policies within Namespaces
In-depth look into role-based access control within a namespace
Role-Based Access Control (RBAC) is a crucial method for controlling who has access to the resources within a namespace. It allows you to specify which users or groups have access to what resources, providing a high degree of control and security.
Implementation of network policies within namespaces
Network policies play a critical role in determining how pods communicate with each other within a namespace. By carefully defining these policies, you ensure the secure and efficient communication of pods.
How namespaces enhance security within the cluster
Namespaces contribute significantly to the security within a cluster. They provide isolation of applications, reduced blast radius of attacks, clear boundaries for access control, and a methodical way of applying security policies, thereby enhancing the overall security stature of the cluster.
Isolation of Development and Production environments using Namespaces
Process of developing custom namespaces for isolation
Custom namespaces can be created to segregate environments, such as separating development and production environments. This ensures both environments don’t interfere with each other, thereby reducing the risk of introducing errors or impending performance.
Pros and cons of using multiple namespaces
The advantage of using multiple namespaces is that it helps in organizing resources, partitioning system resources, and enhancing security. However, the downside could include managing overhead if namespaces number increases and the potential for incorrect configuration or permissions leading to issues.
Examining a multi-tenant environment through namespaces
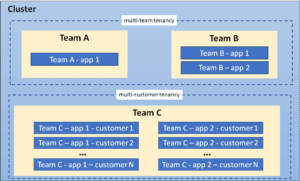
In a multi-tenant environment, different users or groups of users can independently work within the same physical cluster, yet within separate namespaces. This provides the feeling of owning independent Kubernetes clusters thereby achieving isolation and efficiency.
Namespaces in sandboxing development and testing environments
Namespaces can be used as a sandbox for development and testing environments. It offers a safe place to test code and applications without impacting production codes or environments.
Working with Kubernetes API within a Namespace
Basics of Kubernetes API
The Kubernetes API serves as a key interface for managing Kubernetes objects including namespaces. It’s built on the principle of declarative configuration, providing endpoints to create, retrieve, update, and delete objects.
Role of Kubernetes API in namespace control and configuration
The Kubernetes API plays a significant role in namespace control and configuration by providing endpoints for creating, controlling, and managing namespaces.
Interaction with Kubernetes API for namespace management
Interactions with the Kubernetes API to manage namespaces can be done using the ‘kubectl’ command or other client libraries. It allows developers to routinely check the state of their namespace, apply configurations, modify settings, or even delete namespaces if required.
Cases of Namespace Usage in Kubernetes
Managing different teams or projects using Namespaces
Namespaces can effectively be used to manage different teams or projects within the same Kubernetes cluster. Each team or project gets its own namespace, guaranteeing logical isolation from others, thereby enabling efficient management of resources per project or team.
Enhancing resource efficiencies via namespaces
Namespaces contribute significantly to enhance resource efficiencies. By setting resource quotas for each namespace, teams can ensure the efficient use of resources and prevent any single namespace from consuming an excessive amount of shared resources.
Use of namespaces for low-level resources
Low-level resources, such as nodes and persistent volumes, are cluster-level resources that don’t belong to a particular namespace but can still be managed effectively using namespaces.
How namespaces aid in easy production code execution
Namespaces in Kubernetes aid in production code execution by isolating production environments, ensuring that testing or development work does not affect production code. This supports stability and reliability, both of which are critical in production environments.
In conclusion, namespaces play a crucial role in Kubernetes, providing a mechanism for segregation and management of resources within a cluster. Be it for maintaining security, ensuring efficient resource management, or simplifying administrative tasks, learning namespaces’ concept is indispensable for effective Kubernetes use.
Frequently Asked Questions
1. How do I make a specific namespace the default for my session?
To set a specific namespace as your default, you can use a command like kubectl config set-context –current –namespace=[desired-namespace], replacing [desired-namespace] with the name of your chosen namespace
2. How do I check my current namespace?
You can determine your current namespace by executing the command kubectl config view grep namespace, which will display the active namespace setting.
3. How do I list all available namespaces?
To see all namespaces within your Kubernetes cluster, use the command kubectl get namespaces.


