Key Takeaways: Empowering Developers with Kubernetes Deployment Strategies
Rolling updates allow you to update deployments with zero downtime, ensuring continuous service delivery.
Canary deployments are ideal for testing new features with a subset of users before a full rollout.
Blue-green deployments offer a switchable environment, reducing the risk of deployment-related downtime.
The recreate strategy is the simplest, though it incurs downtime, it provides a clean environment for new versions.
Understanding and utilizing labels and selectors are crucial for managing and automating deployments effectively.
What is a Kubernetes Deployment?
Think of a Kubernetes deployment as a wizard for your applications. It’s a way to tell your Kubernetes cluster how to create, update, and delete instances of your application, called Kubernetes pods. But it’s not just a one-trick pony; it’s a smart wizard that makes sure these changes happen without impacting your users.
Understanding the Basics
At its core, a Kubernetes deployment is a set of instructions. These instructions are written in a YAML file, which is a bit like a recipe that Kubernetes follows to manage your application’s lifecycle. You don’t have to stick around and watch it work; Kubernetes takes care of the heavy lifting, ensuring your apps are running as you want them to.
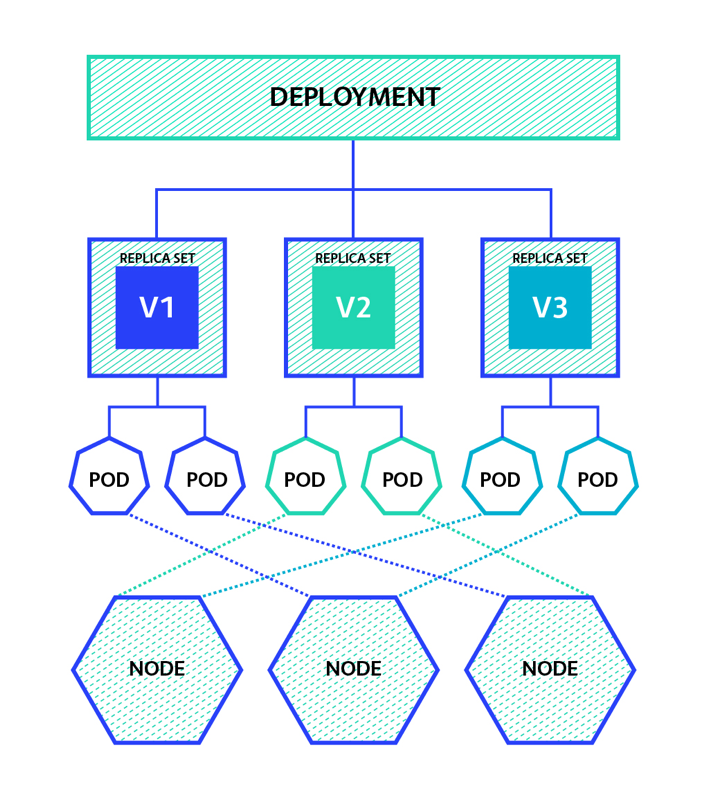
The Role of a Deployment in the Kubernetes Ecosystem
Deployments are like the puppet masters of the Kubernetes world. They control the number of copies of your application that should be running, handle rolling updates, and roll back to previous versions if something goes wrong. It’s all about maintaining that delicate balance between change and stability.
Breaking Down the Deployment Spec
Now, let’s get our hands dirty and break down what goes into a Kubernetes deployment spec. This is the blueprint for how your application should run in the Kubernetes cluster.
Anatomy of a YAML File
The YAML file for a Kubernetes deployment might seem intimidating at first, but it’s actually pretty straightforward once you get the hang of it. It’s composed of several parts that define the desired state of your application. Think of it as a wishlist you’re giving to Kubernetes: “Here’s what I want, now make it happen.”
Key Components of a Kubernetes Deployment Spec
In this YAML file, you’ll specify things like the number of replicas, or copies, of your application that should be running, what image to use for the containers, and how to update them. You’ll also set up probes that Kubernetes uses to check if your application is healthy and ready to serve traffic.
Common Kubernetes Deployment Strategies Explained
There are a few options when it comes to choosing a Kubernetes deployment strategy when deploying applications in Kubernetes, and each has its own advantages. Let’s explore some of the most common ones.
Understanding Rolling Updates
Rolling updates are the go-to strategy for most deployments. They work by slowly replacing the old version of your application with the new one. It’s a bit like renovating a train while it’s still running; passengers barely notice the changes as old carriages are updated one by one.
For example, if you have an application running with 10 replicas, a rolling update will update one replica at a time, waiting for it to become ready before moving on to the next one.
This strategy is great because it ensures there’s no downtime. Your users continue to use the application, blissfully unaware of the changes happening in the background.
Canary Releases for Gradual Deployment
Canary releases are like dipping your toes in the water to test the temperature before diving in. You release the new version to a small group of users first. If everything goes well, you then roll it out to everyone.
Imagine you’re rolling out a new feature and want to test it with 10% of your users. You can configure a canary deployment to direct a fraction of the traffic to the new version while the rest continues to use the stable version.
This strategy is perfect when you want to be extra careful with your updates, minimizing the risk of introducing bugs to all your users at once.
Blue-Green Deployments for Zero-Downtime
Blue-green deployments are like having a stunt double for your application. You have two identical environments: one is blue (the current version) and the other is green (the new version). Once you’re happy with the green environment, you simply switch the traffic over from blue to green.
It’s a safety net that allows you to quickly rollback if something goes wrong with the new version, as you still have the old version running and ready to go.
Recreate Strategy: A Clean Slate
The recreate strategy is the simplest of all. It’s like a theater intermission; the old version is completely removed before the new version takes the stage. This does mean your application will be down for a short period, so it’s best used when you can afford some downtime.
Now that we’ve set the stage with the basics, let’s dive deeper into Kubernetes deployment strategies and truly empower developers with the automation magic of Kubernetes.
Implementing Deployment Strategies in Kubernetes
Implementing a deployment strategy in Kubernetes is like choreographing a dance. Each move must be executed precisely and at the right moment to create a seamless performance. Let’s walk through how to set the stage for your applications to perform flawlessly in the Kubernetes environment.
Creating a New Deployment: Step-by-Step
Starting with a new deployment? Here’s how to do it right. First, you’ll need to create a YAML file that describes your application. This file is like a set of instructions for Kubernetes, telling it what to do with your application.
In this file, you’ll define things like which container image to use, the number of replicas you want, and the deployment strategy. For instance, if you’re using a rolling update strategy, you’ll specify how many pods can be taken down at once and how many new pods can be created simultaneously.
Once you’ve got your YAML file set up, you’ll use the kubectl apply command to create the deployment in your cluster. Kubernetes will then work its magic, reading your instructions and bringing your application to life in the cluster.
Here’s a simple checklist to follow when creating a new deployment:
Write your YAML file with the necessary specifications.
Use the kubectl apply -f your-deployment.yaml command to create the deployment.
Verify the deployment with kubectl get deployments to ensure it’s running.
Check the status of the rollout with kubectl rollout status deployment/your-deployment-name.
Finally, confirm that your pods are up and running with kubectl get pods.
I should note here that this manual way of deployment is fine for demonstration and education purposes for a simple deployment, but in real world situations with complex environments you would use helm charts or a CI/CD pipeline to automate the process.
Updating an Existing Deployment: Best Practices
Always test your changes in a staging environment before applying them to production.
Update the deployment YAML file with the new container image or configuration changes.
Use the kubectl apply -f your-deployment.yaml command to apply the changes.
Monitor the deployment to ensure no errors occur during the update.
Keep an eye on your application’s logs and performance metrics to catch any issues early.
When updating an existing deployment, you want to be as smooth as a ninja. Make your changes in the YAML file, and then apply them without your users noticing a thing. Keep a close eye on the deployment process and be ready to act if something doesn’t go according to plan.
Remember, the goal is to make updates as transparent to the user as possible. By following these best practices, you can ensure that your updates roll out smoothly, with minimal impact on the user experience.
It’s also important to have a rollback plan in case something goes wrong. Kubernetes makes it easy to roll back to a previous deployment if you encounter any issues with the new version.
Monitoring Deployment Rollout Status
After you’ve initiated a deployment, you’re not done yet. Monitoring the rollout status is crucial to ensure everything is going according to plan. You can use the kubectl rollout status command to get real-time updates on the status of your deployment.
If you notice something amiss, don’t panic. Kubernetes provides tools to help you diagnose and resolve issues. Check the logs of individual pods with kubectl logs and describe the state of the pods with kubectl describe pods to get more detailed information on what’s happening behind the scenes.
The Power of Labels and Selectors in Kubernetes Deployments
Labels and selectors are the secret sauce of Kubernetes. They’re like the tags on your clothes that tell you what’s what. In Kubernetes, labels are used to tag your resources, and selectors are used to tell Kubernetes which resources you want to operate on.
Connecting Pods to Services with Labels
When you create a service in Kubernetes, you use labels to tell the service which pods it should manage traffic for. This is how you ensure that the right traffic goes to the right place. It’s like assigning a postman to deliver mail to the correct addresses.
For example, you might have a label app: my-app on all the pods for your application. When you create a service, you’ll use a label selector to tell the service to manage traffic for all pods with that label.
Define labels in your pod template within the deployment YAML file.
Create a service that uses a selector to match those labels.
Apply the service using kubectl apply -f your-service.yaml.
By connecting your pods to services through labels, you ensure that network traffic is efficiently distributed among the available pods, providing a seamless user experience.
Controlling the Deployment with Label Selectors
Label selectors aren’t just for services; they’re also used to control which pods are included in a deployment. When you update a deployment, Kubernetes uses label selectors to determine which pods to replace with the new version.
It’s essential to use label selectors wisely. If your selectors are too broad, you might accidentally target the wrong pods. If they’re too narrow, your deployment might not update any pods at all. It’s all about finding the right balance.
Adjusting Replica Counts
One of the keys to high availability and scalability in Kubernetes is managing the number of replicas of your application. If you expect higher traffic, you can increase the number of replicas to handle the load. Conversely, if traffic is low, you can reduce the number of replicas to save resources.
Auto-Scaling for Performance and Efficiency
But why adjust the replica count manually when you can automate it? Kubernetes has a feature called Horizontal Pod Autoscaler that automatically adjusts the number of pod replicas based on CPU usage or other select metrics.
With auto-scaling, your application can respond dynamically to changes in demand, ensuring high performance without wasting resources. It’s like having a thermostat for your application, keeping it at the perfect temperature no matter what the conditions are outside.
Rolling Back Deployments: Safety Nets in Action
Even with the best planning, things can go wrong. That’s why Kubernetes has built-in mechanisms for rolling back deployments. If a new version of your application starts causing problems, you can quickly revert to a previous version with a simple command.
Using The kubectl Command to Undo Changes
Rolling back a deployment in Kubernetes is straightforward. Use the following command :
kubectl rollout undo deployment/your-deployment-name
and Kubernetes will revert to the previous version of the deployment. It’s like having a time machine for your deployments, giving you the power to undo changes with the press of a button.
Understanding the Importance of Health Checks
Health checks are your early warning system in Kubernetes. By setting up readiness and liveness probes, you can tell Kubernetes how to check if your application is healthy. If a pod fails these checks, Kubernetes can automatically restart it or prevent it from receiving traffic until it’s healthy again.
This proactive approach to monitoring ensures that any issues are caught and addressed quickly, minimizing the impact on your users.
Advanced Deployment Features for Developers
Let’s shift gears and look at some of the more advanced features that Kubernetes offers to manage deployments. These features give developers fine-grained control over how and when their applications are updated or rolled back.
Controlling Updates with Readiness and Liveness Probes
Readiness and liveness probes are the gatekeepers of your application’s health. Readiness probes ensure that a pod is ready to handle requests before it’s brought into service. Liveness probes keep tabs on running pods, restarting them if they fail. By fine-tuning these probes, developers can ensure their applications are always responsive and available.
For instance, a web server might use a readiness probe to check if it’s finished loading configuration files and a liveness probe to verify that the server is able to handle connections without long delays. If either check fails, Kubernetes can take corrective action automatically, like restarting the pod or removing it from the pool of active pods.
Using Resource Requests and Limits to Manage Pod Performance
Resource requests and limits are how you tell Kubernetes the amount of CPU and memory each pod needs. It’s like giving your applications a budget; they need to stay within these limits to play nicely with others. By setting these parameters, developers can prevent applications from hogging all the resources on a node, which could impact other applications running on the same cluster.
Here’s a quick example of how to set resource requests and limits in your deployment YAML:
spec:
containers:
– name: my-container
image: my-image
resources:
requests:
cpu: “250m”
memory: “128Mi”
limits:
cpu: “500m”
memory: “256Mi”
With these settings, Kubernetes will ensure that your container gets at least the requested resources but won’t let it exceed the specified limits.
Integrating with Other Kubernetes Resources
Deployments don’t exist in isolation; they’re part of a larger Kubernetes ecosystem. To get the most out of deployments, it’s important to understand how they interact with other Kubernetes resources, such as ConfigMaps.
The Interplay Between Deployments and Services
Services in Kubernetes provide a stable endpoint for accessing the pods in a deployment. While individual pods may come and go, the service ensures that the application remains accessible, acting as a load balancer that distributes network traffic to healthy pods.
For a deployment to be effective, it needs to work hand-in-hand with services. By defining a service that targets the pods managed by a deployment, you create a robust and resilient infrastructure that ensures your application is always reachable, even as updates and changes occur.
Security Considerations with ConfigMaps and Secrets
Security is paramount, and Kubernetes offers ConfigMaps and Secrets to handle sensitive information. ConfigMaps are used for non-confidential data, like configuration settings, while Secrets are for sensitive information, like passwords and tokens.
When you deploy an application, you can use ConfigMaps and Secrets to provide configuration data and credentials to your pods securely. This way, you keep sensitive information out of your deployment manifests and avoid exposing it unnecessarily.
Deployments in Practice: Real-World Applications
Now, let’s look at how all of this comes together with some typical use cases. Deployments are used in a variety of ways, from simple web applications to complex microservices architectures.
Case Study: Optimizing a Web Server Deployment
Consider a web server deployment in Kubernetes. The deployment spec would define the container image for the web server, the number of replicas for scalability and high availability, and a rolling update strategy to ensure zero downtime during updates.
With readiness probes, the deployment can ensure that each instance of the web server is fully operational before it starts receiving traffic. Resource requests and limits would be set to manage the server’s performance, and a service would be defined to provide a stable endpoint for users to access the web server.
From Development to Production: Strategies for a Smooth Transition
Transitioning from development to production can be a challenge, but Kubernetes deployments make it easier. By using the same deployment specs across environments, you can ensure consistency and reduce the risk of deployment-related issues.
It’s also important to tailor your deployment strategies to the needs of your application. For example, a blue-green deployment might be the best approach for critical applications that require zero downtime, while a canary deployment could be more appropriate for applications where gradual rollout is desired.
Frequently Asked Questions
Let’s address some common questions about Kubernetes deployments to wrap things up.
What Kinds of Applications Benefit Most from Kubernetes Deployments?
Applications that need to scale dynamically, require high availability, or have complex update and rollback needs benefit greatly from Kubernetes deployments. This includes most modern web applications, microservices, and any application that needs to handle variable loads or continuous updates.
Can Kubernetes Deployments Be Automated Across Multiple Environments?
Yes, Kubernetes deployments can be automated across development, staging, and production environments. This can be achieved through continuous integration and continuous deployment (CI/CD) pipelines that apply deployment specs automatically.
What’s the Difference Between a Kubernetes Deployment and a StatefulSet?
A Deployment is ideal for stateless applications, where each instance is interchangeable. A StatefulSet, on the other hand, is used for stateful applications that require stable, unique network identifiers and persistent storage.
How Do Readiness Probes Impact the Deployment Process?
Readiness probes determine whether a pod is ready to handle traffic. If a readiness probe fails, Kubernetes will not route traffic to that pod until it passes the check. This helps maintain the user experience by ensuring only healthy pods receive traffic during updates.
What Strategies Exist for Handling Failed Deployments?
Kubernetes provides several strategies to handle failed deployments, including automatic rollbacks, manual rollbacks, and pause/resume capabilities. These strategies allow you to quickly revert to a previous version if a deployment doesn’t go as planned.