Key Takeaways
Kubernetes CronJobs automate time-based tasks within a Kubernetes cluster, providing precise control over when and how jobs are executed.
To create a Cron Job, you’ll need to write a YAML manifest file that specifies the job details and schedule.
Understanding cron syntax is essential for setting the timing of CronJobs to match your needs.
Best practices for CronJobs include managing concurrency and ensuring jobs are monitored for success and failure.
For advanced use cases, Kubernetes CronJobs can be fine-tuned for efficient resource utilization and integrated into complex workflows.
Unpacking the Power of Kubernetes CronJobs
What Is a Kubernetes CronJob?
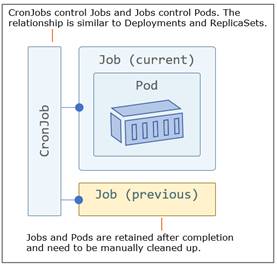
Imagine you have a robot that can do your chores exactly when you want, as often as you want, without you having to remind it. That’s sort of what a Kubernetes CronJob is, but for computer tasks. It’s a feature in Kubernetes, which is a system that helps manage lots of computers working together. A CronJob tells Kubernetes to run specific tasks, which are like chores, at regular times, like a schedule. This could be anything from backup jobs to sending out a report every first Monday of the month.
Why Schedule Tasks in Your Kubernetes Cluster?
Why not just do these tasks manually? Well, because it’s a hassle to remember and it’s easy to make mistakes. Automating tasks with CronJobs means they’re done consistently and without you having to lift a finger. Plus, in a big system with lots of tasks, it’s much easier to manage everything when it’s automated. This is especially true in business or when you’re dealing with lots of data that needs to be moved around or processed at specific times or a specific interval.

“cronjobs in kubernetes” from livebook.manning.com and used with no modifications.
Blueprint for Launching Your First CronJob
Crafting Your CronJob YAML File
First things first: to make a CronJob, you need to write a YAML file. YAML is a simple way to tell Kubernetes what you want it to do. Think of it as a recipe that tells your robot exactly how to do a chore. You’ll include details like the job name, the name of the pod, what container image to use (that’s like the tools the robot needs), and the time intervals or schedule the different tasks should run at. Don’t worry, I’ll walk you through it step by step.
Here’s a simple CronJob YAML example:
apiVersion: batch/v1beta1
kind: CronJob
metadata:
name: my-cronjob
spec:
schedule: “0 2 * * *”
jobTemplate:
spec:
template:
spec:
containers:
– name: my-container
image: my-container-image
restartPolicy: OnFailure
In this example, ‘my-cronjob’ is the name of the CronJob, ‘my-container-image’ is the container image it will use, and ‘0 2 * * *’ is the schedule. The schedule here means the job will run at 2 AM every day. The ‘restartPolicy: OnFailure’ part means if the job fails, Kubernetes will try again.
Setting the Clock: Understanding Cron Schedules
Now, let’s talk about the schedule. It’s written in cron format, which is a way to write down when you want tasks to happen. It might look a bit weird at first, but once you get the hang of it, it’s pretty straightforward. The format is made up of five fields that represent different units of time:
The first field is for minutes (0 – 59).
The second field is for hours (0 – 23).
The third field is for the day of the month (1 – 31).
The fourth field is for the month (1 – 12).
The last field is for the day of the week (0 – 6, where 0 is Sunday).
Each field can have a specific value, or an asterisk (*) which means “every”. So, ‘0 * * * *’ would mean “run this job every hour, on the hour”. You can also use ranges, like ‘1-5’ in the day of the week field to mean “Monday through Friday”. For more detailed guidance on scheduling tasks in Kubernetes, refer to this comprehensive Kubernetes restart deployment guide or refer to the Kubernetes documentation.
And that’s the basics of setting up a CronJob in Kubernetes. In the next part, we’ll delve into some best practices to keep your scheduled tasks running smoothly and how to handle more complex scheduling needs.
Managing Job Concurrency
Let’s talk about juggling tasks. You know how sometimes you might try to do too many things at once and get overwhelmed? Jobs in Kubernetes can get like that too. Concurrency in CronJobs refers to the system’s ability to handle multiple jobs at the same time. You can tell your Kubernetes cluster how to deal with this by setting a ‘concurrency policy’. This can be set to ‘Allow’ (let jobs pile up), ‘Forbid’ (no two jobs at the same time), or ‘Replace’ (cancel the old job and start a new one). It’s like telling your robot helper, “Hey, if you’re still vacuuming when it’s time to wash dishes, just switch to that.”
Tracking Job Success and Failures
Now, we need to make sure we know if the robot does the job right. In Kubernetes, you can check on your jobs to see if they succeeded or if something went wrong. Each job creates a ‘pod’, which is like a temporary robot that does the work. When the pod finishes, it reports back with a ‘success’ or ‘failure’. You can look at the logs to see what happened, which is like checking a robot’s memory. It’s important to keep an eye on this because if a job keeps failing, you need to fix it, just like you’d repair a robot that keeps dropping dishes.
Advanced CronJob Strategies
Once you’ve got the basics down, you can start doing fancier things with your CronJobs. For example, you might want to run jobs only when there’s not much other stuff going on in your system, or you might need to handle jobs that take different amounts of time on different days. Kubernetes gives you tools to handle these advanced scenarios, so your automated tasks are smart and flexible.
For those of you who are curious, Kubernetes CronJobs can also use ‘startingDeadlineSeconds’. This is a countdown that starts when the job is supposed to run. If the job doesn’t start before the countdown ends (maybe because the cluster was too busy), it will skip that run. This prevents your cluster from getting bogged down with too many jobs trying to start at once.
Efficient Resource Utilization in Scheduling
Just like you wouldn’t run the dishwasher and the washing machine at the same time if you’ve got a weak power supply, you need to ensure you have sufficient resources in Kubernetes. You can set ‘resource limits’ and ‘requests’ for each job, telling Kubernetes the maximum resources a job can use and the minimum it needs to start. This way, your jobs don’t hog all the power, and everything runs smoothly.
It’s all about being smart with what you’ve got. If you know a job is a big one, like backing up all your company’s data, you can give it more resources. But if it’s just a small task, like sending a quick email, it doesn’t need much. Balancing this ensures your cluster isn’t wasting energy or getting stuck because one job is being a resource hog.
Dynamic Scheduling Patterns and Use Cases
Some tasks are like clockwork, the same thing every time. But others change depending on different factors, like how busy your website is or what day it is. Kubernetes lets you set up dynamic schedules that can adjust to these kinds of changes. You can even use ‘CronJob suspend’ to temporarily stop a job from running without deleting it, which is handy if you know you won’t need it for a while.
Think of it like this: if you run a food delivery service, you might want more delivery robots running during dinner time than in the middle of the night. With Kubernetes, you can adjust your CronJobs to handle these peak times efficiently.
Rolling Out a CronJob to Production
When you’re ready to move from testing to actually using your CronJobs in a real-world scenario, it’s like going from practicing a dance in your room to performing on stage. You want to make sure everything goes perfectly. This means testing everything thoroughly, setting up alerts for failures, and maybe even having backup plans in case something goes wrong.
Ensuring High Availability for Scheduled Jobs
High availability means making sure your jobs are always ready to run, even if something goes wrong. You can do this by running multiple copies of your Kubernetes cluster in different places, so if one has a problem, the others can keep the jobs going. It’s like having a few extra robots in case one breaks down.
Another way to ensure high availability is by using ‘activeDeadlineSeconds’, which is a time limit for how long a job can run. If a job takes too long, Kubernetes will stop it and try again later. This prevents a broken job from blocking everything else.
Integrating CronJobs with CI/CD Pipelines
Finally, you can connect your CronJobs to your CI/CD pipeline, which is the process that takes the software you write and gets it ready to use. This way, you can automatically update your CronJobs whenever you make changes to your software, keeping everything up to date. It’s like having a robot that can update itself whenever it learns a new dance move.
And there you have it! With these strategies and practices, you’re well on your way to mastering Kubernetes CronJobs. Remember, it’s all about making sure your automated tasks are doing what they’re supposed to, when they’re supposed to, without causing any trouble. Now go forth and automate with confidence!
Now, let’s dive into some frequently asked questions that might pop up as you’re working with Kubernetes CronJobs. These nuggets of knowledge will help you troubleshoot and optimize your scheduled tasks.
FAQ
Whether you’re a seasoned pro or just getting started with Kubernetes, questions are bound to arise. Here are answers to some of the most common queries:
How do I create a new CronJob in Kubernetes?
What happens if a CronJob fails?
Can I schedule multiple Kubernetes jobs with the same CronJob?
How do CronJobs differ from regular Kubernetes jobs?
What is the best way to monitor Kubernetes CronJobs?
How Do I Create a New CronJob in Kubernetes?
Creating a new CronJob in Kubernetes is like giving your cluster a new set of instructions. You’ll write a YAML file that includes the details of the new jobs and the schedule. Here’s what you need to do:
Open your favorite text editor and create a new file with a ‘.yaml’ extension.
Define the CronJob resource, including the schedule, job template, and any other configurations you need such as job spec, job name etc.
Use the ‘kubectl’ command-line tool to apply the YAML file to your cluster.
For example:
kubectl apply -f my-cronjob.yaml
What Happens If a CronJob Fails?
If a CronJob fails, Kubernetes will keep a record of the failed job attempt. Depending on your job’s ‘restartPolicy’, it might try to run the job again. If you’ve set a ‘backoffLimit’, Kubernetes will stop retrying after a certain number of failed attempts. You can check the logs for the pods created by the CronJob to diagnose and address any issues.
Can I Schedule Multiple Kubernetes Jobs with the Same CronJob?
Yes, you can schedule multiple jobs with the same CronJob, but it’s crucial to manage this carefully. If your jobs might overlap, you’ll need to decide on a concurrency policy. You can allow for concurrent executions of a job, forbid them, or replace the currently running job with a new job. Remember, each job will create its own new pod.
How Do CronJobs Differ from Regular Kubernetes Jobs?
A regular Kubernetes job runs a task to completion, just once. A CronJob, on the other hand, is for tasks that need to run on a repeating schedule or time-based schedule. Think of a job like a one-time command, while a CronJob is like setting an alarm clock to run that command over and over again at the times you specify.
What Is the Best Way to Monitor Kubernetes CronJobs?
Monitoring Kubernetes CronJobs is all about staying informed. You can use Kubernetes’ own monitoring tools, like the Dashboard, to keep an eye on your jobs. Many people also set up additional monitoring and alerting with tools like Prometheus and Grafana. These can notify you if something goes wrong, so you can jump in and fix it fast.
With these FAQs in your back pocket, you’re better equipped to handle the challenges that come with scheduling tasks in a Kubernetes cluster. CronJobs are powerful tools that, when used wisely, can automate your workflow and free up your time to focus on more complex problems. So, go ahead, set up your CronJobs, and watch your Kubernetes cluster hum along like a well-oiled machine!


