
Key Points
- Before starting the migration process, thoroughly assess application compatibility and dependencies when migrating legacy applications to Kubernetes.
- Reduce risk and ensure business continuity by using a phased migration approach with proper application inventory and prioritization.
- Refactoring code and rethinking state management is often required to containerize legacy applications and fully leverage Kubernetes capabilities.
- For a successful Kubernetes migration, infrastructure preparation, including proper networking, storage, and security configurations, is critical.
- Appvia provides specialized tools and expertise to streamline the Kubernetes migration process for enterprise-level legacy applications.
Migrating legacy applications to Kubernetes can feel like trying to rebuild an airplane while it’s still in the air. The benefits are substantial—improved scalability, faster deployments, and reduced operational costs—but the journey requires careful planning and execution. This comprehensive guide walks you through the entire migration process, helping you navigate potential pitfalls while minimizing disruption to your business operations.
Why Kubernetes is a Must for Your Legacy Applications
Legacy applications frequently experience inconsistencies in deployment, restrictions in scaling, and inefficiencies in infrastructure that directly affect your profit margin. When you migrate to Kubernetes, you’re not just adopting a platform for container orchestration—you’re adopting a fundamentally different model of operation that addresses these challenges. Organizations that have successfully migrated have reported 66% faster deployment times, 75% reduction in downtime, and significant cost savings through better utilization of resources. These improvements translate to tangible business outcomes: faster time-to-market, improved customer satisfaction, and competitive advantage in rapidly evolving markets.
It’s important to note that migrating to Kubernetes isn’t a universal solution. The intricacy of your current applications, their architectural structures, and your organization’s preparedness are all vital factors in deciding the migration approach. This is where SlickFinch’s migration expertise comes in handy, providing specialized knowledge to ensure your transition balances technical requirements with business objectives.
Getting Started: Must-Do Tasks Before Migrating
Before you even think about writing any configuration code, you need to set yourself up for a successful migration. This is your chance to identify any potential issues, set achievable expectations, and lay the groundwork for your Kubernetes migration. It might be tempting to skip these steps, especially when you’re up against a deadline, but doing so will only lead to problems that will take much more time and resources to fix down the line. For an in depth look at migration strategies, explore the big bang vs. phased cloud migration approach.
Assess Application Compatibility
Some applications are better suited for Kubernetes than others. Applications that are already running in containers or were built with a microservices architecture will likely migrate more easily than monolithic systems with complex dependencies. You should evaluate each application’s architecture, runtime requirements, and state management approach in detail. Applications that use configuration files instead of hardcoded values, have a clear distinction between the application and data layers, and do not depend on local file system operations are more likely to be compatible with containerized environments. They will also require less refactoring during the migration process.
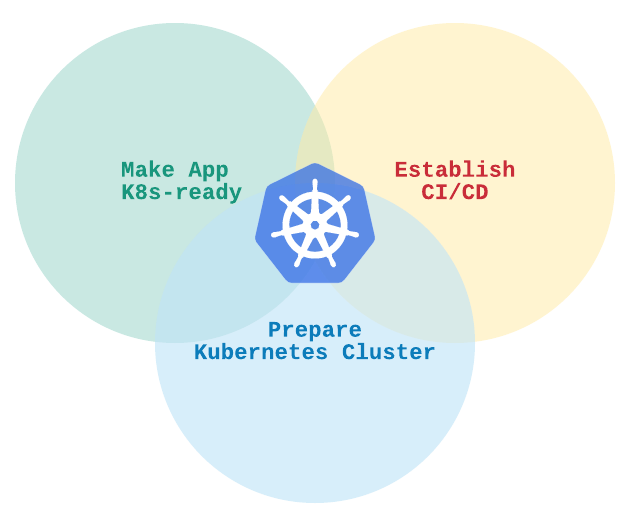
“How to migrate your app to Kubernetes …” from greenm.io and used with no modifications.
Checklist for Application Readiness:
✓ Config separated from code
✓ Minimal reliance on local filesystems
✓ Stateless design or clear state separation
✓ Can be scaled horizontally
✓ Defined procedures for startup and shutdown.
Identify All Dependencies
Legacy applications are usually not standalone. They are dependent on databases, caching systems, message queues, and other services that must be included in your migration plan. Develop a detailed dependency map for each application, identifying both internal dependencies between components and external dependencies on other systems. This map will guide you in designing Kubernetes resources and determining the order of migration. Systems that maintain state often require the most careful planning during migration, so pay special attention to these. For more insights, look at the differences between microservices and monolithic applications and use this in your strategy.
Utilizing resources such as application performance monitoring (APM) solutions can assist in uncovering concealed dependencies by monitoring real-time communication patterns. The analysis of network traffic can expose connections that may not be included in documentation, particularly in antiquated systems where the documentation may no longer align with the actual implementation.
Identify Your Migration Objectives and Set a Practical Timeline
Start with a clear vision of what you want to achieve with the Kubernetes migration. Are you looking to enhance scalability, cut operational expenses, boost developer productivity, or maybe all of the above? Set measurable KPIs that are in line with your business goals.
Build a step-by-step migration timeline that takes into account your team’s capabilities, the technical complexity of the task, and any business restrictions. Most successful migrations follow a gradual approach, starting with less important applications to build the team’s confidence and skill level before moving on to the most important systems. This method reduces risk while allowing your team to create and perfect migration patterns that can be applied to more and more complex applications. If your team are inexperienced or lacking bandwidth, then you should consider bringing in external help to lead or guide them through the project
Selecting Your Kubernetes Platform
Your choice of Kubernetes platform will have a significant influence on your migration process and your operational experience over the long term. You have a variety of options to choose from, including managing your own Kubernetes installations or using the fully managed services provided by cloud providers (such as EKS from AWS, AKS from Azure, or GKE from Google Cloud). Each option comes with its own balance of control, responsibility, and ease of management.
- Self-managed Kubernetes: While this option gives you the most control, it requires a high level of expertise to set up and maintain.
- Managed Kubernetes services: These services are easy to operate but give you less control over the underlying infrastructure.
- Kubernetes distributions: Solutions like Rancher, OpenShift, or Tanzu provide additional tools and support on top of Kubernetes.
Consider your team’s skills, operational needs, and existing cloud strategy when choosing an option. If your organization is new to Kubernetes, you might find it helpful to start with managed services. These services can reduce the operational burden while your team develops internal capabilities. As your team becomes more skilled, you can consider whether the limitations of managed services are worth the investment in self-managed options.
Step 1: Develop a Detailed Inventory of Your Applications
Creating a thorough inventory of your applications is the first and most crucial step in your migration strategy. This inventory should be more than just a list of applications. It should also include detailed information about each application, such as its characteristics, dependencies, and its importance to your business. This information will help you prioritize your migration efforts and identify common patterns that can make the migration process more efficient. Understanding whether your applications are microservices or monolithic can also aid in planning your migration strategy effectively.
Find Out Which Apps are Suitable for Migration
Start by making a list of all the applications you currently have, collecting essential details about each one. For every application, note down technical features (such as the language, framework, and architecture), operational metrics (like traffic patterns and resource usage), and deployment information (including the current infrastructure and how often it’s updated). Applications that are already in containers, follow the 12-factor principles, or have few external dependencies are often the best ones to migrate first. Applications that need to be deployed frequently often give the most immediate benefits when you start using Kubernetes, so they’re often good ones to migrate early on, even if there might be technical challenges.
Rank Applications According to Their Business Significance
From a business standpoint, not all applications carry the same weight. Evaluate the significance of each application to the fundamental business operations, revenue production, and customer experience. Applications that have a direct influence on revenue or customer experience often require special attention during the migration planning process. By balancing the technical complexities of migration with the business importance, you can develop a migration list that is prioritized to reduce business risk and build momentum for the migration.
Think about making a basic matrix that rates each application based on the technical difficulty of migration (from low to high) and the importance to the business (from low to high). This visual aid can help you figure out the logical waves of migration and make it easier to talk to business stakeholders. Applications that are not complex and not very important to the business are perfect for your first wave of migration. On the other hand, applications that are very important might need a lot of preparation, no matter how technically complex they are.
Record the Architecture and Dependencies of Your Application
For each application you have, record its current architecture, component structure, and all internal and external dependencies. Having this architectural knowledge is crucial for creating suitable Kubernetes resources and identifying potential migration issues. Pay close attention to aspects that may cause problems in containerized environments, like local file storage, long-running processes, or direct inter-service communication patterns.
Developing thorough architectural designs is a great way to both see what you’re currently working with and plan for what you want to achieve in Kubernetes. These designs are incredibly useful for communicating with different people involved in the migration process. Make sure to include all points of integration, data flows, and state management strategies to ensure that your migration planning is as thorough as possible.
Step 2: Get Your Infrastructure Ready
Now that you’ve taken stock of all your applications, it’s time to get the Kubernetes infrastructure ready that will be home to your migrated applications. This preparatory phase is the bedrock on which all your containerized applications will operate. A well-thought-out Kubernetes infrastructure takes into account not just the current requirements of the applications, but also future expansion, security requirements, and operational models.
Prepare Your Kubernetes Cluster
Setting up your Kubernetes cluster is the initial task in the infrastructure. Whether you opt for a managed service like EKS, AKS, or GKE, or you decide to deploy your own cluster, the focus should be on creating an environment that is ready for production with the right redundancy and scaling capabilities. For critical workloads that need high availability, consider multi-zone or multi-region deployments. Size your worker nodes based on the resource requirements of your application, ensuring you leave enough room for scaling and system processes.
Set up distinct clusters or namespaces for each environment (development, testing, staging, production) to ensure proper isolation. Establish appropriate access controls for each environment, restricting production access to only those who absolutely need it. Thoroughly document your cluster configuration to aid in future troubleshooting and to support infrastructure-as-code practices.
Set Up Networking
Networking in Kubernetes can be a bit complicated, but it’s crucial to ensure that your applications can communicate securely. You’ll want to select a network plugin that matches your needs for network policies, performance, and integration with your existing infrastructure. Calico, Cilium, and Flannel are all popular choices, each offering different benefits in terms of enforcing network policies, performance, and observability.
Set up your network architecture so that it can handle both internal communication between pods and external access to your applications. Make sure you have enough IP addresses for all your pods across all namespaces. If your applications need to talk to systems outside the cluster, set up the right network routes and make sure your firewall rules allow the necessary traffic while still keeping everything secure.
Set Up Storage
One of the biggest hurdles you’ll face when moving legacy applications to Kubernetes is storage. Stateless applications transition smoothly to Kubernetes’ transient nature, but applications that need persistent storage need to be carefully planned. You’ll need to determine the right storage classes for various types of data, keeping in mind the performance requirements, durability needs, and cost constraints.
If you are deploying to the cloud, use storage options from your cloud provider that work seamlessly with Kubernetes (like EBS for AWS or Azure Disk for Azure). If you are deploying on-premises, you can use something like Rook, Portworx, or OpenEBS to get cloud-like storage capabilities. Make sure whatever storage solution you choose supports dynamic provisioning to make operations easier, and check that it fits your needs for backup, restoration, and disaster recovery.
Establish Security Measures
Security shouldn’t be an afterthought when setting up your Kubernetes infrastructure. It should be part of the initial setup. Implement role-based access control (RBAC) to limit permissions to the minimum necessary for each role or service account. Set up network policies to limit pod-to-pod communication, following the principle of least privilege. Make sure to scan images for vulnerabilities before deployment, preferably as part of your CI/CD pipeline.
Think about leveraging tools such as Open Policy Agent (OPA) or Kyverno to ensure policy-as-code throughout your cluster, which stops the deployment of non-compliant resources. Use proper secrets management with Kubernetes Secrets or external solutions such as HashiCorp Vault or AWS Secrets Manager. Regular security audits and penetration testing should be part of your ongoing security practices.
Check Your Infrastructure Components
Don’t rush into deploying your production workloads. Instead, take the time to properly test your infrastructure components. You want to make sure they perform as expected under a variety of conditions. Confirm that your networking configuration allows for the right communication between pods and with external systems. Test your storage provisioning. You want to ensure volumes can be dynamically created, attached, and detached as pods move between nodes.
Perform chaos testing to ensure your infrastructure is robust. This involves intentionally creating node failures, network partitions, or resource constraints to see how your system responds. By creating controlled failure scenarios, you can spot vulnerabilities before they affect your production workloads. Make sure to record your testing procedures and outcomes. This will not only help you trust your infrastructure more but also guide you in making future enhancements.
Step 3: Prepare Your Applications for Containers
After setting up your infrastructure, the next big step is making your applications ready for containers. This step is more than just putting your existing code into a Docker container. You often need to change parts of your application to fit with the principles of containerization. The aim is to make containers that are both portable and efficient, and that take full advantage of Kubernetes orchestration.
Construct Effective Dockerfiles
It’s crucial to have effectively constructed Dockerfiles to produce secure and efficient containers. Begin with suitable base images, preferably minimal official images that meet the runtime requirements of your application. Contemplate multi-stage builds to differentiate build-time dependencies from runtime requirements, leading to smaller end images. Arrange your Dockerfile instructions to maximize layer caching, positioning instructions that frequently change (such as updates to application code) after layers that are more stable (like installations of dependencies).
Adhere to security best practices like executing containers as non-root users, reducing the amount of installed packages, and eliminating unnecessary tools and files. Incorporate suitable health checks and startup commands that manage initialization smoothly. Record any particular requirements or considerations in the Dockerfile itself to help with future upkeep. For further guidance on securing your pipeline, consider exploring the best CI/CD pipeline security practices.
Manage Your Configurations
One of the key principles of container-based applications is that the configuration should be separate from the code. Instead of having hard-coded values or properties files in the application, move these configurations into Kubernetes ConfigMaps and Secrets. This will allow you to change settings for different environments without having to rebuild the container images. Make sure your configuration strategy is designed to support multiple environments and keep sensitive information secure.
Think about using a hierarchical configuration method where default values can be overridden by settings specific to the environment. This pattern makes it easier to manage configurations across development, testing, and production environments. For complex applications with many configuration parameters, tools like Helm or Kustomize can help manage configuration variations between environments in a structured, version-controlled manner.
Handling State and Persistence
When it comes to containerizing legacy applications, managing state is often the most difficult part. Containers are designed to be ephemeral, but many legacy applications are built with the assumption of persistent local storage. You need to identify all the ways your application uses state—this could be databases, file storage, caches, or session data—and come up with a strategy for each one. If you’re dealing with databases, you might want to think about moving to managed database services, or you could deploy database containers that have persistent volumes set up correctly.
For applications that write to the local filesystem, you need to figure out whether this data is truly persistent or can be treated as ephemeral. You can replace local file operations with appropriate alternatives like object storage services (S3, Azure Blob Storage) for truly persistent files. Session data might need to be moved to external caching systems like Redis or Memcached to enable proper scaling and resilience.
Develop Continuous Integration and Delivery Pipelines
To fully take advantage of containerization, you need to have continuous integration and delivery pipelines in place. These pipelines should be designed to automatically build, test, and deploy your containerized applications to the right environments. You should also set up quality gates like vulnerability scanning, unit testing, and integration testing to catch any issues early on in the development cycle.
Ensure your pipelines are integrated with your container registry and Kubernetes cluster, this will automate the deployment of new versions while also maintaining proper governance. You might want to think about implementing GitOps practices where your desired state is declared in version-controlled repositories and automatically reconciled with cluster state. This method will improve visibility, auditability, and repeatability of deployments.
Step 4: Create Kubernetes Resources
Once your applications are containerized, it’s time to generate the Kubernetes resource definitions that outline how your applications should be deployed and handled. These resources convert your application requirements into directives that Kubernetes uses to schedule and execute your workloads. Efficient Kubernetes resources strike a balance between application needs and operational factors such as scalability, reliability, and resource efficiency.
Make Deployment Manifests
Deployments are the main resource for running your applications in containers in Kubernetes. Make deployment manifests that specify your container image, resource requirements (CPU, memory), replica count, and deployment strategy. Include the right liveness and readiness probes to allow Kubernetes to monitor your application health and manage traffic the right way during deployments and failures.
Set up resource requests according to the specific needs of your application, and set limits to avoid resource conflicts. If your application has unique requirements, such as mounting volumes, setting up environment variables, or setting security contexts, you should include these needs in your deployment manifests. If your application has more complex lifecycle requirements, you might want to use StatefulSets or DaemonSets instead of standard Deployments.
Establish Service Definitions
Kubernetes Services offer reliable networking endpoints for your applications, which facilitate discovery and load balancing. Formulate Service definitions that align with your application’s communication patterns, and choose the right service type (ClusterIP, NodePort, LoadBalancer) based on access needs. For applications made up of several components, create services for each component to ensure correct internal communication.
Make sure to include relevant selectors that match the labels of your pods. This ensures that traffic is directed to the right instances. Name your services in a way that reflects the function of the application, rather than the details of its implementation. This makes discovery and reference more intuitive. If you have services that require stable DNS names across the cluster, you might want to consider using ExternalName services or implementing a service mesh. This gives you more advanced options for service discovery and traffic management.
Set Up Ingress Rules
If your application needs to be accessed externally, you should set up Ingress resources to handle incoming traffic. Ingress controllers offer features like URL routing, SSL termination, and authentication, which make managing external access easier. You should create your Ingress rules to match your application’s URL structure, redirecting paths to the right backend services while keeping security boundaries intact.
When your application needs more advanced traffic management features like canary deployments, A/B testing, or circuit breaking, you may want to consider implementing a service mesh solution like Istio, Linkerd, or Cilium. These tools offer advanced traffic management capabilities that go beyond the basic features of Kubernetes, allowing for more complex deployment patterns and improving observability.
Set Resource Limits
Effective resource management is key to maintaining stable operations within Kubernetes. Establish suitable CPU and memory requests and limits for each container, based on observed usage patterns. Requests should mirror the resources your application requires for normal operation, while limits stop an application from using too many resources and impacting other workloads.
If your applications have fluctuating load patterns, you might want to think about using horizontal pod autoscaling (HPA). This feature automatically adjusts the number of replicas based on CPU utilization, memory usage, or custom metrics. For applications that can scale up and down, vertical pod autoscaling can adjust resource allocations within set boundaries. To avoid resource contention between teams or applications sharing a cluster, set resource quotas at the namespace level.
Step 5: Transfer the Data
The process of transferring data is usually the most crucial and intricate part of moving legacy applications to Kubernetes. Unlike application code, which can be launched in multiple versions at the same time, data usually needs to be carefully synchronized to avoid losing or corrupting it. A well-thought-out data transfer plan will reduce downtime and ensure that the data remains intact throughout the transition.
Devise a Strategy for Database Migration
Your database migration strategy will be determined by the type, size, and downtime tolerance of your database. If you have a relational database, you could use anything from a simple backup and restore operation to a more complex method like logical replication. Document databases might use their own replication capabilities, while key-value stores often have export and import utilities you can use. You’ll need to evaluate each database’s needs and choose migration methods that offer the right balance of speed, complexity, and risk.
If you’re dealing with a large database and you can’t afford much downtime, you might want to consider a staged migration. You’d start with a big initial data transfer, and then keep the new database synced with the old one through ongoing replication. This way, you can test out the new database and make sure it’s working properly before you make the final switch. This reduces the risk involved and could even eliminate downtime altogether.
Establish Data Backup Protocols
Prior to starting any data migration, it’s important to set up thorough backup protocols to safeguard against any migration hiccups. Make complete backups of all data sources and double-check restoration protocols to confirm the backups are legitimate. For systems that are of utmost importance, you may want to consider keeping multiple backup copies in different locations to safeguard against a variety of failure scenarios.
Ensure that you have automated backup solutions in place for your data stores hosted on Kubernetes. You can use tools like Velero for cluster-wide backups or operators that back up specific databases. Set up retention policies that strike a balance between recovery requirements and the cost of storage. This could mean more frequent backups for recent periods and less frequent backups for longer-term retention. It’s also important to regularly test the restoration of your backups to make sure that the procedures will work as expected when you need them. SlickFinch can help you choose the right backup policies and tools.
Try Out the Data Migration Process
Never attempt a production data migration without first testing it thoroughly. You should create a copy of your production environment and carry out complete migration rehearsals. This will allow you to measure performance, verify data integrity, and document the process in great detail. Use these rehearsals to fine-tune your migration procedures, pinpoint potential problems, and create contingency plans for different failure scenarios.
During migration testing, it is crucial to focus on data validation. You should create detailed validation queries or scripts that can confirm record counts, key relationships, and important data points before and after migration. These validation tools will be vital during the actual migration, ensuring that the migration was successful and that the integrity of the data was preserved.
Step 6: Try Before You Buy
Before you move production workloads to Kubernetes, you must rigorously test your applications. This process will ensure that your applications work properly in the new environment, perform well, can handle stress, and meet security standards. A good testing strategy will cover the functional, non-functional, and operational aspects of your applications.
Checking Performance
When you move from traditional infrastructure to Kubernetes, you may notice significant changes in performance characteristics. You should run load tests that imitate the traffic patterns you expect to see. These tests should measure response times, throughput, and resource utilization. You should compare the results to the baseline measurements from your current environment. This will help you identify any performance regressions that you need to address before you migrate.
Make sure to include scale testing to confirm that your applications can scale horizontally as expected under increased load. Measure the startup times for new instances and confirm that load balancing functions correctly as replica counts change. Test auto-scaling configurations to ensure they respond appropriately to changing demand without oscillation or excessive scaling activities.
Stress Testing
While Kubernetes offers robust stress management features, applications need to be built to use these tools efficiently. Use chaos testing tools such as Chaos Mesh or Litmus to mimic different failure situations—pod failures, node outages, network disruptions, and resource constraints. Monitor how your application reacts during these controlled failures to pinpoint potential vulnerabilities.
Ensure that you are managing state correctly during failure scenarios. Make sure that applications recover cleanly after container restarts, reconnect correctly to dependent services, and maintain data consistency. For applications with specific resilience requirements, develop custom test scenarios that verify these capabilities function as expected in the Kubernetes environment.
Checking Security
Securing a container requires a unique method compared to securing a traditional application. Use tools like Trivy, Clair, or Snyk to scan container images for vulnerabilities and resolve any serious issues before deployment. Ensure that containers are running with the correct privileges and adhere to the principle of least privilege to reduce the number of potential attack surfaces. For further insights, explore CI/CD pipeline security practices to enhance your container security strategy.
Ensure that the RBAC configurations in Kubernetes are tested to verify that access controls are correctly limiting operations to authorized users and service accounts. Make sure that network policies are effectively limiting communication to expected patterns, thereby preventing unauthorized access between namespaces or applications. Include penetration testing that is specific to containerized environments, addressing attack vectors that are specific to Kubernetes and vulnerabilities related to container escape.
Step 7: Launch in Production
After comprehensive testing, it’s time to launch your containerized applications in your production Kubernetes environment. This crucial stage needs meticulous planning and implementation to reduce disruption and maintain application availability. The deployment strategy you choose should match your application needs, business limitations, and risk acceptance.
Checklist for Migrating to Production:
✓ Make sure to have a final backup of all data and verify it
✓ Clearly define the roles and responsibilities of each team member involved in the migration
✓ Establish a communication plan that includes all stakeholders
✓ Document all the steps involved in the migration and make sure they are reviewed
✓ Test rollback procedures and have them ready
✓ Monitor both the old and new environments
✓ Clearly define and measure the criteria for successBefore you start deploying the production, make sure everyone involved knows the migration plan. This includes the expected timelines, potential impact, and communication procedures. If possible, schedule the migration during times when the business is less active. This will help to reduce any potential impact. Prepare detailed runbooks that guide the migration team through each step. This should include decision points and verification procedures.
Think about temporarily operating both the old and new environments simultaneously, gradually transferring traffic between them. This method provides extra security by allowing for a quick return to the original environment if problems occur. Keep a close eye on everything throughout the migration process to quickly spot and resolve any unexpected behavior. For a deeper understanding of deployment strategies, explore the differences between blue-green and canary deployments.
Blue-Green Deployment
Blue-green deployment is a risk-averse strategy for migrating to production by keeping two identical environments—the active environment (blue) and the new Kubernetes environment (green). Deploy your containerized applications to the green environment, perform a final check, then redirect traffic from blue to green in one action. This approach reduces downtime and provides a simple rollback option if problems occur after the switch. The main difficulty with blue-green deployment is keeping data in sync between environments, especially for databases and other stateful components.
Canary Deployments
Canary deployments are a method where you slowly start routing traffic from your current environment to the new Kubernetes environment. You begin with a small percentage and gradually increase as your confidence in the new environment grows. This method allows you to detect problems early on, while also limiting the potential impact to a small portion of users. Make sure you have appropriate metrics collection and automated rollback triggers in place, so you can react quickly if the canary deployment starts behaving unexpectedly. Canary deployments are particularly effective for applications with a lot of traffic, as statistical analysis can quickly spot any irregularities.
Plan for Rollback
Even with the best preparation, things can go wrong during deployment into production. Having a clear rollback strategy can help you recover quickly and with the least amount of disruption. You should document specific rollback triggers, decision criteria, and procedures for each component of your application. For stateless components, the rollback can usually be as simple as directing traffic back to the original environment. For stateful components like databases, you will need to consider what to do about any data changes that occurred during the failed deployment to avoid losing data or creating inconsistencies.
Step 8: Keep an Eye on Things and Make Improvements
Once you’ve moved your applications to Kubernetes, you’ll need to concentrate on keeping track of things and making them better. Because of the way Kubernetes environments change, you’ll need strong tools and methods for observability to keep things running smoothly, reliably, and without breaking the bank. Start monitoring everything right away so you can spot and fix problems quickly and set a standard for making things better in the future.
Monitoring Kubernetes is quite different from monitoring traditional infrastructure. Instead of focusing on fixed servers, Kubernetes monitoring focuses on dynamic, ephemeral resources. You should design your monitoring strategy to capture metrics at multiple levels. These levels include infrastructure, Kubernetes objects, and application performance. This will provide a complete picture of the health and performance of your environment.
Establish Monitoring Systems
Establish a monitoring stack that offers a clear view of your entire Kubernetes environment. Prometheus has become the go-to standard for collecting metrics in Kubernetes, offering robust data collection, storage, and querying capabilities. Pair Prometheus with visualization tools like Grafana to create all-inclusive dashboards that display crucial metrics in an easy-to-understand format. For larger deployments, consider managed observability platforms that offer integrated metrics, logging, and tracing capabilities with less operational overhead.
Set Up Logging Solutions
Centralized logging is crucial in distributed Kubernetes environments where applications could run on any node in the cluster. Establish a logging stack that gathers, processes, and saves logs from all containers and Kubernetes components. Common choices include the Elasticsearch-Fluentd-Kibana (EFK) stack or cloud-based logging solutions like AWS CloudWatch Logs or Google Cloud Logging.
Set up suitable log retention policies that strike a balance between storage expenses and troubleshooting requirements. Consider adopting structured logging practices to make logs more searchable and analyzable. For applications with high traffic, apply sampling or filtering to handle log volume while still recording significant events.
Set Up Alerts
Setting up alerts in advance can help you spot problems before they affect your users. Determine what alerts you need based on the most important performance and reliability indicators, concentrating on metrics that have a direct impact on user experience. Set the right thresholds based on the baseline behavior you’ve observed to avoid both false positives, which can lead to alert fatigue, and false negatives, which can overlook serious issues.
Important Metrics to Keep an Eye On:
✓ Resource usage for each node (CPU, memory, disk)
✓ Resource usage for each pod and scaling events
✓ Response times and error rates for applications
✓ Network throughput and connection counts
✓ Health of the Kubernetes control plane
✓ Usage and availability of PersistentVolumeEnsure that notifications are directed to the right teams based on the affected components by setting up alert routing. For critical alerts that are not acknowledged or resolved quickly, set up escalation procedures. To minimize the need for manual intervention, consider setting up automated remediation for common problems, such as restarting failed pods or scaling deployments under load.
Real-World Success: Migration Wins and Lessons
Companies from all sectors have successfully migrated legacy applications to Kubernetes, achieving significant benefits while navigating complex challenges. A large financial services company migrated their core transaction processing system—a 15-year-old Java monolith—to Kubernetes over six months, resulting in 40% infrastructure cost reduction and 70% faster release cycles. Their key lesson was starting with extensive refactoring to make the application more cloud-native before migration. Conversely, a healthcare provider took a “lift and shift” approach with minimal refactoring, containerizing their legacy .NET applications with minimal changes. While they achieved their primary goal of infrastructure standardization, they didn’t realize the full benefits of Kubernetes until later phases when they gradually refactored for better cloud-native compatibility.
Start Your Kubernetes Migration Today
When you migrate legacy applications to Kubernetes, you’re embarking on a journey that can transform your business. By following the steps in this guide, from the initial assessment to containerization, deployment, and ongoing optimization, you’re setting yourself up for success. But remember, migrating to Kubernetes isn’t a one-time project. It’s the start of a new way of operating that will continue to evolve. So, invest in your team’s Kubernetes skills, cultivate a culture of continuous improvement, and use SlickFinch’s consulting services to speed up your journey, guide your team and avoid common mistakes.
Common Questions
Switching old applications to Kubernetes can cause a lot of confusion, particularly for companies that are just starting to use containerization. These common questions tackle typical worries and offer practical advice from actual migration experiences. Knowing these things can help you manage your migration journey better and establish suitable expectations for everyone involved.
These solutions are based on industry standards and trends seen in successful migrations, but you may need to adjust them based on your specific situation. Use these answers as a starting point for more in-depth conversations with your migration planning team, and adapt the advice to suit your specific technical environment and business needs.
What is the duration of a standard Kubernetes migration?
The time frame for migration can differ greatly depending on the complexity of the application, the expertise of the team, and the scope of the migration. Simple applications with a minimal state and modern architectures may be migrated in 2-4 weeks. On the other hand, complex monolithic applications with extensive state management and legacy dependencies usually need 3-6 months for a proper migration. Migrations that involve dozens or hundreds of applications across an enterprise generally span 1-3 years and are implemented in waves of increasing complexity. The most successful migrations are those that allocate enough time for proper assessment, refactoring, testing, and knowledge building, rather than rushing to meet artificial deadlines.
Is it better to migrate all applications simultaneously or in stages?
For most organizations, a staged approach is highly recommended. Start with easier, less critical applications to build your team’s expertise and establish patterns before moving on to business-critical systems. Group applications into migration waves based on technical similarity, business priority, and interdependencies. This method spreads risk over time while allowing your team to apply what they’ve learned from early migrations to later, more complicated ones. Complete “big bang” migrations are rarely successful and create unnecessary business risk that can be avoided with thoughtful staging.
What are the main issues when moving legacy applications?
The most difficult part of moving legacy applications to Kubernetes is usually managing the state. Applications that store local state, depend on shared file systems, or assume fixed host names often need a lot of refactoring to function correctly in Kubernetes’ dynamic environment. Legacy applications with hard-coded configurations, tight coupling between components, or direct database connections also pose additional problems that need to be solved during the move.
Often, the cultural and organizational challenges are just as hard, if not harder, than the technical ones. Teams used to traditional deployment models may be resistant to moving to containerization and continuous delivery. Operations teams need to learn new skills for monitoring, troubleshooting, and managing in Kubernetes environments. Setting up cross-functional ownership models that align with Kubernetes’ architecture can require significant organizational change.
Networking is another area that often presents challenges, especially for applications that rely on specific network topologies, fixed IPs, or non-standard network protocols. Kubernetes’ network model is quite different from traditional infrastructure, necessitating changes to network assumptions and security models.
- Migration from direct filesystem access to volume mounts or external storage
- Applications that assume fixed IP addresses or hostnames
- Services that are tightly coupled with hard dependencies
- Monolithic applications that need to be decomposed into microservices
- Long-running processes that do not handle termination signals properly
How can I persuade stakeholders that migrating to Kubernetes is worth it?
Construct a persuasive business case that turns technical advantages into business results that strike a chord with decision-makers. Quantify the expected improvements in deployment frequency, time-to-market, infrastructure utilization, and operational efficiency. Include both the hard cost savings from infrastructure optimization and the soft benefits such as increased developer productivity and fewer outages. Refer to industry case studies from organizations of a similar size or in similar industries that have successfully completed migrations to Kubernetes.
Think about carrying out a small-scale proof-of-concept migration that shows real advantages with a minor investment. This method offers solid proof that is unique to your environment while also developing in-house expertise. Emphasize how Kubernetes solves particular issues that the business is currently dealing with, such as sluggish deployments, scaling restrictions, or infrastructure inconsistencies.
What if my app isn’t ready for the cloud?
Most legacy apps aren’t ready for the cloud without some changes. You’ll want to check your app against the principles of cloud-native and see where it falls short. Some common problems are hardcoded configurations, local state persistence, and assumptions about infrastructure stability. From there, you can make a plan for refactoring that ranks changes by how much they’ll help with migration and realizing benefits.
Think about using the “strangler fig” pattern, which allows you to slowly swap out parts of the legacy application with cloud-native services, all while keeping the functionality intact. This step-by-step method minimizes risk and lets you focus your refactoring efforts on the most crucial areas. For applications that can’t be completely refactored in the short term, think about containerizing them with as few changes as possible to start, then implement a long-term modernization strategy after the initial migration.
SlickFinch has the necessary tools and knowledge to assess the readiness of applications for the cloud-native approach and to develop realistic migration strategies for even the most complicated legacy applications. Our experience in a variety of migration situations can speed up your journey to Kubernetes and help you avoid typical mistakes, as outlined in this cloud migration strategy planning guide. Reach out for a free consultation on your potential migration.