Key Takeaways
Migrating from VMware to Google Kubernetes Engine (GKE) can automate and streamline your application management.
GKE Autopilot offers a managed Kubernetes experience, reducing manual processes.
Preparation is key: assess your current VMware environment and understand application dependencies before migrating.
Using Migrate for GKE simplifies the transition by converting VMs to containers and generating necessary deployment files.
Post-migration, focus on optimizing resource utilization, monitoring, scaling, and ensuring security and compliance.
Seamless Transition to Kubernetes: Migrating from VMware to GKE
The Need for Migration
As organizations scale, the need for flexible, scalable, and efficient cloud solutions becomes paramount. Traditional virtual machine (VM) environments, such as VMware, offer stability but can be limiting in terms of scalability and agility. Migrating to Kubernetes, specifically Google Kubernetes Engine (GKE), provides a robust platform that automates much of the operational overhead.
Besides that, Kubernetes excels in managing containerized applications, offering features like automatic scaling, rolling updates, and self-healing capabilities. Therefore, transitioning to GKE can significantly enhance your operational efficiency and application performance.
Benefits of Migrating from VMware to Kubernetes
Migrating from VMware to Kubernetes brings several key benefits:
Scalability: Kubernetes can automatically scale your applications based on demand, ensuring optimal performance.
Resource Efficiency: Kubernetes manages resources efficiently, reducing costs by optimizing the use of hardware.
Flexibility: Kubernetes supports a wide range of applications and services, making it easier to deploy and manage diverse workloads.
Automation: With features like auto-scaling and self-healing, Kubernetes reduces the need for manual intervention.
Security: Kubernetes provides robust security features, including network policies and role-based access control (RBAC).
Introduction to GKE Autopilot
GKE Autopilot is a managed Kubernetes service that simplifies cluster management by automating operational tasks. It allows you to focus on deploying and managing applications without worrying about the underlying infrastructure. With GKE Autopilot, Google Cloud takes care of node provisioning, scaling, and maintenance, ensuring that your cluster is always optimized for performance and cost.
Additionally, GKE Autopilot integrates seamlessly with other Google Cloud services, providing a comprehensive ecosystem for your applications. This integration makes it easier to leverage advanced features like machine learning, big data analytics, and serverless computing.
“migrate VM workloads to GKE Containers …” from bgiri-gcloud.medium.com and used with no modifications.
Preparing for the Migration
Before diving into the migration process, it’s crucial to prepare thoroughly. This preparation involves setting up the necessary accounts and roles, assessing your current environment, and understanding the dependencies of your applications.
Setting Up a Google Account and IAM Roles
First, you need to set up a Google Cloud account if you don’t already have one. Follow these steps to get started:
Visit the Google Cloud website and sign up for an account.
Once your account is set up, create a project where your GKE clusters will reside.
Set up Identity and Access Management (IAM) roles to control who can access and manage your resources. Ensure that the necessary roles, such as Kubernetes Engine Admin and Compute Admin, are assigned to the appropriate users.
Assessing Your Current VMware Environment
Next, evaluate your existing VMware environment. Identify the VMs you plan to migrate and gather detailed information about their configurations, including:
CPU and memory usage
Storage requirements
Network configurations
Operating system and software dependencies
This assessment helps you understand the scope of the migration and identify any potential challenges that may arise, such as network configurations.
Understanding Application Dependencies
Understanding the dependencies of your applications is critical to a successful migration. Identify any services, databases, or external systems that your applications rely on. Document these dependencies and plan how they will be handled in the Kubernetes environment.
For example, if your application relies on a specific database, you need to ensure that the database is also migrated or accessible from the GKE cluster. Additionally, consider any network configurations or security policies that need to be replicated in the new environment.
Planning Your Migration
With the preparation complete, the next step is to plan the migration. A well-thought-out plan ensures a smooth transition and minimizes downtime. For instance, understanding zero-downtime deployment in Kubernetes can be crucial for maintaining service availability during the migration process.
Creating a Migration Plan
Start by creating a detailed migration plan that outlines each step of the process. Your plan should include:
A timeline for the migration
Roles and responsibilities of team members
Steps for testing and validating the migration
Contingency plans for potential issues
Estimating Downtime and Cost
Estimating the downtime and cost associated with the migration is crucial for planning and budgeting. Consider the following factors:
Downtime: Estimate the time required to migrate each application and plan for minimal disruption to your users.
Cost: Calculate the cost of running both environments during the migration period, including any additional resources required.
By understanding these factors, you can make informed decisions and set realistic expectations for the migration process.
Setting Up Monitoring and Alerts
Monitoring and alerts are essential for tracking the progress of the migration and identifying any issues that arise. Set up monitoring tools to track the performance and status of your applications during and after the migration. Configure alerts to notify you of any critical issues that need immediate attention.
Step-by-Step Migration Process
Now that you have a solid plan, it’s time to execute the migration. Follow these steps to ensure a smooth transition from VMware to GKE.
Setting Up Monitoring and Alerts
Monitoring and alerts are essential for tracking the progress of the migration and identifying any issues that arise. Set up monitoring tools to track the performance and status of your applications during and after the migration. Configure alerts to notify you of any critical issues that need immediate attention.
Google Cloud offers tools like Stackdriver Monitoring and Logging, which can be integrated with GKE to provide comprehensive insights into your applications’ health and performance. Set up dashboards to visualize key metrics and create alert policies to notify your team of any anomalies.
Step-by-Step Migration Process
Now that you have a solid plan, it’s time to execute the migration. Follow these steps to ensure a smooth transition from VMware to GKE.
Deploying GKE Cluster and Node Pools
The first step in the migration process is to deploy a GKE cluster and configure the necessary node pools. A node pool is a group of nodes within a cluster that have the same configuration. Here’s how you can deploy a GKE cluster and node pools:
Open the Google Cloud Console and navigate to the Kubernetes Engine section.
Click on “Create Cluster” and choose the “Autopilot” mode for a fully managed experience.
Configure the cluster settings, including the name, region, and node pool specifications.
Click “Create” to deploy the cluster. This process may take a few minutes.
Once the cluster is deployed, you can configure additional node pools if needed. Node pools allow you to optimize resource allocation based on the specific requirements of your applications.
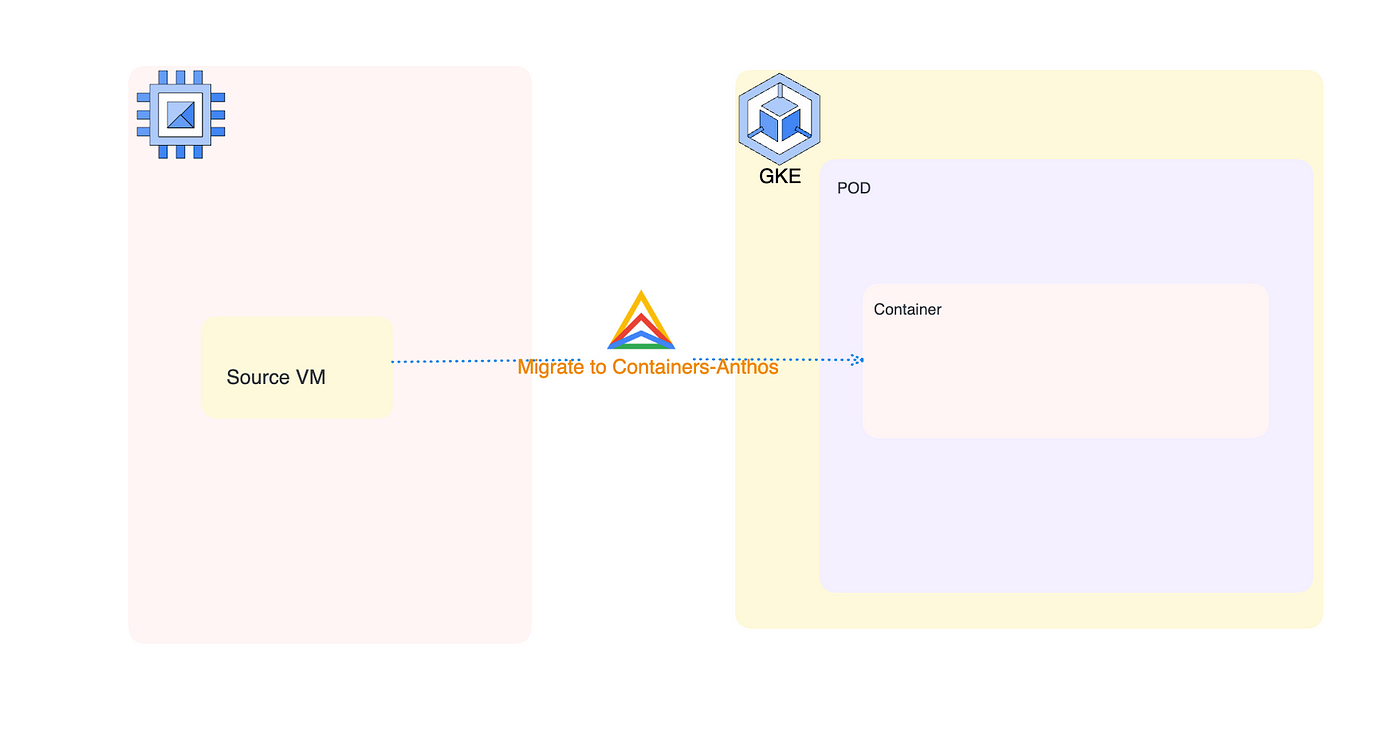
Using Migrate for GKE
Migrate for GKE is a tool that simplifies the migration process by converting VMs to containers and generating the necessary deployment files. Follow these steps to use Migrate for GKE:
Install the Migrate for GKE components on your GKE cluster. This can be done using the Google Cloud Console or the gcloud command-line tool.
Run the fit assessment tool to evaluate your VMs and determine their suitability for migration. The tool will generate a report highlighting any potential issues.
Initiate the migration process by specifying the VMs you want to migrate. Migrate for GKE will automatically extract the core components necessary to run the application.
By leveraging Migrate for GKE, you can streamline the migration process and ensure that your applications are containerized correctly.
Converting VMs to Containers
After initiating the migration process, Migrate for GKE will convert your VMs to containers. This involves extracting the application code, dependencies, and configurations from the VMs and packaging them into Docker images. The tool will also generate Kubernetes deployment YAML files, which define how the containers should be deployed and managed on the GKE cluster.
During this step, it’s essential to verify that all necessary components are included in the Docker images and that the deployment YAML files are correctly configured. This ensures that your applications will run smoothly in the Kubernetes environment.
Creating Docker Images and Deployment YAML
Once the VMs are converted to containers, the next step is to create Docker images and deployment YAML files. Docker images are lightweight, standalone, and executable packages that include everything needed to run a piece of software, including the code, runtime, libraries, and dependencies.
Use the Dockerfile generated by Migrate for GKE to build the Docker images. You can do this by running the following command:
docker build -t <image-name> <path-to-dockerfile>
After building the Docker images, push them to a container registry, such as Harbor, Google Container Registry (GCR) or Docker Hub. This allows you to easily deploy the images to your GKE cluster.
Next, use the deployment YAML files generated by Migrate for GKE to deploy the containers on the GKE cluster. Apply the YAML files using the kubectl command:
kubectl apply -f <path-to-deployment-yaml>
Testing the Migration
Testing is a critical step in the migration process. It ensures that your applications function correctly in the new environment and that all dependencies are properly configured. Follow these steps to test the migration:
Deploy the applications on the GKE cluster using the deployment YAML files.
Monitor the deployment process and verify that the containers start without any issues.
Run functional and performance tests to ensure that the applications behave as expected.
Check for any errors or warnings in the logs and address any issues that arise.
By thoroughly testing the migration, you can identify and resolve any problems before fully transitioning to the new environment.
Deploying Applications on GKE
After successfully testing the migration, it’s time to deploy your applications on the GKE cluster. Follow these steps to deploy your applications:
Ensure that the Docker images are available in the container registry.
Apply the deployment YAML files to the GKE cluster using the kubectl command.
Monitor the deployment process and verify that the containers start without any issues.
Configure any necessary services, ingress controllers, and load balancers to expose your applications to external users.
Once the applications are deployed, monitor their performance and ensure that they are running smoothly. This marks the completion of the migration process.
Post-Migration Considerations
With the migration complete, it’s essential to focus on optimizing resource utilization, monitoring, scaling, and ensuring security and compliance in your new Kubernetes environment.
Optimizing Kubernetes Resource Utilization
Optimizing resource utilization is crucial for maximizing the efficiency of your Kubernetes cluster. Kubernetes provides several features to help you achieve this, including cluster performance tuning.
Resource Requests and Limits: Define resource requests and limits for your containers to ensure that they receive the necessary CPU and memory resources.
Horizontal Pod Autoscaling: Use horizontal pod autoscaling to automatically scale the number of pods based on CPU or memory usage.
Vertical Pod Autoscaling: Use vertical pod autoscaling to automatically adjust the resource requests and limits for your containers based on their usage patterns.
Monitoring and Scaling Your Applications
Monitoring and scaling your applications is essential for maintaining performance and availability. Use the following tools and techniques to monitor and scale your applications:
Stackdriver Monitoring and Logging: Integrate Stackdriver with your GKE cluster to monitor the performance and health of your applications.
Custom Metrics: Define custom metrics to monitor specific aspects of your applications and set up alerts for critical thresholds.
Cluster Autoscaler: Use the cluster autoscaler to automatically adjust the number of nodes in your cluster based on resource utilization.
Using Kubernetes Metrics
Kubernetes provides a wealth of metrics that can help you monitor and optimize your applications. Some of the key metrics to monitor include:
CPU and Memory Usage: Track the CPU and memory usage of your pods to ensure that they have sufficient resources.
Pod and Node Status: Monitor the status of your pods and nodes to identify any issues or failures.
Network Traffic: Track the network traffic to and from your pods to identify any bottlenecks or performance issues.
To dive deeper into this topic, check out our guide on Kubernetes cluster performance tuning.
Automating Scaling With Autopilot
GKE Autopilot simplifies the process of scaling your applications by automating many of the operational tasks. With Autopilot, Google Cloud manages the underlying infrastructure, allowing you to focus on deploying and managing your applications.
Autopilot automatically adjusts the number of nodes in your cluster based on resource utilization, ensuring that your applications have the necessary resources to run efficiently. Additionally, Autopilot handles node maintenance and upgrades, reducing the operational overhead for your team.
Ensuring Security and Compliance
Security and compliance are critical considerations in any cloud environment. Kubernetes provides several features to help you secure your applications and ensure compliance with industry standards:
Network Policies: Use network policies to control the traffic between pods and ensure that only authorized communication is allowed.
Role-Based Access Control (RBAC): Use RBAC to control access to your Kubernetes resources and ensure that only authorized users can perform specific actions.
Secrets Management: Use Kubernetes Secrets to securely store and manage sensitive information, such as API keys and passwords.
Compliance Audits: Regularly audit your Kubernetes environment to ensure compliance with industry standards and best practices.
By focusing on these post-migration considerations, you can ensure that your applications run efficiently, securely, and in compliance with industry standards.
Using Kubernetes Metrics
Kubernetes provides a wealth of metrics that can help you monitor and optimize your applications. Some of the key metrics to monitor include cluster performance tuning.
CPU and Memory Usage: Track the CPU and memory usage of your pods to ensure that they have sufficient resources.
Pod and Node Status: Monitor the status of your pods and nodes to identify any issues or failures.
Network Traffic: Track the network traffic to and from your pods to identify any bottlenecks or performance issues.
By keeping an eye on these metrics, you can ensure that your applications run smoothly and efficiently. Additionally, setting up alerts for critical metrics can help you quickly respond to any issues that arise.
Tips for a Smooth Transition
Migrating from VMware to GKE can be a complex process, but with careful planning and execution, you can ensure a smooth transition. Here are some tips to help you along the way:
Common Migration Pitfalls and How to Avoid Them
During the migration process, several common pitfalls can arise. Here are some of the most frequent issues and how to avoid them:
Insufficient Planning: Ensure that you have a detailed migration plan that includes timelines, roles, and contingency plans.
Overlooking Dependencies: Thoroughly document and plan for all application dependencies to avoid disruptions.
Inadequate Testing: Conduct comprehensive testing to identify and resolve any issues before fully transitioning to the new environment.
Resource Mismanagement: Optimize resource allocation by defining resource requests and limits for your containers.
By being aware of these pitfalls and taking proactive steps to address them, you can minimize the risk of disruptions and ensure a successful migration.
Best Practices for Kubernetes Management
Managing a Kubernetes environment requires following best practices to ensure optimal performance and reliability. Here are some key best practices to consider:
Use Infrastructure as Code (IaC): Define your infrastructure using code to enable version control, repeatability, and automation.
Implement Continuous Integration/Continuous Deployment (CI/CD): Automate your deployment pipeline to ensure consistent and reliable application updates.
Monitor and Log Everything: Set up comprehensive monitoring and logging to gain insights into your application’s performance and identify issues quickly.
Regularly Update and Patch: Keep your Kubernetes environment up to date with the latest patches and updates to ensure security and stability.
By following these best practices, you can effectively manage your Kubernetes environment and ensure that your applications run smoothly.
Leveraging Google Cloud Resources and Support
Google Cloud offers a wealth of resources and support to help you with your migration and ongoing management of your GKE environment. Here are some resources you can leverage:
Documentation: The Google Cloud documentation provides detailed guides and tutorials on using GKE and other Google Cloud services.
Community Support: Join the Google Cloud Community to connect with other users and get help with your questions.
Training and Certification: Take advantage of Google Cloud’s training and certification programs to build your skills and knowledge.
Professional Services: If you need additional support, consider engaging with SlickFinch for expert guidance and assistance.
By leveraging these resources, you can gain the knowledge and support you need to successfully manage your GKE environment.
Frequently Asked Questions (FAQ)
What are the main benefits of migrating to GKE?
Migrating to GKE offers several benefits, including:
Scalability: GKE can automatically scale your applications based on demand, ensuring optimal performance.
Resource Efficiency: GKE manages resources efficiently, reducing costs by optimizing the use of hardware.
Flexibility: GKE supports a wide range of applications and services, making it easier to deploy and manage diverse workloads.
Automation: With features like auto-scaling and self-healing, GKE reduces the need for manual intervention.
Security: GKE provides robust security features, including network policies and role-based access control (RBAC).
How long does the migration process typically take?
The duration of the migration process can vary depending on the size and complexity of your environment. A small-scale migration might take a few days, while a larger, more complex migration could take several weeks or even months. Proper planning, thorough testing, and effective execution are key to minimizing the time required for migration.
Do I need to manually create Docker images?
No, Migrate for GKE simplifies the process by automatically converting your VMs to containers and generating the necessary Docker images. However, it’s essential to verify that all necessary components are included in the Docker images and that the deployment YAML files are correctly configured.
Can I migrate specific applications instead of the entire environment?
Yes, you can choose to migrate specific applications instead of the entire environment. This approach allows you to gradually transition to GKE and address any issues on a smaller scale before fully committing to the migration.
What are the cost implications of switching to GKE?
The cost of switching to GKE can vary depending on several factors, including the size of your environment, resource usage, and the duration of the migration process. While GKE can offer cost savings through efficient resource management and automation, it’s essential to calculate the costs associated with running both environments during the migration period and any additional resources required. Proper planning and optimization can help you manage costs effectively.
By following this comprehensive guide, you can ensure a seamless transition from VMware to GKE, leveraging the power of Kubernetes to enhance your application’s performance, scalability, and efficiency. Remember to plan thoroughly, test rigorously, and take advantage of the resources and support available from Google Cloud to make your migration a success.