Key Takeaways
-
Helm is a powerful package manager for Kubernetes, simplifying the deployment and management of applications.
-
Helm 3 offers significant improvements over Helm 2, including enhanced security and better management of charts.
-
Installing Helm involves downloading the binary and configuring your Kubernetes cluster.
-
Creating your first Helm chart involves understanding its structure and using basic commands.
-
Helm 3's templating and lifecycle hooks make it easier to manage complex deployments.
Mastering Helm: The Ultimate Guide to Kubernetes Package Management
Helm 3 is an essential tool for anyone working with Kubernetes. It streamlines the process of packaging, deploying, and managing applications on Kubernetes clusters. Whether you're new to Kubernetes or looking to deepen your expertise, mastering Helm can significantly enhance your workflow.
An Introduction to Helm
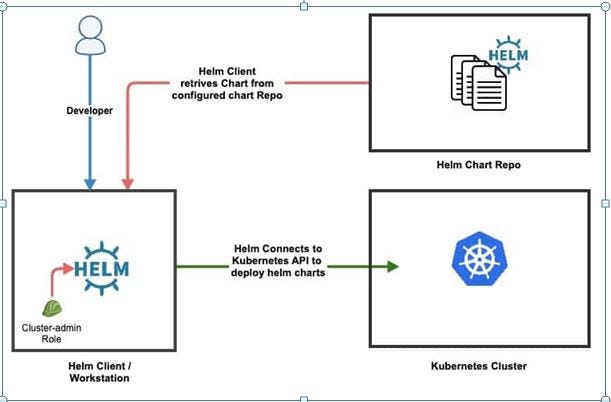
Helm is often referred to as the "package manager for Kubernetes." Just as package managers like apt or yum simplify software installation on Linux, Helm simplifies the installation and management of applications on Kubernetes. Helm uses a packaging format called charts, which are collections of files that describe a related set of Kubernetes resources.
Importance of Helm in Kubernetes Management
Managing applications on Kubernetes can be complex. Helm addresses this complexity by providing a standard way to define, install, and upgrade applications. It allows you to deploy applications with a single command and manage their lifecycle effortlessly. Most importantly, Helm ensures consistency across different environments, reducing the chances of errors.
"Helm charts make it easy to deploy applications in a repeatable and consistent manner, saving time and reducing the risk of human error." – Kubernetes User
"Kubernetes Helm Chart Overview. Helm ..." from medium.com and used with no modifications.
Understanding Helm
What is Helm?
Helm is a tool that streamlines the deployment and management of applications on Kubernetes. It packages Kubernetes resources into charts, which can be easily shared and reused. Helm charts can be stored in repositories, making it easy to distribute and deploy applications across different environments.
Evolution from Helm 2 to Helm 3
Helm 3 is a significant upgrade from Helm 2. One of the key changes is the removal of Tiller, the server-side component that had elevated permissions and posed security risks. Helm 3 operates client-side only, which enhances security and simplifies the architecture. Besides that, Helm 3 introduces improved chart management and better support for Kubernetes namespaces.
Key Features and Improvements in Helm 3
Helm 3 comes with several enhancements:
-
Security: No more Tiller, reducing security vulnerabilities.
-
Improved CLI: Enhanced command-line interface for better user experience.
-
Chart Management: Better support for managing and distributing charts.
-
Namespace Isolation: Improved handling of Kubernetes namespaces.
Getting Started with Helm 3
Installing Helm
Installing Helm is straightforward. Follow these steps:
-
Download the Helm 3 binary from the official Helm website.
-
Unpack the binary and move it to a directory in your PATH.
-
Verify the installation by running
helm version.
curl -fsSL https://raw.githubusercontent.com/helm/helm/main/scripts/get-helm-3 | bash
Setting Up Your First Helm Chart
Creating your first Helm chart is an exciting step. A Helm chart is a collection of files that describe a related set of Kubernetes resources. To create a chart, use the following command:
helm create mychart
This command generates a directory structure with all the necessary files. You'll find a Chart.yaml file, a values.yaml file, and a templates directory where you define your Kubernetes resources.
Basic Helm Commands You Need to Know
Helm provides several commands to manage your charts:
-
helm install: Installs a chart.
-
helm upgrade: Upgrades an existing release.
-
helm rollback: Rolls back a release to a previous version.
-
helm delete: Deletes a release.
-
helm list: Lists all releases.
Understanding these basic commands is crucial for managing your applications effectively.
Chart Structure and Anatomy
Understanding the structure of a Helm chart is essential for creating and managing your own charts. A typical Helm chart consists of the following components:
-
Chart.yaml: This file contains metadata about the chart, such as its name, version, and description.
-
values.yaml: This file defines the default configuration values for the chart.
-
templates/: This directory contains the Kubernetes manifest templates that Helm will render using the values from
values.yaml. -
charts/: This directory can contain other charts that your chart depends on.
-
README.md: A markdown file to document your chart.
Here's an example of a simple Helm chart structure.
    mychart/    ├── Chart.yaml
    ├── values.yaml
    ├── charts/
    └── templates/
        ├── deployment.yaml
        ├── service.yaml
        └── ingress.yaml
Authoring Your Own Helm Charts
Creating your own Helm charts allows you to package and share your Kubernetes applications efficiently. Start by using the helm create command to generate a basic chart structure:
helm create mychart
Once you have the basic structure, you can customize the templates in the templates/ directory to define your Kubernetes resources. For example, you might create a deployment.yaml template to define a Deployment resource:
    apiVersion: apps/v1
    kind: Deployment
    metadata:
      name: {{ .Values.name }}
    spec:
      replicas: {{ .Values.replicaCount }}
      template:
        metadata:
          labels:
            app: {{ .Values.name }}
        spec:
          containers:
          - name: {{ .Values.name }}
            image: "{{ .Values.image.repository }}:{{ .Values.image.tag }}"
            ports:
            - containerPort: 80
Next, define the default values for these templates in the values.yaml file.
    name: myapp
    replicaCount: 2
    image:
      repository: myapp
      tag: latest
By customizing these templates and values, you can create reusable charts that can be easily deployed across different environments.
Managing Dependencies in Charts
Helm charts can depend on other charts, allowing you to compose complex applications from simpler components. To manage dependencies, use the requirements.yaml file in your chart:
    dependencies:
    - name: mysql
      version: "1.6.7"
      repository: "https://charts.helm.sh/stable"
After defining dependencies, run the following command to update them:
helm dependency update
This command downloads the specified dependencies and places them in the charts/ directory, making them available for use in your templates.
Advanced Helm 3 Techniques
Once you're comfortable with the basics of Helm, you can explore advanced techniques to get the most out of Helm 3. These techniques will help you manage more complex deployments and integrate Helm into your existing workflows.
Using Helm Templates
Helm templates are a powerful feature that allows you to define Kubernetes resources using Go templating. This enables you to create dynamic configurations based on the values provided in the values.yaml file. For example, you can use conditional statements to include or exclude resources based on specific values.
    {{- if .Values.ingress.enabled }}
    apiVersion: networking.k8s.io/v1
    kind: Ingress
    metadata:
      name: {{ .Values.name }}
    spec:
      rules:
      - host: {{ .Values.ingress.host }}
        http:
          paths:
          - path: /
            pathType: Prefix
            backend:
              service:
                name: {{ .Values.name }}
                port:
                  number: 80
    {{- end }}
This template will only create an Ingress resource if the ingress.enabled value is set to true.
Helm Hooks for Lifecycle Events
Helm hooks allow you to execute actions at specific points in the release lifecycle. This is useful for tasks like database migrations or cleanup operations. You can define hooks in your templates using annotations:
    apiVersion: batch/v1
    kind: Job
    metadata:
      name: {{ .Values.name }}-migrate
      annotations:
        "helm.sh/hook": pre-install,pre-upgrade
    spec:
      template:
        spec:
          containers:
          - name: migrate
            image: "{{ .Values.image.repository }}:{{ .Values.image.tag }}"
            command: ["./migrate.sh"]
          restartPolicy: OnFailure
This Job will run before the install and upgrade phases, ensuring that database migrations are completed before the application is deployed or updated.
Integrating Helm with CI/CD Pipelines
Integrating Helm with your CI/CD pipeline can automate the deployment process, ensuring that your applications are consistently deployed across environments. Here’s how you can achieve this:
-
Include Helm commands in your pipeline scripts to install, upgrade, and rollback releases.
-
Use environment-specific values files to customize deployments for different stages (e.g., development, staging, production).
-
Leverage Helm's built-in support for versioning to track and manage releases.
For example, in a Jenkins pipeline, you might use the following script to deploy a Helm chart:
    pipeline {
        agent any
        stages {
            stage('Deploy') {
                steps {
                    script {
                        sh 'helm upgrade --install myapp ./mychart -f values-prod.yaml'
                    }
                }
            }
        }
    }
This script installs or upgrades the myapp release using the production values file, ensuring that your application is deployed with the correct configuration.
Best Practices for Helm 3
To get the most out of Helm 3, it's important to follow best practices for version control, security, and performance optimization. These practices will help you manage your Helm charts more effectively and ensure that your deployments are secure and efficient. For instance, understanding Kubernetes RBAC configuration is crucial for maintaining security in your deployments.
Version Control for Helm Charts
Version control is crucial for managing changes to your Helm charts. Use a version control system like Git to track changes and collaborate with your team. Here are some tips:
-
Keep your chart repository separate from your application code repository.
-
Use semantic versioning for your charts to indicate the type of changes (e.g., bug fixes, new features, breaking changes).
-
Create a
CHANGELOG.mdfile to document changes and updates.
For example, your Chart.yaml file might look like this:
    apiVersion: v2
    name: myapp
    version: 1.0.0
    description: A Helm chart for my application
Securing Your Helm Deployments
Security is a critical aspect of any Kubernetes deployment. Here are some best practices for securing your Helm deployments:
-
Use role-based access control (RBAC) to restrict access to Helm and Kubernetes resources.
-
Enable TLS for Helm to secure communication between the client and the Kubernetes API server.
-
Regularly update your charts to include the latest security patches and fixes.
For example, you can enable TLS by configuring your Helm client with a certificate:
helm install myapp ./mychart --tls --tls-ca-cert ca.crt --tls-cert helm.crt --tls-key helm.key
This command ensures that the Helm client communicates securely with the Kubernetes API server.
Optimizing Helm Performance and Efficiency
To optimize the performance and efficiency of your Helm deployments, consider the following tips:
-
Use Helm's built-in caching to speed up chart downloads and reduce network traffic.
-
Leverage Helm's templating capabilities to create reusable and modular templates.
-
Monitor the performance of your Helm deployments using tools like Prometheus and Grafana.
For example, you can enable caching by configuring your Helm client with a cache directory:
helm repo add stable https://charts.helm.sh/stable --cache-dir /path/to/cache
This command configures Helm to use a local cache directory, reducing the need to download charts from remote repositories.
Troubleshooting Common Helm Issues
Even with the best practices in place, you may encounter issues while working with Helm. Understanding how to troubleshoot these issues can save you time and frustration.
Debugging Helm Charts
Debugging Helm charts involves identifying and resolving issues in your chart templates and configurations. Here are some tips for effective debugging:
-
Use the
helm lintcommand: This command checks your chart for common issues and errors. -
Enable debug output: Use the
--debugflag with Helm commands to get detailed output that can help you identify issues. -
Inspect rendered templates: Use the
helm templatecommand to render your templates locally and inspect the generated Kubernetes manifests.
    helm lint mychart
    helm install myrelease mychart --debug
    helm template mychart
These commands provide valuable insights into the structure and content of your Helm charts, helping you pinpoint and resolve issues.
Common Installation Errors and Solutions
During the installation of Helm charts, you might encounter common errors. Here are some typical errors and their solutions:
-
Error: "unable to recognize '': no matches for kind ...": This error indicates that Kubernetes cannot find the specified resource type. Ensure that your Kubernetes cluster supports the resource and that you have the correct API version.
-
Error: "failed to download ...": This error occurs when Helm cannot download a chart from the repository. Verify that the repository URL is correct and accessible.
-
Error: "release ... failed, and has been rolled back": This error indicates that the deployment failed and Helm rolled back the release. Check the detailed error messages and logs to identify the root cause.
Addressing these common errors promptly ensures that your deployments proceed smoothly and without interruptions.
Performance Bottlenecks and Remedies
Performance bottlenecks can affect the efficiency of your Helm deployments. Here are some common bottlenecks and their remedies:
-
Slow chart downloads: Use Helm's caching capabilities to reduce the need for repeated downloads.
-
High resource consumption: Optimize your chart templates to use resources efficiently and avoid over-provisioning.
-
Long deployment times: Use Helm hooks to perform pre- and post-deployment tasks efficiently, reducing overall deployment time.
By addressing these performance bottlenecks, you can ensure that your Helm deployments are fast, efficient, and reliable.
Conclusion
Mastering Helm 3 is essential for anyone working with Kubernetes. Helm simplifies the process of packaging, deploying, and managing applications, making it a vital tool in your Kubernetes toolkit. By understanding the basics, exploring advanced techniques, and following best practices, you can leverage Helm 3 to streamline your workflows and ensure consistent, reliable deployments.
Recap of Key Points
In this guide, we covered:
-
The importance of Helm in Kubernetes management.
-
Key features and improvements in Helm 3.
-
How to install Helm 3 and set up your first Helm chart.
-
Advanced techniques for using Helm templates, hooks, and integrating with CI/CD pipelines.
-
Best practices for version control, security, and performance optimization.
-
Troubleshooting common Helm 3 issues.
Next Steps for Helm Mastery
To continue mastering Helm 3, consider the following steps:
Explore advanced techniques for using Helm templates, hooks, and integrating with CI/CD pipelines.
-
Experiment with creating and deploying your own Helm charts.
-
Explore the Helm documentation and community resources for additional tips and best practices.
-
Integrate Helm with your existing CI/CD pipelines to automate deployments.
-
Stay updated with the latest Helm releases and features to leverage new capabilities.
Frequently Asked Questions (FAQ)
Here are some common questions about Helm 3:
What is the main difference between Helm 2 and Helm 3?
The main difference between Helm 2 and Helm 3 is the removal of Tiller, the server-side component in Helm 2. Helm 3 operates client-side only, enhancing security and simplifying the architecture. Additionally, Helm 3 offers improved chart management and better support for Kubernetes namespaces.
Can Helm be used with any Kubernetes cluster?
Yes, Helm can be used with any Kubernetes cluster that meets the minimum version requirements. Helm 3 requires Kubernetes version 1.14 or higher. Ensure that your Kubernetes cluster is properly configured and that you have the necessary permissions to deploy resources.
How do I secure my Helm chart deployments?
Securing your Helm chart deployments involves:
-
Using role-based access control (RBAC) to restrict access to Helm and Kubernetes resources.
-
Enabling TLS for Helm to secure communication between the client and the Kubernetes API server.
-
Regularly updating your charts to include the latest security patches and fixes.
What are Helm hooks and how are they useful?
Helm hooks are annotations that allow you to execute actions at specific points in the release lifecycle. They are useful for tasks like database migrations, cleanup operations, and other pre- and post-deployment tasks. By using hooks, you can automate and streamline these tasks, ensuring that they are performed consistently and reliably.
How can I integrate Helm with my CI/CD pipeline?
Integrating Helm with your CI/CD pipeline involves understanding the deployment strategies and best practices outlined in this article. If you need help with Helm or Kubernetes, then reach out to SlickFinch today, our team of experts will be happy to advise you.