
When you’re juggling multiple tasks at once, it’s like trying to keep a bunch of balls in the air – drop one, and your performance falters. The same goes for managing applications in Kubernetes; load balancing is the art of keeping all those “balls” – or network traffic – evenly spread out so that your applications run smoothly without a hitch. Let’s dive into how you can master this juggling act.
Article-at-a-Glance
Load balancing in Kubernetes helps distribute incoming traffic across multiple pods to ensure high availability and reliability.
Kubernetes offers several types of services, such as ClusterIP, NodePort, and LoadBalancer, each serving different use cases.
Implementing a LoadBalancer service in Kubernetes is straightforward and can be done using a simple configuration file.
Readiness and liveness probes are crucial for maintaining the health of your services and ensuring traffic is only sent to responsive pods.
Advanced load balancing features like session affinity and consistent hashing can optimize traffic flow and user experience.
Unlocking Kubernetes Load Balancing Efficiency
Defining Load Balancing in a Kubernetes Environment
In a nutshell, load balancing in Kubernetes is about smartly routing client requests to the right set of pods. Imagine you have a bustling ice cream shop. If a new customer walks in, you wouldn’t want them to wait too long while one server is overwhelmed with orders, right? Similarly, Kubernetes load balancing ensures that no single pod gets overloaded with requests, which could lead to slower response times or even crashes.
Understanding Load Balancer Types and Their Use Cases
Before we start configuring anything, it’s crucial to understand the different flavors of load balancers at your disposal:
ClusterIP: This default Kubernetes service type is great for internal traffic. It assigns a virtual IP within the cluster to enable communication between different services.
NodePort: Exposes your service on each Node’s IP at a static port. While it’s handy for development, it’s not the most refined option for production environments.
LoadBalancer: Integrates your internal Kubernetes services with external load balancers provided by cloud providers. It’s the go-to for handling external traffic.
Now, let’s get your hands dirty and set up a Kubernetes load balancer that’s as efficient as a bee in a blooming garden.

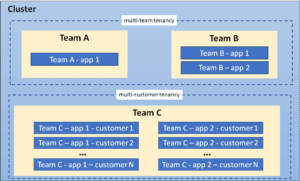
“Learn Kubernetes Service Load Balancer …” from www.densify.com and used with no modifications.
Choosing the Right Load Balancer for Your Kubernetes Cluster
Internal versus External Load Balancers
First things first, you need to decide whether you need an internal load balancer that handles traffic within your cluster or an external one that balances incoming traffic from the outside world. Here’s the deal:
Internal Load Balancers are perfect when you want to distribute traffic within your own network – think of it as organizing an in-house event.
External Load Balancers are your best bet when you’re ready to open the doors to the public, handling all the incoming traffic like a pro.
ClusterIP vs LoadBalancer vs NodePort: Picking the Best Option
Choosing the right service type for your needs is a bit like picking the right tool for a job. You wouldn’t use a hammer to screw in a lightbulb, would you?
For internal-only services, ClusterIP is your go-to. It’s like having an unlisted phone number – it keeps things private within your cluster.
When you’re ready to go public and want an easy way to expose your service to the outside world, opt for a LoadBalancer service. It’s like having a grand opening sign on your store – hard to miss and open to all.
If you’re in a pinch and need a quick and temporary way to expose a service, NodePort can help. It’s like setting up a pop-up stand – it gets the job done but isn’t meant for the long haul.
Most importantly, the choice you make affects how traffic flows to your applications, so choose wisely based on your specific needs.
Setting Up a Robust Load Balancing Structure
Step-by-Step Guide to Implement a LoadBalancer Service
Let’s say you’ve decided on using a LoadBalancer service. Here’s how to get it up and running:
Create a configuration file for your service. Think of it as writing down the recipe for your favorite dish.
In the file, specify the type as LoadBalancer. This tells Kubernetes to prepare the banquet hall for your grand opening.
Define the ports and target pods. It’s like setting up tables and directing guests to their seats.
Apply the configuration using the kubectl apply command. It’s showtime!
Once you’ve executed these steps, Kubernetes takes over, working with your cloud provider to set up the external load balancer and routing traffic to your pods.
Integrating an Ingress Controller for Advanced Routing
Think of an Ingress Controller as the maître d’ of your Kubernetes restaurant. It’s a type of load balancer that manages external access by directing incoming traffic to the right services based on the URL.
To set up an Ingress Controller, you’ll need an Ingress resource. This is like a set of rules for your maître d’ – it tells them which guests (traffic) should be seated at which tables (services).
Customizing Health Checks for Optimal Traffic Management
Health checks are your secret sauce to ensuring that traffic is only sent to healthy pods. Kubernetes uses readiness and liveness probes to perform these checks:
Readiness probes determine if a pod is ready to handle traffic. If a server isn’t ready to take orders, you wouldn’t send customers their way, right?
Liveness probes check if a pod is alive and kicking. If a server has fainted, you’d want to know so you can provide assistance!
By configuring these probes, you ensure that your services are always up to the task of handling incoming requests.
That’s a wrap for the first part of our Kubernetes load balancing guide. Stay tuned for the next steps, where we’ll cover how to maintain high availability and leverage advanced features for a top-notch setup.
As you continue to refine your Kubernetes setup, you’ll want to ensure that you’re not putting all your eggs in one basket. That’s where leveraging multiple load balancers comes into play.
Leveraging Multiple Load Balancers for Improved Fault Tolerance
Using multiple load balancers is like having several doors in a busy restaurant. If one door gets jammed, customers can still come in through the others, ensuring business continues as usual. In Kubernetes, this means setting up multiple load balancer services or ingress controllers to handle incoming traffic. This strategy increases your system’s fault tolerance – if one load balancer fails, others can take over.
Finetuning Load Balancing with Advanced Features
Now that you have a handle on the basics, let’s fine-tune your load balancing strategy with some advanced features that Kubernetes offers.
Session Affinity and When to Use It
Session affinity is like giving a VIP pass to a returning customer, ensuring they get the same waiter each time they visit. In Kubernetes, you can use session affinity to direct requests from the same user to the same pod, which can be important for stateful applications or personalized user sessions.
To enable session affinity, set the
sessionAffinityproperty in your service configuration to “ClientIP”.Use session affinity cautiously, as it can lead to uneven load distribution if not managed properly.
Remember, while session affinity can improve user experience, it can also lead to certain pods being overworked. Balance is key.
Utilizing DNS Records for Smoother Load Distribution
Just like a well-organized address book helps you find contacts quickly, DNS records in Kubernetes help streamline how traffic finds its way to your services. By setting up DNS records that point to your load balancers, you can manage traffic with precision and ease.
For example, you might have a DNS record that points shop.example.com to your LoadBalancer’s IP address. This way, whenever someone visits that URL, they’re directed to your service without any fuss.
Efficiency with Least Connections and Consistent Hashing Techniques
Choosing the right load balancing algorithm is like picking the right gear for a bike ride – you want to make sure it matches the terrain. Kubernetes offers several algorithms, but two standout options are:
Least Connections: This algorithm sends new requests to the pod with the fewest active connections. It’s like a host who always knows which table has the least number of diners.
Consistent Hashing: This method uses a hash function to determine which pod will handle a request, which can be useful for caching by ensuring the same pod handles requests from the same user.
These techniques help distribute traffic more evenly, preventing any one pod from becoming overwhelmed.
Best Practices for Kubernetes Load Balancing
As with any technology, there are best practices that can help you get the most out of Kubernetes load balancing.
Here are a few key tips:
Regularly review and update your load balancing rules and configurations.
Monitor your load balancer’s performance and adjust as necessary to handle traffic spikes or lulls.
Ensure your load balancer’s health checks are properly configured to avoid routing traffic to failing pods.
Incorporating Cloud Provider Capabilities for Enhanced Performance
Most cloud providers offer their own load balancers that are designed to work seamlessly with Kubernetes. These often come with additional features like automated scaling, detailed monitoring, and enhanced security.
Take advantage of these features to optimize your load balancing setup.
For example, you might use AWS’s Elastic Load Balancing or Google Cloud’s Load Balancing services.
These services can greatly simplify the process of managing traffic to your Kubernetes applications.
Effective Use of Service Discovery and External Access
Service discovery is like having a directory that lists all the services in your Kubernetes cluster. It allows pods to find and communicate with each other without hardcoding IP addresses.
For external access, Kubernetes provides load balancers and ingress controllers. These allow you to expose your services to the outside world securely and efficiently, ensuring that external users can access your applications without a hitch.
Security Considerations for External Traffic and SSL Termination
When you’re exposing your services to the internet, security should be top of mind. SSL termination is the process of decrypting HTTPS traffic at the load balancer before passing it on to your pods. This offloads the encryption workload from your pods and centralizes your SSL management.
Make sure your load balancer is configured to handle SSL termination securely, using up-to-date protocols and ciphers to protect your data from prying eyes.
Streamlining Load Balancing Across Multiple Cloud Environments
Running Kubernetes across multiple clouds can be like playing a complex symphony – each instrument needs to be in perfect harmony. Load balancing in this setup requires careful coordination to ensure traffic is distributed evenly across different environments.
Managing a Global Server Load with a Multi-Cloud Strategy
A multi-cloud strategy allows you to spread your Kubernetes clusters across different cloud providers, balancing the load and reducing the risk of downtime. This is like having multiple branches of your restaurant in different neighborhoods – if one is too crowded or has an issue, customers can go to another location.
But remember, a multi-cloud approach can add complexity, so it’s crucial to have a solid plan and the right tools to manage your traffic across these environments.
Stay tuned for the final installment of this guide, where we’ll discuss common challenges and troubleshooting tips, as well as wrap up with a concise recap of all the key points covered.
Responding to Fluctuating Load and Performance Bottlenecks
Imagine you’re at an amusement park on a busy day. The lines for the rides can get long and frustrating, right? In Kubernetes, performance bottlenecks are like those long lines. They slow down your applications and can turn a smooth ride into a tedious wait. To keep the lines moving, you need to respond to fluctuating loads quickly and efficiently.
Monitoring is key. Keep a close eye on metrics like CPU and memory usage, response times, and error rates. Use tools like Prometheus and Grafana for real-time insights. When you see a bottleneck forming, you can adjust your load balancing strategy on the fly, perhaps by scaling out your pods or tweaking your load balancer’s rules.
Kubernetes Load Balancing Simplified
Load balancing doesn’t have to be a complex affair. At its core, it’s about making sure that your applications are always available and responsive, no matter how much traffic comes their way. By spreading the load across multiple pods and nodes, Kubernetes helps you keep your applications running smoothly, even under pressure.
Whether you’re using a simple ClusterIP service for internal traffic or a sophisticated LoadBalancer service with an Ingress Controller for external requests, Kubernetes offers the tools you need to manage your traffic with confidence. And with health checks and advanced routing features at your disposal, you can fine-tune your setup to handle any scenario.
Most importantly, remember that load balancing is not a set-it-and-forget-it task. It requires ongoing attention and adjustment to keep up with the changing demands of your applications and users.
Recap: Efficient Load Balancing in a Nutshell
So, what have we learned? Load balancing in Kubernetes is about distributing incoming traffic across a pool of servers – or pods, in Kubernetes lingo. It’s crucial for maintaining high availability and performance of your applications. You have a variety of service types to choose from, each suited to different needs. Health checks are your best friend for ensuring traffic goes to the right place, and advanced features like session affinity can further optimize the user experience. And finally, don’t forget to follow best practices and keep an eye on those performance metrics!
Frequently Asked Questions
What are the Main Types of Kubernetes Services?
Kubernetes offers several service types, each designed for different use cases:
ClusterIP: Used for internal communication within the cluster.
NodePort: Exposes a service on each node’s IP at a specific port. Read more about NodePort services.
LoadBalancer: Integrates with cloud providers to handle external traffic.
Can You Explain Ingress Resource in Simple Terms?
Think of Ingress as the traffic cop of your Kubernetes cluster. It manages external access to your services by providing HTTP and HTTPS routing. You define a set of rules in an Ingress resource, and the Ingress Controller enforces them, directing traffic to the appropriate services based on the request URL.
How Do I Expose My Kubernetes Pods to External Users?
Create a service of type LoadBalancer to expose your pods externally.
Use an Ingress resource for more complex routing requirements.
Both methods will assign an external IP address that external users can access.
What Is a Kube-Proxy Feature and How Does It Tie Into Load Balancing?
Kube-proxy is a network proxy that runs on each node in the cluster.
It maintains network rules that allow network communication to your pods from network sessions inside or outside of your cluster.
It enables the Kubernetes service abstraction by maintaining network rules on the host and performing connection forwarding.
Essentially, kube-proxy handles the routing and load distribution of traffic to the pods.
How Do I Safely Perform Load Distribution Across a Kubernetes Cluster?
Here’s how to ensure a safe and even load distribution:
Understanding load balancing in Kubernetes is essential for ensuring that your applications can scale properly and handle traffic efficiently. It involves distributing network traffic across multiple servers to ensure no single server bears too much demand. By spreading the load, Kubernetes can help avoid server overload and ensure high availability and reliability of applications.