Key Takeaways: Simplifying Persistent Storage in Kubernetes
Kubernetes Volumes ensure your data persists beyond pod restarts, and VolumeMounts let your containers access this data.
Persistent Volume Claims (PVCs) are your ticket to dynamically allocate storage resources as needed.
Choosing the right type of volume—be it hostPath, emptyDir, or NFS—depends on your specific needs for persistence and sharing.
Storage Classes in Kubernetes can automate the provisioning of storage, saving you time and preventing human error.
Understanding and using Kubernetes volumes and mounts is crucial for stateful applications that need to manage sensitive data safely and efficiently.
Let's talk about how to handle storage in Kubernetes. It's like giving each of your apps its own hard drive on the cloud. Now, if you're scratching your head wondering how to make that happen, don't worry. I'm here to guide you through the maze of Kubernetes VolumeMounts and Volumes. We'll look at how to use them and, most importantly, when to use them.
Unlocking the Power of Persistent Volumes
Imagine you have a toy box that follows you wherever you go. No matter where you are, your toys are always there. That's what Persistent Volumes (PVs) do for your data in Kubernetes. PVs are like your toy box, but for your apps. They make sure your data sticks around, even if your app has to move to a different place in the cloud.
Persistent Volumes are like a contract between your pod and the storage it needs. They're created by admins who know the ins and outs of the cluster's storage capabilities. Once a PV is in place, it's like having a reserved parking spot for your data.
A Deep Dive into Kubernetes Volumes
Before we get into the nitty-gritty, let's understand what a Kubernetes Volume is. Think of it as a folder on your computer, but this one's supercharged. It's not just on your machine; it's available to any app running in your Kubernetes cluster. And here's the kicker: it doesn't go poof when your app stops running. A volume can still be around long after the lifetime of a pod itself. Here's a quick rundown of some different types of volumes:
**emptyDir**: A simple shelf that gets cleaned out when the app, or pod, is removed. It's like a temporary workspace for your app.
**hostPath**: This one's more permanent. It sticks around on the node itself, so it's great for things that need to stay put, like logs.
**nfs**: Think of NFS as a shared network folder. It's great when you want multiple apps to access the same files.
Embracing Persistent Volume Claims for Dynamic Storage
Now, let's talk about getting your hands on that storage. That's where Persistent Volume Claims (PVCs) come into play. A PVC is like a storage request form. You tell Kubernetes what you need, and it finds a spot for you. It's like calling dibs on that toy box we talked about earlier. And the best part? You don't need to worry about the specifics. Kubernetes figures out where to get the storage from, so you can focus on building cool stuff.
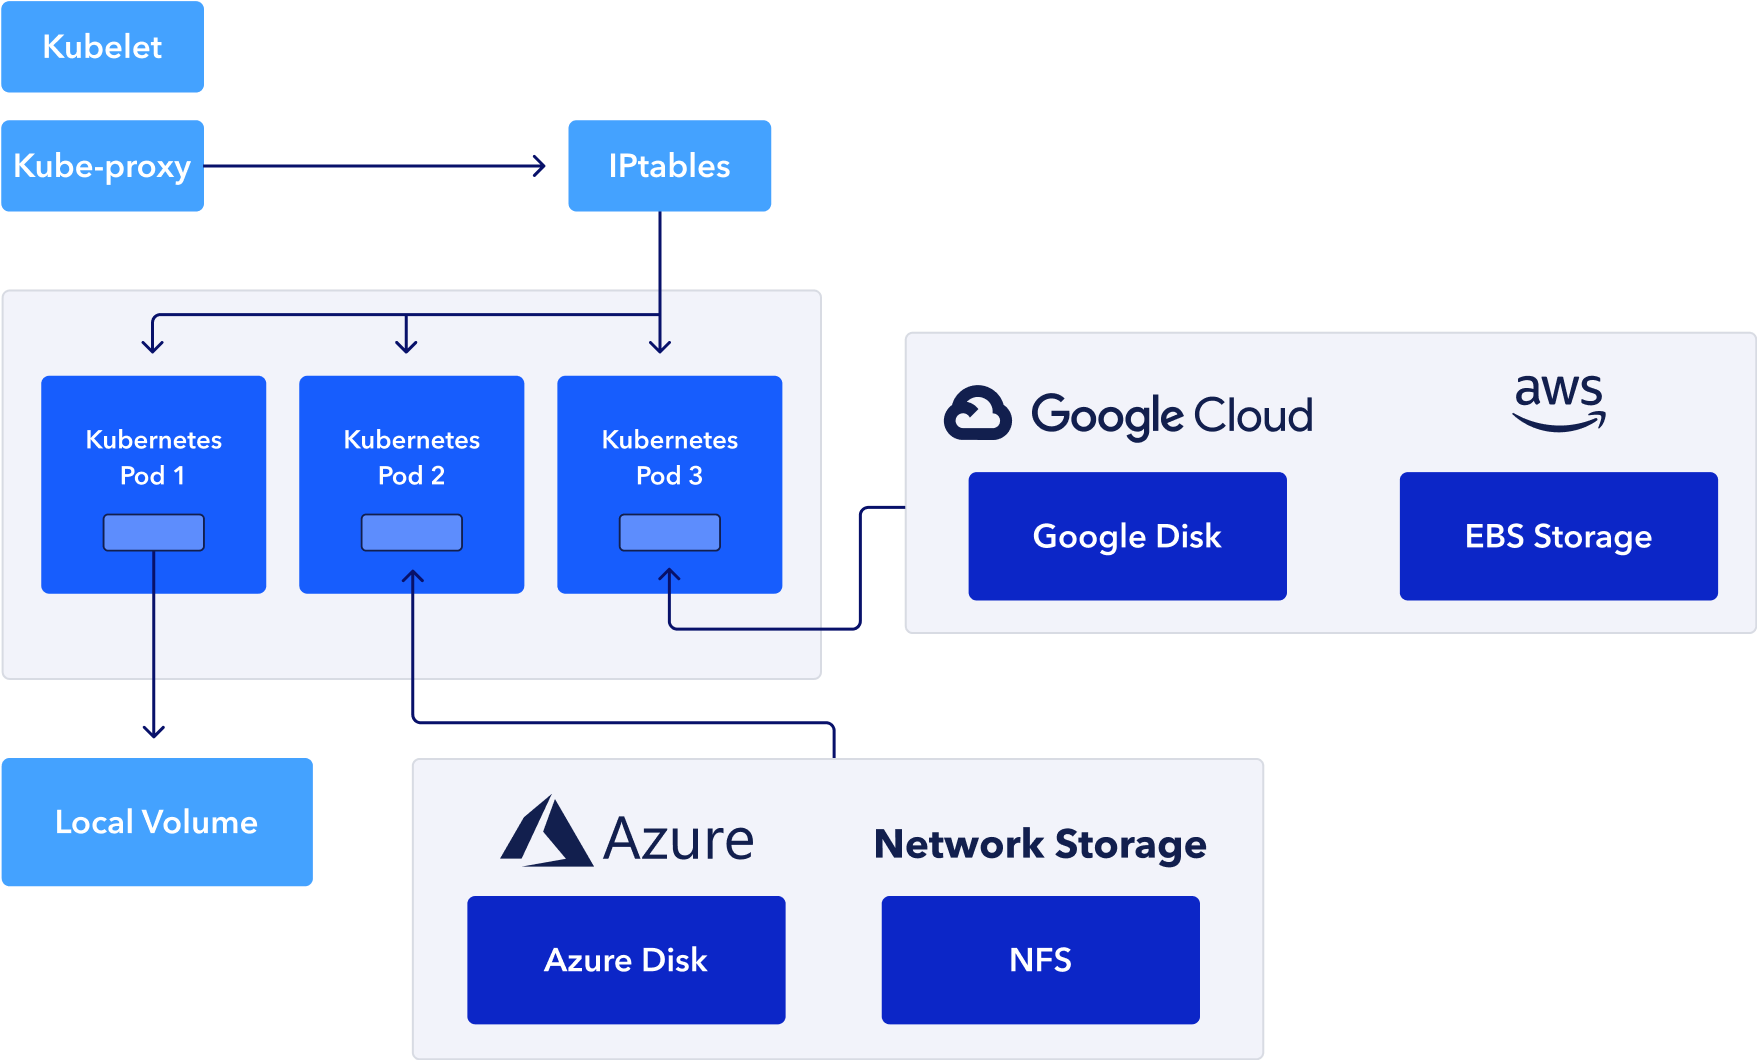
"How do Volumes work in Kubernetes" from cto.ai and used with no modifications.
Connecting Containers to Storage with Volume Mounts
Define where your app should look for its data using a path, like "/data".
Match the VolumeMount in your app's configuration to a Persistent Volume Claim.
Make sure the access modes (like read-only or read-write) match what your app needs.
When you've got your PVC and you know where your data's coming from, it's time to connect the dots. That's where VolumeMounts shine. They're like the plugs that connect your app to its storage. You decide where in your app's file system you want to access the data, and Kubernetes makes it happen.
Let's say your app needs to access a database file. You'd set up a VolumeMount to tell your app, "Hey, look in /var/myapp for your data." Kubernetes then ensures that the data from the PV is available right there, just like plugging in a USB drive into your laptop.
Defining Volume Mounts in Pod Specifications
Start with your pod's configuration file, usually a YAML file.
Add a **volumes** section to define the PVs your app needs.
Under each container in your pod, add a **volumeMounts** section to specify where to mount those volumes.
Getting your app to talk to its storage is a matter of some simple steps in your pod's configuration. You'll list out the volumes you've claimed, and then tell each container exactly where to find them. It's like giving each app its own map to its toy box.
Here's a little example to make things clear: for more detailed guidance, check out our Kubernetes ImagePullPolicy guide.
volumes:
- name: my-data
persistentVolumeClaim:
claimName: my-pvc
containers:
- name: my-container
image: my-image
volumeMounts:
- mountPath: "/var/myapp"
name: my-data
With this snippet, you're telling your container to look for its data in "/var/myapp", and that data is coming from the Persistent Volume Claim named "my-pvc".
Troubleshooting Common Volume Mount Challenges
Even with the best plans, things can go sideways. Maybe your app can't see its data, or the storage isn't sticking around like it should. When that happens, check a few things:
Ensure your [VolumeMount paths](https://slickfinch.com/blog/kubernetes-components-understanding-core-elements/) match up with where your app is looking.
Check that your PVCs are in good standing and that they're bound to the right PVs.
Verify that the storage classes and access modes are correctly set to meet your app's needs.
It's like making sure your toy box isn't locked or that it's not being shared with someone who keeps taking your toys. A quick checkup can save you a lot of headaches down the line.
Alright, we've covered a lot of ground here, but this is just the beginning. In the next sections, we'll dig deeper into choosing the right volume types and setting up your Kubernetes storage like a pro. Stick with me, and you'll be a Kubernetes storage wizard in no time.
Architecting Resilient Storage Solutions
Now that you're familiar with the basics, it's time to build a storage strategy that's as resilient as it is efficient. In the world of Kubernetes, resilience means ensuring your data is there when you need it, come rain or shine—or in tech terms, through pod restarts and node failures.
Selecting the Right Volume Type for Your Needs
Choosing the right type of volume for your application is like picking the right backpack for a hike. You've got to consider what you're carrying and the terrain you'll face. Here are a few options:
**hostPath**: Great for single-node setups, but remember, if your node goes down, so does your data.
**emptyDir**: Perfect for temporary data that's needed only as long as the pod is running.
**PersistentVolume (PV)**: The go-to for data that needs to stick around, no matter what happens to the pod.
Each type of volume serves different use cases, so choose wisely. And always think about the lifecycle of your data. Will it outlive the pod? Does it need to be shared across different services? These are the questions that'll point you to the right choice.
Optimizing Volume Utilization in Kubernetes Clusters
Optimization is key to making the most out of your resources. With Kubernetes, this means ensuring that your storage is used effectively and isn't sitting idle or, worse, wasting money.
Best Practices for Managing Volume Lifecycles
Good lifecycle management of volumes prevents clutter and cost overruns. Here's what you need to keep in mind: for a deeper understanding, consider exploring our comprehensive Kubernetes cost monitoring and management guide.
Regularly review and clean up unused volumes.
Automate the provisioning and de-provisioning of volumes with PVCs and StorageClasses.
Monitor your volume usage and performance to avoid bottlenecks.
It's like keeping your digital workspace tidy. A little bit of regular housekeeping goes a long way in maintaining a smooth operation.
Securing Volume Access with Kubernetes API
Security is non-negotiable, especially when it comes to data. Thankfully, Kubernetes has your back. By using the Kubernetes API, you can set up strict access controls on who can create, view, or delete your volumes. It's like having a bouncer for your data, ensuring only the VIPs—your authorized services and users—get in.
Remember to always define your security policies clearly. Use Role-Based Access Control (RBAC) to specify who can do what. And keep those policies updated; as your team and services evolve, so should your access controls.
Going Beyond Basics: Advanced Volume Types and Usage
Once you've got the hang of the standard volumes, it's time to explore the more advanced options. These can offer better performance, more flexibility, or suit specific scenarios better than your run-of-the-mill volumes.
Exploiting Ephemeral Volumes for Temporary Data Needs
Ephemeral volumes are the shooting stars of Kubernetes storage—they're there for a moment, bright and useful, and then they're gone. Use them for data that's transient, like caching layers or temporary computations. When the pod dies, so does the ephemeral volume, leaving no trace behind.
Integrating Network File Systems with NFS Volume
When you need multiple pods to access the same files, an NFS volume is like a shared drive for your cluster. It's a network file system that's accessible to all the pods that need it, making it ideal for collaborative applications or distributed systems.
Setting up an NFS volume is straightforward, but it requires a bit of networking know-how. You'll need to ensure your NFS server is reachable from within your Kubernetes cluster and properly configured for concurrent access.
Leveraging Storage Classes for Automated Provisioning
Storage Classes are like templates for creating Persistent Volumes. They're the secret sauce to dynamic provisioning, which is just a fancy way of saying "creating storage on-the-fly."
Understanding Dynamic Provisioning through Storage Classes
Dynamic provisioning is a game-changer. Instead of pre-provisioning a bunch of volumes and hoping you got the size and performance right, you let Kubernetes do the heavy lifting. When a PVC is created, Kubernetes uses the Storage Class to create a matching PV automatically. It's like ordering pizza and getting exactly what you asked for, every time, without having to make it yourself.
Example Storage Class for Dynamic Provisioning:
apiVersion: storage.k8s.io/v1
kind: StorageClass
metadata:
name: fast-storage
provisioner: kubernetes.io/gce-pd
parameters:
type: pd-ssd
This example tells Kubernetes to create Persistent Volumes on Google Compute Engine's SSD-backed storage when a PVC asks for the "fast-storage" class. It's that easy.
Comparing Static and Dynamic Persistent Volume Provisioning
Static provisioning is like meal-prepping for the week—you do all the work upfront. Dynamic provisioning, on the other hand, is like having a personal chef who makes whatever you want when you're hungry. Here's how they stack up:
| Static Provisioning | Dynamic Provisioning |
|---|---|
| Manually create PVs ahead of time | Kubernetes creates PVs as needed |
| Potential for unused resources | Resources created match demand |
| Requires more admin intervention | Less hands-on management needed |
Most folks are moving towards dynamic provisioning because it's more efficient and scales with your needs. It's like having a cloud that really is as flexible as it's supposed to be.
Practical Guide: Crafting Your Kubernetes Volume Strategy
Alright, let's put all this knowledge into action. Crafting your Kubernetes volume strategy is about understanding your app's needs and matching them to the right kind of storage. It's a balancing act between performance, cost, and manageability.
Step-by-Step: Configuring a Persistent Volume Claim
Configuring a PVC is like filling out a wish list. You tell Kubernetes what you want, and it goes to work to make it happen. Here's how you do it:
Create a PVC YAML file specifying the size and access modes you need.
Apply the YAML file using `kubectl apply -f your-pvc-file.yaml`.
Wait for Kubernetes to bind your PVC to an available PV.
Once your PVC is bound, you're good to go. Your app can now use the volume to store its data safely and securely.
In the next and final section, we'll tackle some frequently asked questions and wrap up with a neat bow on top. Stay tuned, because you're about to become the Kubernetes storage expert you always knew you could be.
Real-World Scenarios: When to Choose HostPath or EmptyDir Volumes
Let's get our hands dirty with some real-world scenarios. Say you're developing a local test environment on your single node cluster. You need to know the right kind of volume to use to suit your use case. A hostPath volume might be the right choice, as it allows your test data to persist on the node's disk. But, if you're running a stateless application that needs a scratch space for its temporary data, an emptyDir volume is more appropriate. It's like choosing between a safe deposit box for your valuables and a temporary locker for your gym bag.
Here's an example of when to use a hostPath volume:
apiVersion: v1
kind: Pod
metadata:
name: test-pod
spec:
containers:
- name: test-container
image: busybox
volumeMounts:
- mountPath: /test-storage
name: test-storage
volumes:
- name: test-storage
hostPath:
path: /data
type: Directory
This configuration mounts a directory from the host node's filesystem into the pod. It's perfect for scenarios where data needs to be retained even if the pod is deleted, like for logging or backups.
On the flip side, here's when an emptyDir volume comes into play:
apiVersion: v1
kind: Pod
metadata:
name: test-pod
spec:
containers:
- name: test-container
image: busybox
volumeMounts:
- mountPath: /test-storage
name: test-storage
volumes:
- name: test-storage
emptyDir: {}
In this case, the emptyDir volume provides a temporary space that is isolated to the pod's lifecycle. It's excellent for temporary files used by your application, like session data or caching.
Use **hostPath** for single-node persistence or for node-specific data.
Opt for **emptyDir** when you need a clean slate with each pod creation.
Remember, hostPath can pose security risks if used carelessly—only use it when absolutely necessary.
Choosing the right volume type is all about understanding your application's requirements and the context in which it runs. Consider the data's lifecycle, sharing needs, and the environment's constraints before making your choice.
FAQ: Addressing Your Kubernetes Volume Questions
By now, you might have a few questions brewing. Let's tackle some of the most common queries to help solidify your understanding of Kubernetes volumes and volummounts.
What Is the Difference Between Persistent Volumes and Ephemeral Volumes?
Persistent Volumes (PVs) are like your bank account—safe, secure, and your money (or data) sticks around as long as you need it. Ephemeral volumes, on the other hand, are like cash in your pocket—it's there for you to use, but once you spend it (or your pod terminates), it's gone. PVs are for data that needs to outlast the pod, while ephemeral volumes are for data that's as temporary as the pod itself.
How Do I Set Up a NFS Volume in Kubernetes?
Setting up an NFS volume in Kubernetes is like setting up a shared folder on your network. First, you need an NFS server with a shared directory. Then, in your Kubernetes pod configuration, you specify that you want to mount that NFS share. It's like telling your apps where the communal cookie jar is and giving them permission to take a cookie when they need it.
What Are the Security Implications of Using hostPath Volumes?
Using a hostPath volume can be like leaving your front door unlocked. It gives your pod access to the host's filesystem, which is powerful but risky. If your pod gets compromised, an attacker could potentially access sensitive parts of your host's filesystem. That's why it's crucial to use hostPath volumes judiciously and ensure that your security policies are airtight.
Can the Same Persistent Volume Be Used by Multiple Pods?
Yes, a Persistent Volume can be shared by multiple pods, but there's a catch. The access mode of the PV has to allow it. Think of it like a shared notebook. If everyone has a pen, they can all write at the same time (ReadWriteMany). But if it's a special pen that only one person can use at a time, you've got to take turns (ReadWriteOnce or ReadOnlyMany).
How Does Kubernetes Handle Storage Resources Across Different Nodes?
Kubernetes is like a maestro, orchestrating storage resources across different nodes in a cluster. It uses a combination of Persistent Volumes, Persistent Volume Claims, and Storage Classes to ensure that your data is available where and when your pods need it. It's a complex symphony of moving parts, but when done right, it's music to a developer's ears.
Understanding Kubernetes components is essential for anyone working with containerized applications. Kubernetes Volumes and VolumeMounts are two fundamental concepts that enable storage in a cluster to be used by containers. Volumes provide the storage space that containers in a pod can consume, while VolumeMounts are the paths inside the container that determine where the volumes should be mounted. Knowing when and how to properly configure them is crucial for ensuring your applications run smoothly and data persistence is handled correctly.