Kubernetes node selectors are crucial for assigning Pods to specific Nodes within a cluster.
Using node selectors effectively enhances application performance and resource utilization.
Labels are key to the node selector strategy, serving as the matching criteria for Pod placement.
Best practices include using built-in node labels and creating custom labels for complex scheduling needs.
Understanding the difference between node selectors and node affinity is essential for advanced scheduling techniques.
Unlock the Power of Kubernetes Node Selector
Imagine you’re the conductor of an orchestra. Each musician is an expert with their instrument, but it’s your job to make sure they’re sitting in the right section and playing in harmony. That’s what Kubernetes node selectors do for your cloud infrastructure. They ensure that each ‘musician’—or Pod, in Kubernetes terms—plays their part exactly where and when you need them to.
What is a Kubernetes Node Selector?
Let’s break it down. In Kubernetes, a node selector is a simple yet powerful way to control where your Pods are placed within the cluster. Think of it as a matchmaking service between Pods and Nodes. You label your Nodes with specific tags, and then you tell your Pods to look for those tags when they’re looking for a place to live. It’s like putting a “Room for Rent” sign on a Node, and only letting Pods with the right keywords move in.
Why does this matter? Because it lets you optimize. You can place Pods on Nodes with the right hardware, or you can keep certain Pods together for better communication. It’s all about making your applications run as smoothly and efficiently as possible.
Why Node Selection Matters in Cloud Infrastructure
Node selection isn’t just about neatness; it’s a vital part of managing a cloud-native environment. Here’s why:
Performance: Some Nodes are like sports cars, and others are more like minivans. You wouldn’t want to waste a sports car on a slow city tour, right? Node selectors help you match high-performance Pods with high-performance Nodes.
Cost Efficiency: By placing Pods on the most appropriate Nodes, you maximize resource utilization, which can save you money. It’s like carpooling; you’re using the space and fuel as efficiently as possible.
Compliance and Security: Sometimes, you need to keep data within certain geographic or regulatory boundaries. Node selectors can ensure that your Pods only run on Nodes that comply with those rules.
Now that we’ve covered the ‘what’ and ‘why,’ let’s dive into the ‘how.’
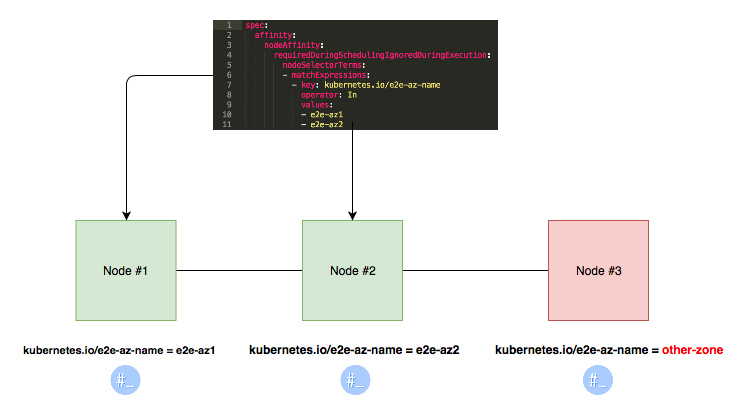
“Learn How to Assign Pods to Nodes in …” from medium.com and used with no modifications.
Crafting Your Strategy with Node Selector
Matching Pods to Nodes: How to Use Labels Effectively
Labels are the secret sauce of node selectors. They’re key-value pairs that you stick onto your Nodes like post-it notes. You might have labels like “gpu=true” for Nodes with a graphics processing unit, or “region=us-west” for Nodes in a particular location.
Here’s how you can start using labels:
First, label your Nodes. You can do this with a simple command like
kubectl label nodes <node-name> <label-key>=<label-value>. So, if you want to label a Node as having a GPU, you’d typekubectl label nodes mynode gpu=true.Next, in your Pod configuration, add a nodeSelector section that matches the labels you’ve used. It’s like telling your Pods, “Find a Node with a ‘gpu=true’ label.”
And that’s it! With those two steps, you’ve created a basic node selector. But let’s not stop there.
Setting Up Your Nodes for Success
Before you start slapping labels on everything, take a moment to plan. Think about the types of workloads you’re running and what they need. Do you have stateless applications that could run anywhere? Or do you have data-heavy workloads that need to be close to storage? Your labels should reflect these needs.
Also, consider using built-in labels. Kubernetes comes with a set of standard labels that you can use to describe a Node’s properties, like its hostname or operating system type. These can be incredibly handy for simple scheduling needs.
Leveraging Built-in Node Labels
Use Kubernetes’ built-in labels to quickly assign Pods to Nodes based on their existing characteristics.
Built-in labels include details like the Node’s operating system, hostname, and architecture.
These labels are automatically created and managed by Kubernetes, ensuring up-to-date and accurate Node information.
When you’re starting out with node selectors, it’s a good idea to get familiar with the built-in node labels that Kubernetes provides. These are labels that are automatically attached to each Node and can give you information about its operating system, hardware, and more. For instance, if you want to ensure that a Pod only runs on a Linux Node, you can use the ‘kubernetes.io/os=linux’ label that’s already there.
Using built-in labels is like having a head start in a race. You don’t have to spend time creating and managing these labels; Kubernetes does that for you. All you need to do is reference them in your Pod specifications, and you’re good to go. This approach is not only efficient but also reduces the risk of errors that might occur if you were to manage these labels manually.
But remember, while built-in labels are convenient, they might not cover all your scheduling needs. That’s where custom labels come into play.
Creating Custom Labels for Advanced Scheduling
There comes a time when built-in labels just don’t cut it. Maybe you have specific security requirements, or you’re dealing with specialized hardware that isn’t covered by the default labels. This is when you roll up your sleeves and create custom labels.
Creating custom labels allows you to tailor your node selection criteria to fit your unique needs. For example, if you’re dealing with sensitive data that can only be processed in a certified environment, you might create a label like ‘compliance=pci-dss’ to ensure that only Nodes with the right security certifications handle that data.
To create a custom label, you follow a similar process to using built-in labels. You label your Nodes with the custom key-value pairs, and then you reference those labels in your Pod specs. It’s a bit like writing your own rules for a game, ensuring that everything plays out just the way you need it to.
Node Affinity vs Node Selector: When to Use Each
Now, you might be wondering about node affinity. It sounds similar to node selector, right? Well, they’re related, but they serve different purposes. Node selector is like a bouncer at a club—it’s very strict about who gets in and who doesn’t. Node affinity, on the other hand, is more like a friendly host—it tries to guide guests to the best table, but it’s not as rigid.
Use node selector when you have hard requirements that must be met for a Pod to be placed on a Node. For example, if a Pod needs a GPU to function, you’d use a node selector to ensure it only lands on a Node with a GPU.
Node affinity is more flexible. It allows you to specify preferences rather than hard requirements. This means you can tell Kubernetes that you’d prefer a Pod to run on a Node with an SSD, but if that’s not possible, it’s not the end of the world—the Pod can run on a Node with a regular hard drive instead.
Advanced Techniques in Node Selection
Once you’ve got the basics down, it’s time to step up your game with some advanced techniques. These can help you fine-tune your Pod placement even further, making sure that your applications are running as efficiently as possible.
Integrating Taints and Tolerations with Node Selector
Taints and tolerations work alongside node selectors to give you even more control over Pod placement. A taint is like a “Keep Out” sign on a Node—it tells Pods to stay away unless they have a matching toleration. This can be useful when you have Nodes that are reserved for specific purposes, like high-security workloads or data-sensitive processes.
To use taints and tolerations, you first taint a Node with a command like kubectl taint nodes node1 key=value:taint-effect, where ‘taint-effect’ can be ‘NoSchedule’, ‘PreferNoSchedule’, or ‘NoExecute’. Then, in your Pod spec, you add a toleration that matches the taint. This tells Kubernetes that it’s okay for this Pod to be scheduled onto the tainted Node. For more detailed information, check out this Kubernetes deployment guide.
Utilizing Pod Topology Spread Constraints to Optimize Deployment
Pod topology spread constraints are a bit like social distancing for Pods—they help you spread out your Pods across different Nodes or even across different zones. This can improve resilience and availability, as it prevents too many Pods from being placed on the same Node or in the same area. For a practical guide on how to implement these constraints, check out Kubernetes startup probes.
To use pod topology spread constraints, you add a ‘topologySpreadConstraints’ section to your Pod spec, where you can specify minimum and maximum numbers of Pods per topology domain (like Nodes or zones) and set preferences for spreading Pods out. It’s a powerful tool for ensuring that your applications are not only efficient but also resistant to failures.
Critical Dos and Don’ts of Node Selector
As with any powerful tool, node selectors come with a set of best practices to keep in mind. Following these can mean the difference between a smoothly running system and a logistical nightmare.
Ensuring Label Consistency Throughout the Cluster
Consistency is key when it comes to labels. Make sure that your labels are applied uniformly across all relevant Nodes. Inconsistencies can lead to Pods not being scheduled where you expect them to be, or not being scheduled at all. It’s like giving someone directions—if you’re not consistent, they’re going to get lost.
Also, be mindful of label changes. If you update or remove a label that’s being used by a node selector, it could cause Pods to be rescheduled unexpectedly. Always double-check your changes and understand their implications before you make them.
Avoiding Common Pitfalls in Node Selection
Finally, watch out for common pitfalls. One of the biggest mistakes is over constraining your Pods. If you set too many specific requirements with your node selectors, you might find that no Nodes match, and your Pods get stuck in a pending state. It’s like throwing a party and only inviting people who can solve a Rubik’s Cube in under a minute—you might end up with a very empty room.
Another pitfall is neglecting to update your node selectors as your cluster evolves. As you add or retire Nodes, or as the needs of your applications change, you’ll need to revisit your node selectors to make sure they’re still doing what you need them to do.
By following these best practices and understanding the tools at your disposal, you can master the art of node selection in Kubernetes. It’s a powerful way to ensure that your applications are running on the right Nodes, with the right resources, at the right time.
Kubernetes node selectors are crucial for assigning Pods to specific Nodes within a cluster.
Using node selectors effectively enhances application performance and resource utilization.
Labels are key to the node selector strategy, serving as the matching criteria for Pod placement.
Best practices include using built-in node labels and creating custom labels for complex scheduling needs.
Understanding the difference between node selectors and node affinity is essential for advanced scheduling techniques.
FAQ
What is the difference between node selector and node affinity?
Node selectors and node affinity are both methods to control where Pods get deployed in a Kubernetes cluster, but they differ in flexibility and complexity. Node selectors are like a firm handshake; they make a strong, straightforward agreement about where Pods can be placed based on labels. If a Node doesn’t have the specified label, the Pod won’t be scheduled there—no exceptions.
Node affinity, on the other hand, is like a dance. It’s more nuanced and allows for both hard and soft preferences. This means you can set rules that must be met (hard affinity) or preferences that the scheduler will try to meet but aren’t mandatory (soft affinity). It’s a step up from node selectors, offering more fine-grained control over the scheduling process.
Can I use multiple labels for a node selector?
Yes, you can use multiple labels for a node selector, and it’s like putting together a puzzle. Each label is a piece of the puzzle, and when they all fit together, they form a complete picture of where your Pod should run. For instance, you might have a Pod that needs a GPU and is best located in a specific region. You can use labels like ‘gpu=true’ and ‘region=us-west’ to ensure the Pod lands on a Node that satisfies both conditions. For more details on how to assign Pods to Nodes, you can refer to the official Kubernetes documentation.
How does node selector interact with resource requests and limits?
Node selectors work alongside resource requests and limits, but they serve different purposes. Think of node selectors as the ‘where’ in the scheduling decision, guiding Pods to the right Nodes based on labels. Resource requests and limits, on the other hand, are the ‘how much’, specifying the amount of CPU and memory a Pod needs or is allowed to use.
While node selectors don’t directly affect the amount of resources a Pod can request or use, they can indirectly influence it by targeting Nodes with specific resource capacities. This way, you can ensure that your Pods are not only on the right type of Node but also have the resources they need to function effectively.
What happens if no nodes match the selector labels?
If no nodes in the cluster match the labels specified by the node selector, the Pod will remain unscheduled. It’s like throwing a party and specifying a dress code that no one can meet—no one shows up. The Pod will stay in a ‘Pending’ state until a Node with matching labels becomes available or the node selector is updated to match existing Nodes.
In this situation, you have a few options:
Review and possibly revise the node selector labels to ensure they correspond to actual labels on the Nodes.
Add the required labels to existing Nodes, if appropriate, to meet the criteria of the node selector.
Consider using node affinity for a more flexible approach that can specify soft requirements.
How can I update a node selector after a pod has been created?
Once a Pod is created, its node selector is set in stone like a message in a bottle—it can’t be changed. However, you can work around this by creating a new Pod with the updated node selector. Here’s how:
Delete the existing Pod, or let it complete its work if it’s already running on a Node.
Update the Pod specification with the new node selector criteria.
Re-create the Pod with the updated specification.
This process ensures that your Pod will be rescheduled according to the new node selector rules. It’s a bit like moving to a new house—you can’t change the address of your current one, but you can find a new place that meets your updated criteria.