
Key Takeaways
Migrating from Heroku to EKS offers greater scalability and control over your applications.
EKS provides enhanced security features and better integration with other AWS services.
Proper evaluation of your current Heroku environment is crucial for a smooth migration.
Using Docker and Helm Charts simplifies the deployment of applications to Kubernetes.
Ensuring data consistency during database migration is essential to avoid data loss.
Why Migrate from Heroku to EKS?
Heroku is an excellent choice for startups and small-scale applications because of its simplicity and ease of use. However, as your application grows, you might find that Heroku’s limitations in scalability, control, and cost-effectiveness become significant bottlenecks. This is where Kubernetes comes into play. While AKS and GKE are also perfectly viable options in a lot of cases, for this article we’ll focus on Amazon Elastic Kubernetes Service (EKS).
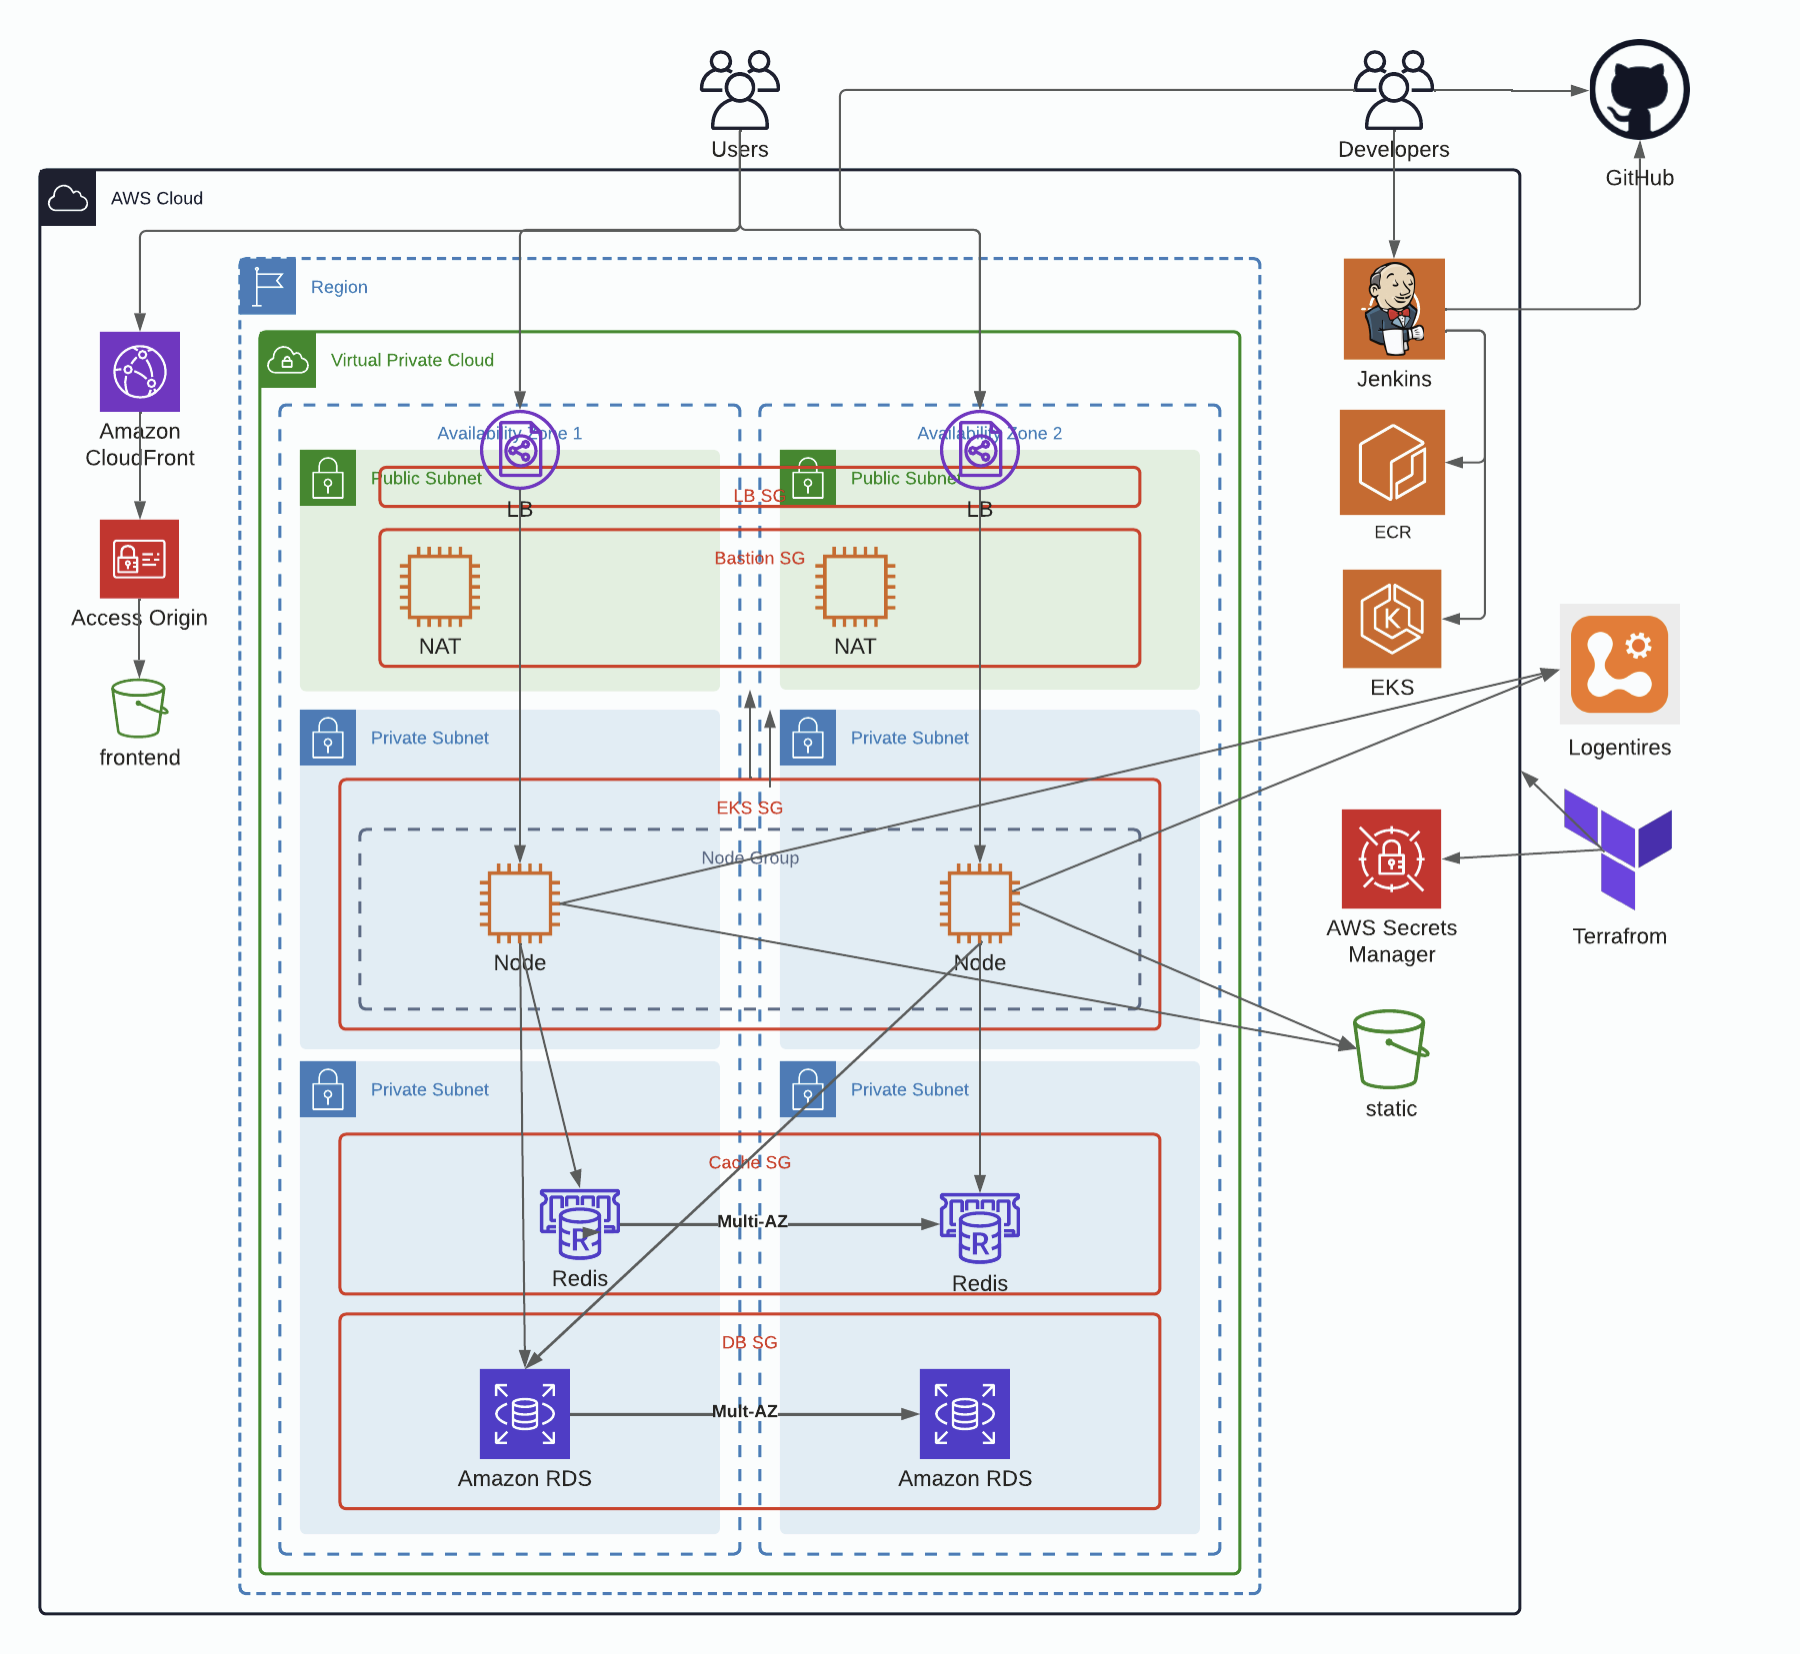
Amazon EKS offers a more robust and scalable environment for running containerized applications. It integrates seamlessly with other AWS services, providing better security, monitoring, and management capabilities. Migrating to EKS allows you to leverage the full power of Kubernetes, giving you greater control over your infrastructure and the ability to scale your applications more efficiently.
“Migration from Heroku to AWS EKS for …” from advascale.com and used with no modifications.
Overview of Heroku and EKS
Heroku is a Platform as a Service (PaaS) that abstracts much of the complexity of managing servers and infrastructure. It allows developers to focus on building applications without worrying about the underlying hardware. However, this simplicity comes at the cost of flexibility and control.
On the other hand, Amazon EKS is a managed Kubernetes service that provides more control and customization options. Kubernetes is an open-source container orchestration platform that automates the deployment, scaling, and management of containerized applications. With EKS, you can run Kubernetes on AWS without needing to install and operate your own Kubernetes control plane or nodes.
Heroku: Easy to use, but limited in scalability and control.
EKS: Offers more control, scalability, and integration with AWS services.
Key Benefits of EKS Over Heroku
Migrating to EKS from Heroku offers several key benefits:
Scalability: EKS can handle large-scale applications with ease, allowing you to scale your applications horizontally and vertically.
Control: With EKS, you have more control over your infrastructure, including the ability to customize your Kubernetes clusters.
Security: EKS provides enhanced security features, such as fine-grained access control with AWS IAM and network policies.
Integration: EKS integrates seamlessly with other AWS services, such as Amazon RDS, S3, and CloudWatch, making it easier to manage and monitor your applications.
Cost-Effectiveness: While EKS may have a steeper learning curve, it can be more cost-effective in the long run due to its scalability and pay-as-you-go pricing model.
Preparing for Migration
Before you begin the migration process, it’s essential to prepare thoroughly. This involves evaluating your current environment, setting up your EKS cluster, and planning resources and capacity.
Evaluating Your Current Environment
The first step in preparing for migration is to evaluate your current Heroku environment. Take inventory of your applications, databases, and any other services you are using. Identify any dependencies and configurations that will need to be replicated in the EKS environment.
Make sure to document the following:
List of applications and services running on Heroku.
Database configurations and data volume.
Environment variables and configurations.
Any third-party integrations or add-ons.
Setting Up the EKS Cluster
Once you have a clear understanding of your current environment, the next step is to set up your EKS cluster. This involves creating an Amazon EKS cluster and configuring it to match your requirements.
Follow these steps to set up your EKS cluster:
Create an EKS Cluster: Use the AWS Management Console, AWS CLI, or eksctl to create a new EKS cluster. Ensure you select the appropriate region and configure the cluster name and version.
Configure VPC and Subnets: Set up a Virtual Private Cloud (VPC) with the necessary subnets, route tables, and security groups. This will provide the networking infrastructure for your EKS cluster.
Launch Worker Nodes: Add worker nodes to your EKS cluster. These nodes will run your application containers. You can use AWS EC2 instances or managed node groups.
Install Kubernetes Tools: Install kubectl and configure it to interact with your EKS cluster. This will allow you to manage your Kubernetes resources.
Planning Resources and Capacity
Proper resource planning is crucial to ensure your EKS cluster can handle the load of your applications. Consider the following factors when planning resources and capacity:
Compute Resources: Determine the number and type of EC2 instances needed to run your applications. Consider factors such as CPU, memory, and storage requirements.
Scaling Policies: Define scaling policies to automatically adjust the number of worker nodes based on demand. This will help optimize resource utilization and cost.
Networking: Ensure your VPC and subnets are configured to provide sufficient IP addresses for your EKS cluster. Consider using Amazon VPC CNI plugin for efficient pod networking.
Security: Configure security groups, IAM roles, and network policies to secure your EKS cluster and applications.
Application Migration Steps
With your EKS cluster set up and resources planned, it’s time to start migrating your applications. This involves creating Docker images, setting up Kubernetes deployments, and using Helm Charts for configuration.
Creating Docker Images
Docker is a crucial tool for containerizing your applications. To migrate your applications to EKS, you need to create Docker images for each application. Follow these steps to create Docker images:
Write a Dockerfile: Create a Dockerfile for each application, specifying the base image, dependencies, and application code. Here’s an example Dockerfile for a Node.js application:
FROM node:14
WORKDIR /app
COPY package*.json ./
RUN npm install
COPY . .
EXPOSE 3000
CMD [“node”, “index.js”]
Build the Docker Image: Use the Docker CLI to build the Docker image. Run the following command in the directory containing your Dockerfile:
docker build -t your-app-name .
Push the Docker Image to a Registry: Push the built Docker image to a container registry, such as Amazon ECR, Docker Hub, or any other registry of your choice. For more advanced techniques, check out our guide on Kubernetes cluster performance tuning. Run the following commands to tag and push the image:
docker tag your-app-name:latest your-registry-url/your-app-name:latest
docker push your-registry-url/your-app-name:latest
Setting Up Kubernetes Deployments
Once you have your Docker images ready, the next step is to set up Kubernetes deployments for your applications. Kubernetes deployments manage the deployment and scaling of your application containers. Follow these steps to set up Kubernetes deployments and achieve zero-downtime deployment:
1. Create a Deployment YAML File: Write a Kubernetes deployment YAML file for each application. This file defines the desired state of your application, including the Docker image, replicas, and environment variables. Here’s an example deployment YAML file:
2. Apply the Deployment: Use kubectl to apply the deployment YAML file to your EKS cluster. Run the following command:
apiVersion: apps/v1
kind: Deployment
metadata:
spec:
replicas: 3
selector:
matchLabels:
app: your-app-name
metadata:
labels:
app: your-app-name
spec:
containers:
- name: your-app-name
image: your-registry-url/your-app-name:latest
ports:
- containerPort: 3000
kubectl apply -f your-deployment-file.yaml
3. Verify the Deployment: Ensure that the deployment is successful and the application pods are running. Use the following command to check the status of your deployment:
kubectl rollout status deployment/your-deployment
This command will provide output indicating whether the deployment is successfully rolled out or if there are any issues.
Additionally, you can use the following command to get an overview of your deployments and their current state:
kubectl get deployments
And for more detailed information about a specific deployment, including the number of desired, current, up-to-date, and available replicas, you can use:
kubectl describe deployment your-deploymentUsing Helm Charts for Configuration
Helm is a package manager for Kubernetes that simplifies the deployment and management of applications. Using Helm Charts allows you to define, install, and upgrade complex Kubernetes applications with ease. Follow these steps to use Helm Charts for configuration:
1. Install Helm: Install Helm on your local machine by following the instructions on the official Helm website.
2. Create a Helm Chart: Create a new Helm Chart for your application using the following command:
helm create your-app-name
This command generates a directory structure with default configuration files for your Helm Chart.
3. Customize the Helm Chart: Modify the generated files to match your application’s requirements. Update the values.yaml file with your application’s configuration, such as the Docker image, environment variables, and resource limits. Learn more about overcoming Helm limitations to ensure your deployment process is smooth.
4. Install the Helm Chart: Use Helm to install the Helm Chart on your EKS cluster. Run the following command:
To get started with Helm, you can use the command:
helm install your-release-name ./your-app-name
5. Verify the Installation: Ensure that the Helm Chart installation is successful and the application pods are running. Use the following command to check the status of your Helm release:
helm status your-release-name
Database Migration Strategy
In addition to migrating your applications, you also need to migrate your databases from Heroku to AWS. This involves evaluating your current database setup, transitioning to Amazon RDS or Aurora, and ensuring data consistency and integrity.
Evaluating Your Database Setup on Heroku
Start by evaluating your current database setup on Heroku. Identify the type of database you are using (e.g., PostgreSQL, MySQL), the data volume, and any configurations or extensions you are using. Make a note of any specific requirements, such as performance, availability, and backup policies.
Document the following details:
Database type and version.
Data volume and growth rate.
Configurations and extensions.
Backup and recovery policies.
Transitioning to Amazon RDS or Aurora
Amazon RDS and Aurora are managed database services that provide high availability, scalability, and performance. Depending on your requirements, you can choose between RDS and Aurora for your database migration.
Follow these steps to transition your database to Amazon RDS or Aurora:
Create a New RDS or Aurora Instance: Use the AWS Management Console to create a new RDS or Aurora instance. Select the appropriate database engine, instance type, and storage options based on your requirements.
Configure Security Groups and Subnets: Set up security groups and subnets to allow secure access to your database instance. Ensure that your EKS cluster can communicate with the database instance.
Backup and Export Data from Heroku: Create a backup of your Heroku database and export the data to a format compatible with your new RDS or Aurora instance. You can use tools like pg_dump for PostgreSQL or mysqldump for MySQL.
Import Data to RDS or Aurora: Import the exported data into your new RDS or Aurora instance. Use tools like psql for PostgreSQL or mysql for MySQL to load the data.
Verify Data Consistency: Ensure that the data has been imported correctly and that there are no inconsistencies or missing data. Perform data validation checks to confirm the integrity of the data.
Ensuring Data Consistency and Integrity
Maintaining data consistency and integrity during the migration process is crucial to avoid data loss or corruption. Follow these best practices to ensure data consistency and integrity:
Perform Regular Backups: Regularly backup your databases during the migration process to ensure that you can recover data in case of any issues.
Validate Data: Perform data validation checks before and after the migration to ensure that the data is consistent and accurate.
Use Transactional Replication: If possible, use transactional replication to synchronize data between your Heroku database and the new RDS or Aurora instance. This ensures minimal downtime and data consistency.
Monitor Data Migration: Monitor the data migration process closely to identify and resolve any issues promptly.
Networking and Security
Ensuring robust networking and security is essential for the successful operation of your EKS cluster. This includes setting up VPCs and subnets, configuring security groups and IAM roles, and implementing secure connections with TLS.
Networking and security configurations help protect your applications and data from unauthorized access and attacks, providing a secure environment for your workloads.
Setting Up VPCs and Subnets
A Virtual Private Cloud (VPC) provides a logically isolated network environment for your EKS cluster. Setting up VPCs and subnets involves creating a network architecture that supports your applications’ connectivity and security requirements.
Follow these steps to set up VPCs and subnets:
Create a VPC: Use the AWS Management Console or AWS CLI to create a new VPC. Specify the CIDR block to define the IP address range for your VPC.
Create Subnets: Divide the VPC into multiple subnets, each representing a different availability zone. This ensures high availability and fault tolerance for your applications.
Configure Route Tables: Set up route tables to control traffic flow between subnets and external networks. Define routes for internet access and inter-subnet communication.
Set Up Internet Gateway: Attach an Internet Gateway to the VPC to enable internet access for your public subnets. Configure route tables to direct internet-bound traffic through the gateway.
Configuring Security Groups and IAM Roles
Security groups and IAM roles are essential for controlling access to your EKS cluster and its resources. Security groups act as virtual firewalls, while IAM roles define permissions for your applications and users.
Follow these steps to configure security groups and IAM roles:
Create Security Groups: Define security groups to control inbound and outbound traffic to your EKS cluster. Specify rules to allow or deny traffic based on IP addresses, ports, and protocols.
Assign Security Groups to Resources: Attach security groups to your EKS cluster, worker nodes, and other resources. Ensure that the security groups are configured to allow necessary communication between components.
Create IAM Roles: Use the AWS Management Console or AWS CLI to create IAM roles for your EKS cluster and applications. Define policies that grant the required permissions for accessing AWS services and resources.
Attach IAM Roles to Resources: Attach IAM roles to your EKS cluster, worker nodes, and other resources. Ensure that the roles are correctly configured to provide the necessary permissions.
Implementing Secure Connections with TLS
Transport Layer Security (TLS) is a cryptographic protocol that ensures secure communication between your applications and clients. Implementing TLS helps protect data in transit from eavesdropping and tampering.
Follow these steps to implement secure connections with TLS:
Obtain SSL/TLS Certificates: Use a Certificate Authority (CA) to obtain SSL/TLS certificates for your domain. You can use AWS Certificate Manager (ACM) to manage certificates easily.
Configure Ingress Controllers: Set up Ingress controllers in your EKS cluster to manage incoming traffic. Configure the controllers to use the SSL/TLS certificates for secure communication.
Update Application Configurations: Modify your application configurations to use HTTPS instead of HTTP. Ensure that your applications are configured to validate SSL/TLS certificates.
Test Secure Connections: Verify that your applications are accessible over HTTPS and that the SSL/TLS certificates are correctly installed and validated.
Implementing CI/CD Pipelines
Continuous Integration and Continuous Deployment (CI/CD) pipelines automate the process of building, testing, and deploying applications. Implementing CI/CD pipelines for your EKS cluster ensures that your applications are consistently delivered with high quality and reliability.
Integrating Code Repositories
The first step in setting up CI/CD pipelines is to integrate your code repositories. This involves connecting your source code management system, such as GitHub or GitLab, with your CI/CD tools.
Follow these steps to integrate code repositories: Overcoming Helm limitations can be a crucial part of this process.
Choose a CI/CD Tool: Select a CI/CD tool that supports integration with your code repository. Popular options include AWS CodePipeline, Jenkins, and GitLab CI/CD.
Connect Your Code Repository: Configure your CI/CD tool to connect to your code repository. This typically involves providing access tokens or credentials to allow the CI/CD tool to access your repository.
Define Build and Deployment Pipelines: Create build and deployment pipelines in your CI/CD tool. Define the steps required to build, test, and deploy your applications to the EKS cluster.
Configuring Continuous Integration with GitHub Actions
GitHub Actions is a powerful CI/CD service that automates the release process for your applications, and would always be our choice. Configuring continuous integration with GitHub Actions ensures that your code changes are automatically built and tested.
Follow these steps to configure continuous integration with GitHub Actions:
- Create a Workflow: Use the GitHub repository to create a new workflow. Define the source, build, and deploy steps for your workflow in a YAML file located in the
.github/workflowsdirectory. - Configure Source Stage: Define the source stage to trigger the workflow on code changes. This typically involves specifying events such as
pushorpull_requestto monitor for changes in specific branches. - Configure Build Stage: Define the build stage to compile and package your code. Use GitHub Actions’ built-in runners or configure a custom runner to execute the build process. Specify the necessary build steps and dependencies in the workflow file.
- Configure Deploy Stage: Define the deploy stage to deploy your application. Use deployment actions or custom scripts to manage the deployment process to your target environment, such as a Kubernetes cluster.
- Test the Workflow: Trigger the workflow to test the integration and ensure that the build and deployment stages are working correctly. Monitor the workflow runs and logs in the GitHub Actions tab of your repository to validate the process.
Automating Deployments to EKS
Automating deployments to EKS ensures that your applications are consistently and reliably deployed to your cluster. This involves configuring your CI/CD pipelines to automatically deploy new code changes to the EKS cluster.
Follow these steps to automate deployments to EKS:
Define Deployment Strategies: Choose a deployment strategy that suits your application’s requirements. Common strategies include rolling updates, blue-green deployments, and canary deployments.
Configure Deployment Tools: Use deployment tools such as AWS CodeDeploy, Helm, or Kubernetes native tools to manage the deployment process. Ensure that the tools are integrated with your CI/CD pipelines.
Monitor Deployments: Monitor the deployment process to ensure that it completes successfully. Use tools like AWS CloudWatch, Prometheus, and Grafana to track deployment metrics and identify any issues.
Monitoring and Scaling Applications
Monitoring and scaling your applications in EKS is essential to ensure their performance, availability, and reliability. This involves setting up monitoring tools, implementing autoscaling, and ensuring observability and logging.
Proper monitoring and scaling help you identify and resolve issues quickly, optimize resource utilization, and maintain high availability for your applications.
Setting Up Monitoring with Prometheus and Grafana
Prometheus and Grafana are popular open-source tools for monitoring and visualizing metrics. Setting up Prometheus and Grafana in your EKS cluster allows you to monitor the performance and health of your applications.
Follow these steps to set up monitoring with Prometheus and Grafana:
Install Prometheus: Use Helm to install Prometheus in your EKS cluster. Run the following command:
helm install prometheus stable/prometheus
Configure Prometheus: Modify the Prometheus configuration to scrape metrics from your application pods. Update the prometheus.yaml file with the necessary scrape configurations.
Install Grafana: Use Helm to install Grafana in your EKS cluster. Run the following command:
helm install grafana stable/grafana
Configure Grafana: Connect Grafana to Prometheus as a data source. Create dashboards in Grafana to visualize the metrics collected by Prometheus.
Implementing Autoscaling in EKS
Autoscaling ensures that your applications can handle varying loads by automatically adjusting the number of running pods. Implementing autoscaling in EKS helps optimize resource utilization and maintain application performance.
Follow these steps to implement autoscaling in EKS:
Enable Cluster Autoscaler: Install and configure the Cluster Autoscaler in your EKS cluster. The Cluster Autoscaler automatically adjusts the number of worker nodes based on the resource demands of your applications.
Configure Horizontal Pod Autoscaler (HPA): Set up the Horizontal Pod Autoscaler to automatically scale the number of pods based on CPU and memory usage. Define the HPA configuration in a YAML file and apply it to your EKS cluster.
Monitor Autoscaling: Use monitoring tools like Prometheus and Grafana to track the performance and behavior of the autoscaling components. Ensure that the autoscaling policies are working as expected.
Ensuring Observability and Logging
Observability and logging are crucial for understanding the behavior and performance of your applications. Implementing observability and logging solutions helps you identify and troubleshoot issues quickly.
Follow these steps to ensure observability and logging in your EKS cluster:
Set Up Centralized Logging: Use tools like Fluentd or Logstash to collect and aggregate logs from your application pods. Send the logs to a centralized logging service like Amazon CloudWatch Logs or Elasticsearch.
Implement Tracing: Use tracing tools like Jaeger or AWS X-Ray to trace the flow of requests through your applications. This helps you identify performance bottlenecks and latency issues.
Create Dashboards: Use Grafana or Kibana to create dashboards that visualize logs, metrics, and traces. This provides a comprehensive view of your application’s health and performance.
Final Switchover and Testing
After migrating your applications and databases, and setting up networking, security, CI/CD pipelines, monitoring, and autoscaling, it’s time for the final switchover and testing. This involves performing a gradual traffic switchover, testing application performance, and monitoring post-migration stability. For more insights on achieving zero downtime deployment, read our detailed guide.
Performing a Gradual Traffic Switchover
Performing a gradual traffic switchover ensures a smooth transition from Heroku to EKS. This involves gradually shifting traffic from your Heroku applications to your EKS cluster to minimize downtime and disruption.
Follow these steps to perform a gradual traffic switchover:
Set Up DNS Records: Update your DNS records to point to your EKS cluster. Use a low Time-To-Live (TTL) value to allow for quick updates.
Gradually Shift Traffic: Use traffic management tools like AWS Route 53 or a service mesh like Istio to gradually shift traffic from Heroku to EKS. Monitor the traffic flow and application performance during the switchover.
Monitor and Test: Continuously monitor the performance and stability of your applications during the traffic switchover. Perform thorough testing to ensure that all functionalities are working correctly.
Complete the Switchover: Once you are confident that the EKS cluster is handling the traffic smoothly, complete the switchover by fully redirecting traffic to the EKS cluster and decommissioning the Heroku applications.
Testing Application Performance
Testing application performance is crucial to ensure that your migrated applications are running efficiently on EKS. This involves conducting performance tests, load tests, and stress tests to identify any performance bottlenecks and optimize resource utilization.
Follow these steps to test application performance:
Conduct Performance Tests: Use tools like Apache JMeter or Locust to simulate user traffic and measure the performance of your applications. Identify any slow response times or high latency issues.
Perform Load Tests: Simulate high traffic loads to evaluate how your applications handle increased demand. Ensure that your applications can scale horizontally to accommodate the load.
Run Stress Tests: Push your applications to their limits by simulating extreme traffic conditions. Identify any potential points of failure and optimize resource allocation to handle peak loads.
Analyze Results: Analyze the results of your performance tests and make necessary optimizations to improve application performance. Monitor key metrics such as response times, error rates, and resource utilization.
Monitoring Post-Migration Stability
Monitoring post-migration stability is essential to ensure that your applications continue to perform well after the migration. This involves setting up monitoring and alerting systems to track the health and performance of your applications.
Follow these steps to monitor post-migration stability:
Set Up Monitoring Tools: Use monitoring tools like Prometheus, Grafana, and AWS CloudWatch to collect and visualize metrics from your applications. Monitor key performance indicators (KPIs) such as CPU usage, memory usage, and response times.
Configure Alerts: Set up alerts to notify you of any performance issues or anomalies. Define thresholds for critical metrics and configure alerting rules to trigger notifications when these thresholds are breached.
Perform Regular Health Checks: Conduct regular health checks to ensure that your applications are running smoothly. Use automated health check scripts to monitor the status of your application components and identify any potential issues.
Analyze Logs and Traces: Continuously analyze logs and traces to identify any errors or performance bottlenecks. Use tools like Fluentd, Elasticsearch, and Kibana to aggregate and visualize logs and traces.
Common Migration Challenges
Migrating from Heroku to EKS can present several challenges that need to be addressed to ensure a successful migration. These challenges include handling downtime and rollbacks, managing differences in platform features, and ensuring team preparedness and training.
Handling Downtime and Rollbacks
Downtime and rollbacks are common challenges during the migration process. To minimize downtime and ensure a smooth transition, it’s essential to have a robust rollback strategy in place.
Follow these steps to handle downtime and rollbacks:
Plan for Downtime: Schedule the migration during a low-traffic period to minimize the impact on users. Communicate the planned downtime to your users in advance.
Implement Blue-Green Deployments: Use blue-green deployments to minimize downtime. Deploy the new version of your application in parallel with the existing version and gradually shift traffic to the new version.
Test Rollback Procedures: Test your rollback procedures thoroughly before the migration. Ensure that you can quickly revert to the previous version of your application in case of any issues.
Monitor the Migration Process: Continuously monitor the migration process to identify any issues early. Have a rollback plan in place to revert to the previous state if necessary.
Managing Differences in Platform Features
Heroku and EKS have different features and capabilities, which can present challenges during the migration process. Managing these differences requires careful planning and adaptation.
Follow these steps to manage differences in platform features:
Identify Feature Gaps: Identify any feature gaps between Heroku and EKS. Determine how these gaps will impact your applications and plan for necessary adjustments.
Use Equivalent Services: Use equivalent AWS services to replace Heroku-specific features. For example, use Amazon RDS for database management and AWS Lambda for serverless functions.
Adapt Application Configurations: Adapt your application configurations to work with EKS. Update environment variables, configuration files, and deployment scripts to match the EKS environment.
Test Compatibility: Test your applications thoroughly to ensure compatibility with EKS. Identify and resolve any issues related to platform differences.
Ensuring Team Preparedness and Training
Ensuring that your team is prepared and trained for the migration is crucial for its success. This involves providing training on EKS, Kubernetes, and AWS services, as well as establishing clear communication and collaboration processes.
Follow these steps to ensure team preparedness and training:
Provide Training: Provide training sessions on EKS, Kubernetes, and AWS services. Ensure that your team members have a good understanding of the new environment and its capabilities.
Establish Communication Channels: Establish clear communication channels for the migration process. Use tools like Slack or Microsoft Teams to facilitate real-time communication and collaboration.
Assign Roles and Responsibilities: Assign clear roles and responsibilities to team members for the migration. Ensure that everyone knows their tasks and how they contribute to the overall migration plan.
Conduct Dry Runs: Conduct dry runs of the migration process to identify any potential issues and ensure that the team is well-prepared. Use these dry runs to refine the migration plan and address any gaps in knowledge or skills.
Conclusion and Recommendations
Migrating from Heroku to EKS offers numerous benefits, including greater scalability, control, and integration with AWS services. However, the migration process requires careful planning, thorough testing, and robust monitoring to ensure a successful transition.
Key Takeaways from the Migration
Thoroughly evaluate your current Heroku environment before starting the migration.
Set up your EKS cluster with proper networking, security, and resource planning.
Create Docker images and use Helm Charts for efficient application deployment.
Ensure data consistency and integrity during the database migration process.
Implement CI/CD pipelines for automated builds and deployments.
Monitor and scale your applications using tools like Prometheus, Grafana, and autoscaling policies.
Perform a gradual traffic switchover and test application performance thoroughly.
Future Optimization Strategies
After completing the migration, consider implementing future optimization strategies to further enhance the performance and reliability of your applications. These strategies may include:
Implementing Advanced Monitoring: Use advanced monitoring tools and techniques to gain deeper insights into your application’s performance and behavior.
Optimizing Resource Utilization: Continuously optimize resource utilization by fine-tuning autoscaling policies and resource allocations.
Enhancing Security: Implement additional security measures, such as network policies, encryption, and regular security audits, to protect your applications and data.
Improving CI/CD Pipelines: Continuously improve your CI/CD pipelines to streamline the development and deployment process further.
Final Thoughts
Migrating from Heroku to EKS is a significant step towards achieving greater scalability, control, and integration with AWS services. By following the steps outlined in this article, you can ensure a smooth and successful migration process. Remember to continuously monitor and optimize your applications to maintain their performance and reliability in the new environment.
Frequently Asked Questions (FAQs)
What are the main benefits of migrating from Heroku to EKS?
The main benefits of migrating from Heroku to EKS include greater scalability, control over your infrastructure, enhanced security features, better integration with other AWS services, and cost-effectiveness in the long run.
How long does the migration process typically take?
The duration of the migration process can vary depending on the complexity and size of your applications and databases. It typically takes several weeks to a few months to complete the migration, including planning, setup, testing, and switchover.
What tools are essential for a successful migration?
Essential tools for a successful migration include Docker for containerizing applications, Helm for managing Kubernetes configurations, AWS CodePipeline for CI/CD automation, Prometheus and Grafana for monitoring, and Fluentd or Logstash for centralized logging.