Imagine you’re the captain of a ship, but instead of the sea, you’re navigating the vast digital ocean of a Kubernetes cluster. Now, as captain, you need to ensure that each part of your ship is functioning properly, no matter where it sails. That’s where Kubernetes Daemonset comes in – it’s like having a trusty first mate on board every vessel in your fleet, keeping essential services running smoothly.
But before we dive deeper, let’s get a clear view of what we’re talking about.
Key Takeaways
A Kubernetes Daemonset ensures a copy of a pod runs on all, or a specific subset of, nodes in a cluster.
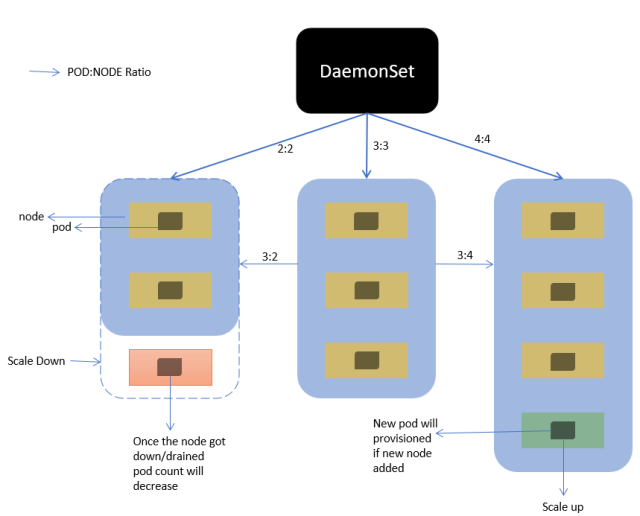
When a new node is added to the cluster, the Daemonset automatically deploys the necessary pod to it.
Daemonsets are ideal for node-level services like network plugins, log collectors, and monitoring agents.
Managing Daemonsets involves creating a YAML file and using the kubectl command-line tool to apply it.
Best practices include using node selectors, setting resource requests, and defining update strategies for Daemonsets.
Unleash Efficiency: Setting Up a Kubernetes Daemonset
Let’s start with the basics. A Kubernetes Daemonset is like a magic wand for developers and system administrators. It allows you to automatically run a specific pod on every node in your cluster. Think of it as ensuring that every room in your hotel has room service, without you having to call and order it each time.
What’s a Daemonset and Why It Matters
Daemonsets are essential for running background tasks that need to be present on all, or certain, nodes. This could be something like a log collector that gathers data from each node to help you keep an eye on how your application is doing.
For example, if you have a fleet of ships, you’d want a member of the crew on each one to send back reports on how the journey is going. Daemonsets automate this process in the Kubernetes world.
Effortless Node Management with Daemonset
With Daemonsets, when you add a new node to your cluster, you don’t have to worry about manually deploying these background services. The Daemonset takes care of it for you, making sure your new node is equipped with all the necessary tools from the get-go.

“Kubernetes: DaemonSets. DaemonSet is a …” from yuminlee2.medium.com and used with no modifications.
Launching Your First Daemonset
Now, let’s talk about how you can launch your first Daemonset. Don’t worry, it’s not as daunting as it sounds. It’s like teaching your ship to automatically send out a drone to inspect for damage every time it docks at a new port.
Decoding the Daemonset YAML File
First things first, you’ll need to create a YAML file. This file is like the instruction manual for your Daemonset – it tells Kubernetes what to do. Here’s a simple breakdown of what goes into this file:
apiVersion: Which version of the Kubernetes API you’re using.
kind: This is where you specify that you’re creating a Daemonset.
metadata: Here you’ll name your Daemonset and add other identifying information.
spec: This is the meat of the file, where you define the pod template and the selector that determines which nodes the Daemonset should run on.
Once you have your YAML file ready, you’re just a step away from setting sail. For more detailed information on the components and configurations, see our guide on Kubernetes components.
Executing the Following Command
To deploy your Daemonset, you’ll use the kubectl command-line tool. Think of it as your ship’s control panel. With a simple command, you can launch your Daemonset across the cluster:
kubectl apply -f your-daemonset-file.yaml
And just like that, you’ve deployed your first Daemonset. Congratulations, Captain! Your fleet is now equipped with automated room service.
Stay tuned for the next part of our journey, where we’ll ensure that every node gets its pod, and dive into the exciting world of node selectors and pod templates.
Configuring Daemonsets for Specific Pods
Now that you’ve got the hang of deploying a basic Daemonset, let’s tailor it to fit your needs like a custom-made suit. Sometimes, you don’t need a pod running on every single node. Maybe you want a special pod on nodes with particular hardware, or perhaps you want to deploy certain services only to nodes in a specific zone.
Node Selector: Choosing the Right Nodes
That’s where node selectors come into play. Node selectors are like VIP passes; they tell Kubernetes which nodes should host your Daemonset pods. You set these by adding labels to your nodes and then specifying these labels in your Daemonset YAML file. Here’s how you do it:
Add labels to your nodes using the command:
kubectl label nodes <node-name> <label-key>=<label-value>In your Daemonset YAML, under the
specsection, add anodeSelectorfield with the same key-value pair.
And voilà! Your Daemonset will now only deploy pods to nodes that are backstage pass holders – those with the right labels.
Pod Template: Designing Your Pod’s Blueprint
The pod template is the heart of your Daemonset configuration. It’s like the blueprint for the rooms in your hotel – it defines what they look like, what amenities they have, and how they’re maintained. In Kubernetes terms, this includes the container image to use, ports to open, volumes to mount, and other critical settings. Getting this right is crucial for your pods to run effectively.
Adjusting Daemonsets To Your Kubernetes Cluster
Just like every ship needs to be adjusted for the specific waters it sails, your Daemonset needs to be fine-tuned for the unique characteristics of your Kubernetes cluster.
Tuning Your Daemonset for High Availability
High availability is the name of the game when it comes to production environments. You want your services to be as resilient as a lighthouse in a storm. By setting up multiple replicas of your pods across different nodes, you ensure that if one node goes down, your service doesn’t. With Daemonsets, since they run on every node, you get high availability by default.
Maintenance Tasks: Keeping Your Daemonsets in Check
Maintenance is key to a smooth sailing experience. Regularly check your Daemonsets to make sure they’re running the latest container images and configurations. Kubernetes makes it easy with rolling updates – you can update your Daemonsets without downtime. Here’s a pro tip: keep an eye on the events and logs for your Daemonsets to catch any issues early.
Automating Deployments Across Cluster Nodes
Automation is like the autopilot for your Kubernetes cluster. Once you’ve set up your Daemonsets, they work tirelessly in the background, ensuring your node-level services are always up and running. This is especially useful for tasks like logging, monitoring, and running custom network configurations.
Rolling Update: Keeping Your Daemonsets Current
Keeping your Daemonsets up-to-date is as crucial as keeping your ship’s navigation charts current. Kubernetes offers a rolling update feature, which gradually updates pods with new versions. This means no downtime for your services, as new pods are only created once the old ones are successfully running. You can specify the update strategy in your Daemonset YAML file to control how and when the updates should roll out.
Load Balancers and Daemonsets: A Perfect Match
Load balancers and Daemonsets go together like sailors and the sea. While Daemonsets ensure that a pod runs on each node, load balancers efficiently distribute incoming traffic across these pods. This combination allows you to handle heavy traffic with ease, ensuring a smooth and responsive experience for your users.
Best Practices for Daemonset Deployment
Let’s talk about best practices – these are the seasoned sailors’ tricks to keep your Kubernetes cluster shipshape.
Optimizing Configuration for Cluster Storage and CPU Requests
Just as you wouldn’t overload your ship, don’t overload your nodes. Make sure to configure your Daemonsets with appropriate CPU and memory requests and limits. This ensures your pods have enough resources to operate efficiently without hogging the entire node’s capacity. It’s all about finding that sweet spot – enough resources to perform well, but not so much that you’re wasting capacity.
When it comes to cluster storage, consider using Kubernetes’ persistent volumes for any storage needs your Daemonset pods might have. This way, if a pod is rescheduled to another node, it can still access its data without a hitch.
In the next part, we’ll take a closer look at Daemonset examples and troubleshooting tips to ensure your Kubernetes journey is smooth sailing.
Daemonset Examples: From Web Servers to Log Collection
Daemonsets are incredibly versatile and can be used for a variety of services within your Kubernetes cluster. Let’s take a closer look at some real-world examples where Daemonsets are the ideal solution.
Example of a Daemonset Manifest File
To give you a better idea of how a Daemonset manifest looks, here’s a simple example:
apiVersion: apps/v1kind: DaemonSet
metadata:
  name: my-daemonset
  labels:
    app: my-daemon
spec:
  selector:
    matchLabels:
      name: my-daemon
  template:
    metadata:
      labels:
        name: my-daemon
    spec:
      containers:
      - name: my-container
        image: my-container-image
        ports:
        - containerPort: 80
This YAML file defines a Daemonset named “my-daemonset” that will ensure a pod running “my-container-image” is deployed on each node of the cluster, listening on port 80.
Common Use Cases: Logging Agent and Network Plugin
Two of the most common use cases for Daemonsets are:
Logging agents: These are pods that collect logs from other applications on the node and send them to a central log store. Since you want to collect logs from every node, a Daemonset ensures that every node runs a logging agent.
Network plugins: Many network plugins for Kubernetes are implemented as Daemonsets. They run on each node to manage the network connectivity for the pods on that node.
Both of these services are critical for maintaining insight into your cluster’s operation and ensuring that your applications can communicate with each other.
Scaling and Managing Kubernetes Daemonsets
As your cluster grows and evolves, you’ll need to scale and manage your Daemonsets to keep up with the changes. This might involve updating the Daemonset to use a new version of a container image or changing its configuration.
The Next Step: Running Pods on Specified Nodes
Sometimes, you don’t want your Daemonset to run on every node. For example, you might have a mix of Linux and Windows nodes and a Daemonset that should only run on Linux. This is where node selectors come in handy. You can use them to ensure that your Daemonset only runs on nodes with a specific label.
Controlling the Number of Pods with Daemonset Controller
The Daemonset controller is responsible for ensuring that the correct number of pods are running on the right nodes. If a node goes down, the Daemonset controller will not create a new pod to replace it because Daemonsets are meant to run one pod per node. However, when the node comes back up, the Daemonset controller will automatically start the pod on that node again.
Troubleshooting: Tips for a Smooth Daemonset Operation
Even with the best setup, you may encounter issues with your Daemonsets. Here are some tips to help you troubleshoot:
Check the logs of the Daemonset pods to see if they’re reporting any errors.
Use the
kubectl describecommand to get more information about the Daemonset and its pods.Ensure your node labels and selectors are correctly configured so that pods are scheduled on the appropriate nodes.
When Daemonsets Work Too Well: Dealing with Overcommitment
Daemonsets are designed to run a pod on every node, but what if you have more nodes than you need for a particular service? This can lead to overcommitment, where you’re using more resources than necessary. To avoid this, you can use node affinity and taints to control exactly which nodes your Daemonset should run on, ensuring that you’re not wasting resources.
In conclusion, Kubernetes Daemonsets are a powerful tool for ensuring that certain types of services run on all or some of the nodes in your cluster. By understanding how to use Daemonsets effectively, you can automate the deployment of critical services like logging agents and network plugins, making your cluster more robust and easier to manage.
Kubernetes is an open-source platform designed to automate deploying, scaling, and operating application containers. It groups containers that make up an application into logical units for easy management and discovery. Kubernetes builds upon 15 years of experience of running production workloads at Google, combined with best-of-breed ideas and practices from the community. For a deeper understanding of Kubernetes’ core elements, you might want to explore the detailed breakdown of Kubernetes components.


