When it comes to software development and deployment, efficiency isn’t just a buzzword—it’s the bedrock of successful operations. And in the world of container orchestration, Kubernetes has become synonymous with streamlining workflows. But, to truly harness its power, setting up a private Docker registry within your Kubernetes cluster is a game-changer. It’s like having a secret weapon that speeds up your development cycle, keeps your data secure, and gives you full control over your container images.
Key Takeaways: Streamline Your Deployment
- A private Kubernetes Docker registry boosts efficiency, security, and control over container images.
- Pre-deployment steps such as ensuring cluster readiness and setting up storage and security are crucial.
- Self-signed TLS certificates can be generated to secure your registry.
- Creating a Kubernetes secret is necessary to manage access to your private registry.
- Once deployed, your private registry needs regular management for scaling and updates.
Why You Need a Kubernetes Private Docker Registry
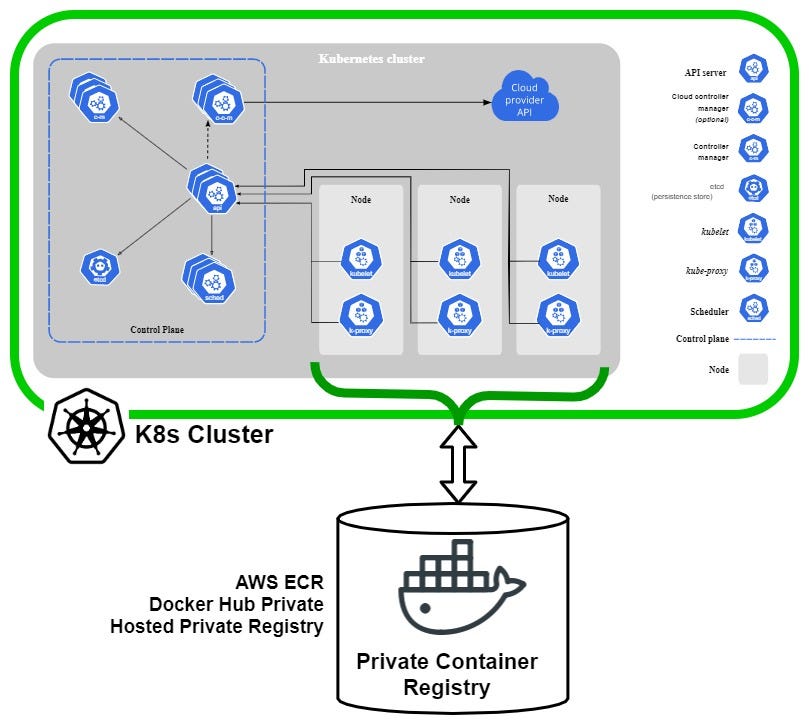
Imagine you’re a developer, and every time you need a container image, you have to fetch it from a public registry, like a library miles away. Now, what if you had that library in your own backyard? That’s what a private Docker registry does for you. It stores all your container images right where you need them—in your Kubernetes cluster. This not only speeds up the image retrieval process but also keeps your proprietary images safe from prying eyes.
What is True Container Efficiency?
True container efficiency is about reducing the time and effort it takes to manage your container images. It’s about having the right tools at your fingertips to automate processes, avoid unnecessary internet traffic, and ensure that your team can focus on what they do best—building great software.
Understanding Private vs. Public Registries
Let’s clear this up: public registries are like community gardens. They’re accessible to everyone, which is great for open-source projects. But for your own private projects, you want a space that’s just yours—a private registry. Here, you have full control over who can access and manage your container images, and you can implement the security measures that best fit your needs.
Laying the Foundation: Pre-Deployment Checklist
Before we dive into setting up your private registry, there are a few things we need to check off the list. This is like making sure you have all the ingredients before you start cooking a meal.
Cluster Health: Ensuring Your Kubernetes Is Ready
First things first, make sure your Kubernetes cluster is up and running smoothly. This is the environment where your private registry will live, so it needs to be in tip-top shape. Check for any existing issues and resolve them before moving forward.
Storage Decisions: Persistent Volume Claims and Access Modes
Next up, think about where you’ll store your container images. In Kubernetes-speak, you’ll need to set up a PersistentVolumeClaim (PVC). This is like claiming a piece of land for your storage house. You’ll also need to decide on access modes—how your containers will access the stored images. Will it be a one-way street or a bustling highway? Choose based on your needs.
Security Essentials: Preparing TLS Certificates
Security is non-negotiable. To keep your registry secure, you’ll need TLS certificates. Think of these like the locks on your doors. You can either get them from a trusted authority or create self-signed ones. While self-signed certificates are like DIY locks, they do the job of keeping your registry safe.
Step-by-Step: Creating Your Private Registry
Now, we roll up our sleeves and get to the actual setup. Don’t worry, I’ll guide you through each step. If you’re new to Kubernetes, you might want to read this comprehensive guide on cloud-native Kubernetes and DevOps before we begin.
Generating Self-Signed Certificates
To generate self-signed certificates, you’ll need some command-line magic. Open your terminal and let’s create those digital locks for your registry.
Configuring Your YAML File
Next, you’ll need to create a YAML file. This file is like the blueprint for your registry. It tells Kubernetes how to build and run your private registry within the cluster. You’ll specify details like the name of your registry, the storage it should use, and the ports it will operate on.
Generating Self-Signed Certificates
Alright, let’s create those self-signed certificates I mentioned. Open up your command line and type the following command.
openssl req -x509 -nodes -days 365 -newkey rsa:2048 -keyout ./registry.key -out ./registry.crt
This creates a new SSL certificate and key, valid for a year. Keep them safe; they’re the keys to your registry’s security.
Configuring Your YAML File
Now, grab your favorite text editor because it’s time to craft your registry’s YAML file. This is where you’ll define everything Kubernetes needs to know. You’ll set parameters like which port to use, the volume for storage, and the secret that holds your certificate. Make sure everything is correct—like double-checking your shopping list before heading to the checkout line.
Crafting Kubernetes Secrets for Access Control
To keep your registry private, you need to set up some access controls. This is where Kubernetes secrets come into play. They’re like the bouncers at the door, checking IDs before letting anyone in. You’ll need to create a secret with your registry’s credentials:
kubectl create secret docker-registry my-registry-secret –docker-server=myregistry.domain.com –docker-username=registry-user –docker-password=registry-password –docker-email=my.email@domain.com
Replace the placeholders with your actual registry server, username, password, and email. This secret will be used later when you pull images from your registry. For more information on storing sensitive data using Kubernetes secrets, refer to our detailed guide.
Next, you need to ensure that your Kubernetes pods know to use this secret when pulling images. Add the secret to your pod spec under imagePullSecrets:
imagePullSecrets:
– name: my-registry-secret
Rolling Out Your Registry with Kubernetes Deployment
With the groundwork laid, it’s time to roll out the red carpet for your private registry. You’ll create a deployment in Kubernetes that defines how your registry should run. It’s like telling your team how you want the play to go down on game day.
Here’s a simple breakdown of what your deployment needs, including understanding the Kubernetes imagePullPolicy.
- A deployment metadata section to name your registry and define labels.
- A spec section where you’ll specify the number of replicas, selector, and template for the pod.
- Inside the template, define the container image for the registry (you can use the official Docker registry image), ports, volume mounts, and the previously created secrets.
Once you’ve got your YAML file set up, apply it with the following kubectl command:
kubectl apply -f my-registry-deployment.yaml
This is the moment where your registry starts taking shape within your Kubernetes cluster.
After deployment, you’ll want to expose your registry so it can be accessed by your worker nodes. You can do this by creating a Kubernetes service. Think of it as opening your registry’s doors to your trusted team while keeping them closed to everyone else.
Kubectl Commands: From Zero to Deployment
Let’s walk through the kubectl commands you’ll use to get your registry up and running. You’ll start by creating a namespace for your registry:
kubectl create namespace docker-registry
Then, you’ll apply your deployment:
kubectl apply -f my-registry-deployment.yaml -n docker-registry
And finally, you’ll set up the service:
kubectl expose deployment my-registry –type=NodePort –port=5000 -n docker-registry
These commands take your plan and make it a reality, launching your private registry into action. To understand more about NodePort services and how they facilitate access to deployments, you can read further.
- Initialize the namespace for your Docker registry.
- Apply your deployment YAML to create the registry pod.
- Expose your registry service to your worker nodes.
Now that your registry is deployed and exposed, it’s time to ensure everything is working as expected.
Validating Deployment: Are We Live Yet?
Once you’ve executed the commands, it’s crucial to check that your registry is running. Use the following command to see the status of your pods:
kubectl get pods -n docker-registry
If you see your registry pod with a status of ‘Running’, you’re good to go. If not, it’s time to troubleshoot. Check the logs, describe the pod, and ensure your YAML file has no typos or configuration issues.
Day-to-Day Operations: Managing Your Docker Images
With your private registry deployed, it’s time to think about the daily grind. You’ll be pushing and pulling images regularly, so let’s streamline this process.
- Pushing images: Tag your local images with your registry’s address and push them using the
docker pushcommand. - Pulling images: When creating pods, use the image name that includes your registry’s address, and Kubernetes will pull the image using the secret you set up.
These tasks will become routine, and with your private registry, they’ll be faster and more secure than ever before.
Pulling and Pushing Containers: A Developer’s Daily Grind
As a developer, you’ll often push new images to your registry and pull existing ones for deployment. Here’s how you do it:
For pushing:
docker tag my-image myregistry.domain.com/my-image
docker push myregistry.domain.com/my-image
And for pulling:
kubectl set image deployment/my-deployment my-container=myregistry.domain.com/my-image -n my-namespace
Remember to replace the placeholders with your actual image and registry details. These commands are your bread and butter, allowing you to move images in and out of your registry with ease. For a deeper dive into managing your Docker images in Kubernetes, check out our guide on troubleshooting Kubernetes ImagePullBackOff errors.
Scaling and Upgrading: Keeping Your Registry Robust
As your project grows, your registry will need to scale and upgrade alongside it. You might need more storage or want to improve performance. Monitor your registry’s usage, and don’t hesitate to adjust resources as needed. It’s like tuning your car for a race; regular maintenance keeps it running at peak performance.
For scaling, understanding Kubernetes components is essential.
kubectl scale deployment my-registry –replicas=3 -n docker-registry
And for upgrades, you’ll update your deployment YAML with the new image version and apply it:
kubectl apply -f my-registry-deployment.yaml -n docker-registry
Optimizing and Troubleshooting Your Private Registry
Even the best setups can encounter issues. If your registry isn’t behaving, look at the logs, check your configurations, and ensure your network policies aren’t blocking traffic. Sometimes, a simple restart can fix hiccups:
kubectl rollout restart deployment my-registry -n docker-registry
Keep an eye on performance metrics, too. If you notice slow pull times or other issues, consider scaling up your resources or optimizing your storage backend.
Optimizing and Troubleshooting Your Private Registry
Just like any system, your private Docker registry on Kubernetes might hit some snags. But don’t worry, with a few smart moves, you can optimize its performance and troubleshoot any issues that arise. It’s like being a detective; you look for clues, follow leads, and eventually, you crack the case.
What to Do When Things Don’t Work: Common Issues
When you run into problems, the first place to look is the logs. Use the command kubectl logs to get insights into what’s happening. If you’re seeing errors related to permissions, double-check your Kubernetes secrets and ensure they’re being referenced correctly in your pod specifications. Connectivity issues might point to network policies or service configurations that need tweaking.
Another common issue could be with the storage. If your registry isn’t responding, make sure that your PersistentVolumeClaims are bound and that the storage is accessible. Sometimes, it’s as simple as a misconfigured access mode that’s causing the hiccup.
Remember, Kubernetes is quite forgiving. If you’ve made an error in your deployment file or service definition, you can always apply an updated YAML file to correct it. Most importantly, don’t panic. Take a systematic approach to troubleshooting, and you’ll find the solution.
Performance Tuning Tips for Your Kubernetes Docker Registry
Performance tuning your registry is all about making sure it runs efficiently. Here are some tips:
- Monitor your usage. Keep an eye on how much storage you’re using and how quickly images are being pulled.
- Scale wisely. If you’re getting more traffic, increase the number of replicas for your registry deployment to handle the load.
- Optimize storage. Choose a storage class that matches your I/O requirements. Some are better for high-throughput scenarios, while others are optimized for many small reads and writes.
And remember, sometimes the best performance improvement is cleaning up. Prune unused images and tags regularly to keep your registry lean and mean.
Frequently Asked Questions
Let’s address some common questions that come up when managing a private Docker registry in a Kubernetes environment. This will give you a clearer picture of what to expect and how to handle various scenarios.
Can I Set Up a Local Docker Registry Without Kubernetes?
Yes, you can set up a local Docker registry without Kubernetes. It’s like setting up a lemonade stand right outside your house instead of in a marketplace. You can use the docker run command to start a registry container on a local machine. However, remember that without Kubernetes, you’re missing out on the orchestration and scalability benefits.
What Are the Benefits of a Helm Chart in Deploying a Docker Registry?
Helm charts are like the instruction manuals for Kubernetes applications. They simplify the deployment process by bundling all the necessary resources and configurations into one package. Using a Helm chart for your Docker registry can help you automate the setup process, manage configurations, and easily update or rollback as needed.
How Can I Convert My Existing Public Docker Images to a Private Registry?
Converting your public Docker images to a private registry is a straightforward process:
- Pull the image from the public registry.
- Tag it with the private registry’s address.
- Push it to your private registry.
Here’s an example:
docker pull my-image:latest
docker tag my-image:latest myregistry.domain.com/my-image:latest
docker push myregistry.domain.com/my-image:latest
Is It Possible to Use Multiple Registries Within a Single Kubernetes Cluster?
Absolutely! You can configure multiple registries within a single Kubernetes cluster. It’s like having different bookshelves for various genres in a library. You can create secrets for each registry and reference the appropriate one in your pod’s imagePullSecrets.
What Are the Best Practices for Role-Based Access Control in My Docker Registry?
For role-based access control (RBAC) in your Docker registry, here are some best practices:
- Define roles and permissions clearly. Decide who can push or pull images, and set the permissions accordingly.
- Use Kubernetes RBAC to control access to the registry’s secrets and namespaces.
- Regularly audit access logs to keep track of who’s accessing your registry and when.
By following these practices, you’ll ensure that only the right people have the right access, keeping your registry secure.
There are no details provided in Step 1 to modify. Please provide the paragraph you would like to have a link added to.