
Key Takeaways
Harbor is an open-source container image registry that enhances Kubernetes deployment efficiency by securely managing artifacts.
It provides features like vulnerability scanning, role-based access control, and image signing, ensuring a secure environment for your container images.
Installing Harbor involves setting up a Kubernetes cluster and deploying Harbor using Helm charts or Docker Compose.
Harbor’s replication capabilities allow for efficient distribution of images across different registries.
It’s a CNCF graduate project, reflecting its maturity and robustness for enterprise use.
Seamless Integration: How Harbor Enhances Kubernetes
When you’re juggling container images in a Kubernetes ecosystem, the efficiency and security of your image registry are paramount. That’s where Harbor comes in. Think of Harbor as a safe haven for your container images, a place where they’re not just stored, but managed with the precision of a Swiss watch. It’s like having a personal assistant for your Kubernetes cluster, one that’s on guard 24/7 to make sure your container images are tucked in safely, free from vulnerabilities, and distributed with ease.
Understanding Harbor’s Role in a Kubernetes Ecosystem
Harbor isn’t just any image registry; it’s a cloud-native registry that’s part of the Cloud Native Computing Foundation’s armory. This means it’s designed to fit snugly into a Kubernetes environment, providing an efficient and secure way to manage your container images. Harbor acts as a centralized hub, making sure that only the right eyes and hands have access to your images with role-based access control, and that your images are as secure as Fort Knox with vulnerability scanning.
But why Harbor, you ask? Because with Harbor, you get more than just a place to store your images. You get a powerhouse that offers:
Security: Rest easy knowing that Harbor scans your images for vulnerabilities, signs them to confirm their integrity, and keeps unauthorized access at bay.
Efficiency: Harbor reduces the bandwidth needed for image transfer, which is especially handy when you’re running a tight ship in terms of resources.
Flexibility: It supports replication between registries, making it easier to keep your images synchronized across different environments.
Benefits of a Private Container Registry
Why go private with your container registry? Because in the world of Kubernetes, privacy means control. With Harbor, you set up a private container registry that’s tailor-made for your needs. You decide who gets to pull images, who can push them, and who has to stand by the sidelines. This is not just about keeping your images safe; it’s about making sure that your entire deployment process is streamlined and efficient.

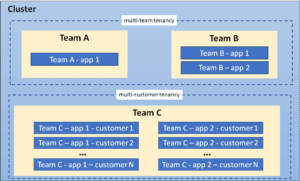
“Kubernetes + Harbor | Kubernetes and Harbor” from ruzickap.github.io and used with no modifications.
Getting Started with Harbor Registry
Installation Prerequisites for Your Kubernetes Cluster
Before you dive into the Harbor waters, you’ll need to make sure your Kubernetes cluster is shipshape. Here’s what you’ll need:
A Kubernetes cluster up and running, because that’s where the magic happens.
Access to the command line, where you’ll be casting the spells (or running the commands).
Persistent storage in place, because your images need a cozy place to call home.
Make sure you’ve got Helm installed, as it’s the trusty tool you’ll use to deploy Harbor.
Step-by-Step Guide to Deploying Harbor
Now, let’s get down to business and set up your Harbor registry. Follow these steps, and you’ll be up and running in no time:
First up, grab the official Helm chart for Harbor. It’s like a treasure map that guides you through the installation process.
Next, customize your Helm chart values. Think of this as setting your preferences for how you want Harbor to behave.
Once you’ve got your values set, it’s time to deploy Harbor using Helm. With a simple command, you’ll watch as Harbor comes to life on your Kubernetes cluster.
Finally, verify that Harbor is running smoothly by accessing the Harbor interface through your web browser.
Remember, each step is crucial, so don’t skip any! And if you hit a snag, the Harbor community is always there to lend a helping hand.
Role-Based Access Control: Fine-Tuning User Permissions
Imagine you’re the captain of a ship, and you need to decide who gets access to the control room. That’s role-based access control (RBAC) in a nutshell. With Harbor, you can assign different levels of access to users based on their roles. You can have administrators who manage the registry, developers who push and pull images, and automated processes that only need limited access. It’s all about giving the right amount of access to the right people, ensuring that your container registry is both secure and functional.
Efficient Docker Image Distribution with Harbor
Efficiency is key when it comes to distributing Docker images, and Harbor has got you covered. With features like image replication, you can synchronize your container images across multiple registry instances. This means if you have teams working in different geographical locations, they all get speedy access to the images they need without any lag. Plus, Harbor’s caching capabilities mean that frequently accessed images are stored closer to where they’re used, which speeds up deployment times significantly.
But there’s more – Harbor supports not just Docker images but also Helm charts, which are like packages for your Kubernetes applications. By storing both in the same registry, you streamline your workflow and make life easier for your development teams. They can find everything they need in one place, without having to juggle multiple tools and repositories.
Configuring Your Kubernetes Cluster for Harbor
Once Harbor is installed, the next step is to make sure it’s properly configured to work with your Kubernetes cluster. This means setting up the network, storage, and security parameters so that Harbor can communicate with Kubernetes and serve images to your deployments. You’ll need to configure persistent storage for Harbor, which is where your images will be stored long-term. You’ll also need to set up an ingress controller, which will direct traffic from outside your cluster to the Harbor service.
Here’s a pro tip: Make sure to secure your Harbor instance with TLS/SSL. You don’t want anyone snooping on your traffic or tampering with your images. You can either use a certificate from a trusted authority or generate your own if you’re just testing things out.
Linking Harbor with Your Kubernetes Users
Integrating Harbor with your Kubernetes users is a breeze. Kubernetes uses service accounts to interact with the registry, and you can configure these to work with Harbor’s RBAC system. By mapping Kubernetes service accounts to Harbor roles, you ensure that your deployments can securely pull images from Harbor without any hiccups. It’s like giving your Kubernetes deployments a VIP pass to the Harbor registry.
Setting Up Ingress for Accessing Harbor
To access Harbor from outside your Kubernetes cluster, you’ll need to set up an ingress controller. This is like the front door to your registry, directing incoming traffic to the right place. You’ll define rules that specify how traffic should be routed to Harbor’s services, and you can also set up TLS/SSL here to keep your connection secure. If you’re using a cloud provider, they might offer an ingress controller that you can use. Otherwise, there are open-source options like Nginx or Traefik that work great too.
Advanced Harbor Management Techniques
Once you’ve got Harbor up and running, there are advanced techniques you can use to manage your registry like a pro. These include setting up high availability, using the official Helm chart for easier deployment, and implementing image replication. Let’s dive into each of these to give you a better understanding.
Enabling High Availability for Your Image Registry
High availability is crucial for any critical system, and your image registry is no exception. To ensure that Harbor is always available, even if one part of the system fails, you can set up a high-availability configuration. This usually involves running multiple instances of Harbor and a database cluster that Harbor can use to store its data. You’ll also want to use a load balancer to distribute traffic across the Harbor instances, ensuring that no single point of failure can take down your registry.
Leveraging the Official Helm Chart for Simplified Deployment
The official Helm chart for Harbor makes deploying and managing your registry a piece of cake. Helm is like the package manager for Kubernetes, and it allows you to define, install, and upgrade complex Kubernetes applications like Harbor. By using the Helm chart, you can customize your Harbor deployment with just a few commands, and you can easily update or scale your registry as needed.
Implementing Image Replication Across Multiple Registry Instances
If you’re working with a distributed team or a multi-cloud environment, image replication is a game-changer. Harbor allows you to replicate container images across multiple registry instances, ensuring that your images are available wherever they’re needed. This not only improves redundancy but also reduces the latency when pulling images, making your deployments faster and more reliable.
Addressing Common Challenges with Harbor in Kubernetes
Integrating Harbor with Kubernetes is straightforward, but there are common challenges you might face. These include managing persistent storage for your container images and integrating vulnerability scanners for enhanced security. Let’s tackle these challenges head-on.
Dealing with Persistent Storage in Containerized Environments
Persistent storage is vital for a container registry because it ensures that your images survive even if the registry service is restarted or moved to a different node. With Harbor, you can use various storage backends like local filesystems, cloud storage, or network-attached storage systems. The key is to choose a storage solution that’s reliable and has enough capacity for your needs. You’ll also want to make sure it’s properly backed up, because losing your container images can be a major setback.
Setting up persistent storage might seem daunting, but it’s not as complicated as it sounds. Kubernetes offers PersistentVolumes (PVs) and PersistentVolumeClaims (PVCs), which you can use to provision and manage storage for Harbor. These abstractions decouple the storage configuration from the actual physical storage, making it easier to manage and scale.
Integrating Vulnerability Scanners for Enhanced Security
Security is non-negotiable when it comes to container registries, and Harbor’s built-in vulnerability scanning is a powerful tool to keep your images safe. However, you might want to integrate additional vulnerability scanners to provide an extra layer of protection. Harbor’s pluggable architecture allows you to hook in external scanners like Clair or Trivy, giving you a more comprehensive security analysis of your images. For those interested in setting up a private container registry, understanding how to deploy a private Kubernetes Docker registry can be an essential step.
By regularly scanning your images for vulnerabilities, you can catch potential security issues before they become a problem. This proactive approach to security helps you maintain trust in your containerized applications and ensures that you’re always deploying safe, secure images.
Best Practices for Maintaining Your Harbor Instance
Like any piece of critical infrastructure, your Harbor instance requires regular maintenance to keep it running smoothly. This includes backing up your data, monitoring activity, and staying on top of updates. Let’s go over some best practices to ensure that your Harbor registry remains a reliable part of your Kubernetes environment.
First and foremost, regular backups are essential. Just like you wouldn’t set sail without a lifeboat, you shouldn’t run a registry without a backup plan. Make sure to back up both the Harbor database and the storage where your container images live. This way, if something goes wrong, you can restore your registry to its former glory without missing a beat.
Next, keep an eye on your Harbor activity. Monitoring is like having a lookout at the crow’s nest; it helps you spot potential issues before they turn into full-blown problems. Use Harbor’s built-in logs and metrics to track usage, performance, and errors. And if you want to get fancy, you can integrate Harbor with external monitoring tools for even more insight into your registry’s health.
Finally, stay up to date with Harbor updates. The Harbor community is constantly working to improve the registry, fix bugs, and add new features. By keeping your Harbor instance updated, you’ll benefit from all the latest improvements and ensure that your registry remains compatible with the ever-evolving Kubernetes ecosystem.
Remember, a well-maintained Harbor registry is a happy registry, and a happy registry means smoother sailing for your Kubernetes deployments. Keep these best practices in mind, and you’ll be set for success.
Integrating Vulnerability Scanners for Enhanced Security
When it comes to container security, being proactive is key. Harbor comes equipped with a vulnerability scanner that can automatically check for known vulnerabilities in your images. But don’t stop there. Integrating additional scanners like Clair or Trivy can beef up your security, scanning each image and providing detailed reports of any issues found. This is like having a security guard on patrol, constantly on the lookout for anything suspicious.
Setting up these scanners is straightforward. Harbor’s pluggable architecture means you can easily add and configure scanners in the registry’s settings. Once in place, they’ll scan new images as they’re pushed to the registry, as well as re-scan images periodically. It’s a set-it-and-forget-it approach to security that can save you from potential headaches down the line.
Best Practices for Maintaining Your Harbor Instance
Running Harbor is like tending to a garden; it requires regular care to thrive. Here are some best practices to ensure your Harbor registry stays in top shape:
Regularly Backing Up Your Harbor Data
Backup, backup, backup! Just like you’d save your important documents, you need to regularly backup your Harbor data. This includes both the database and the filesystem where the images are stored. Regular backups protect you from data loss in case of hardware failure, accidental deletions, or other disasters. Schedule these backups to occur automatically, and verify them regularly to ensure you can recover when needed.
Harbor’s documentation provides detailed instructions on how to backup and restore your registry. Follow these guidelines closely to make sure you don’t miss any critical data during the backup process.
Monitoring and Auditing Your Harbor Activity
Keep an eye on your Harbor registry’s activity with monitoring and auditing tools. Monitoring helps you track performance and usage patterns, while auditing gives you insight into actions taken within the registry. Look for any unusual activity that could indicate a security issue or misuse of the registry.
Harbor provides logs that can be used for auditing purposes, and it can integrate with monitoring solutions like Prometheus to give you real-time metrics. Use these tools to stay informed about the health and security of your registry.
FAQ
Got questions about Harbor? You’re not alone. Here’s a quick rundown of some frequently asked questions to help you get a better grasp of what Harbor can do for your Kubernetes deployments:
What is the Harbor Container Registry Used for in Kubernetes?
Harbor is used as a secure, private container registry within a Kubernetes environment. It’s where you store and manage your Docker images and Helm charts, ensuring they are safe, organized, and accessible to your Kubernetes deployments. Harbor adds a layer of security with features like vulnerability scanning and RBAC, making it an integral part of a secure containerized application lifecycle.
How Can Harbor Improve the Deployment of Containers?
Harbor streamlines the deployment process by providing a centralized repository for container images, reducing the time and bandwidth needed to pull images onto your Kubernetes nodes. With replication and caching, Harbor ensures that images are readily available across different clusters, leading to faster and more reliable deployments.
Can Harbor Operate with Other Container Orchestrators Beyond Kubernetes?
Yes, Harbor can work with other container orchestrators. While it’s tailored for Kubernetes, Harbor adheres to the Open Container Initiative (OCI) standards, which means it can manage containers for other systems like Docker Swarm or Mesos. This versatility makes Harbor a flexible choice for a variety of containerized environments.
Is It Possible to Use Harbor as a Proxy Cache for Docker Hub?
Yes, Harbor can function as a proxy cache for Docker Hub. This feature allows you to use Harbor to cache images from a public registry like Docker Hub, reducing the need to pull images across the internet each time they’re needed. It’s a great way to speed up image pulls and reduce external bandwidth usage.
How Does Harbor Ensure the Security of Docker Images?
Harbor ensures the security of Docker images through several mechanisms, including vulnerability scanning, role-based access control, and image signing. To understand the importance of these security measures, consider how Kubernetes deployment strategies play a crucial role in the continuous delivery pipeline.
Vulnerability Scanning: Harbor scans images for known vulnerabilities, providing reports and preventing the deployment of compromised images.
Role-Based Access Control (RBAC): Harbor allows fine-grained control over who can access, push, and pull images, ensuring only authorized users can make changes.
Image Signing: With Notary integration, Harbor allows image signing to ensure images are tamper-proof and come from a trusted source.
Together, these features create a robust defense against security threats, making Harbor a secure harbor for your container images.