Key Takeaways
A Kubernetes Pod is a group of one or more containers, with shared storage and network resources, and a specification for how to run the containers.
Describing a single Pod with kubectl provides you with a detailed report of its configuration and current state, which is crucial for troubleshooting and understanding workload performance.
The ‘kubectl describe pod’ command is used to fetch detailed information about a specific Pod, including the status of your pod, recent events, its label name, and more.
Understanding the output of ‘kubectl describe pod’ can help you quickly identify issues and ensure your Pods are running as expected.
Best practices include using consistent naming conventions for resources and maintaining a clear labeling system to manage and query your Pods effectively.
Getting to Know Your Kubernetes Pod With Kubectl
Imagine you’re a detective, and your job is to uncover the mysteries of a Kubernetes Pod. You need to know every detail: where it lives, how it behaves, and if it’s in good health. Your magnifying glass? The kubectl command-line tool. Let’s dive in and see how you can use kubectl to describe a Kubernetes Pod, gaining insights that are vital for keeping your applications running smoothly.
What is a Kubernetes Pod?
Kubernetes Pods are the smallest deployable units in the Kubernetes ecosystem. Think of it as a cozy home where your containerized applications live. Pods can house one or multiple containers that share resources like storage and networking, but they always run in a shared context. This design allows your applications to be portable and easily managed across different environments, whether that’s on a physical machine or a virtual one in the cloud.
Why Describing Your Pod Matters
So, why should you care about describing your Pod? Well, just like knowing the details of your car’s engine helps you understand how it runs, describing a Pod helps you understand how your application is running in Kubernetes. It gives you the visibility to diagnose issues, monitor resources, and make informed decisions about scaling and updating your applications. In short, it empowers you to take control of your Kubernetes environment.
“kubernetes – Describe the pod info …” from stackoverflow.com and used with no modifications.
Fetching Pod Details in Your Terminal
Starting with kubectl: The Basics
Before you can describe a Pod, you need to get comfortable with kubectl, the Swiss Army knife of Kubernetes. It’s the Kubernetes command-line tool that lets you interact with your Kubernetes cluster. To make sure you have it ready, open your terminal and type kubectl version. This simple command will confirm that kubectl is installed and communicating with your cluster.
Understanding Your Cluster’s Current Context
Next, you need to ensure you’re looking at the right cluster. Kubernetes can manage multiple clusters, and kubectl needs to know which one you’re interested in. Run kubectl config view to see your current context, which is essentially your target Kubernetes cluster and the user credentials kubectl will use for access.
With these basics out of the way, you’re ready to start describing Pods. And trust me, this is where things get interesting.
Gathering Data from Multiple Pods
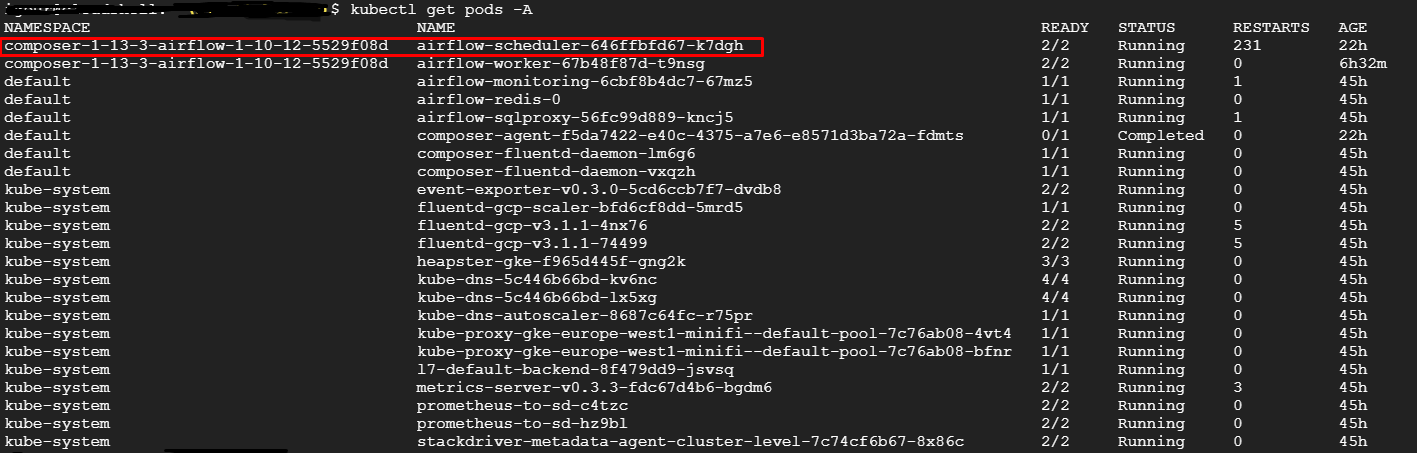
Let’s say you’re not just interested in one Pod, but you need a broader view of what’s happening across several Pods. This could be because you’re monitoring a service that spans multiple Pods, or you’re trying to get a sense of the overall health of your application. The good news is, describing multiple Pods is as simple as leaving out the Pod name in your kubectl command. Just type kubectl describe pods, and you’ll get a detailed report on all the Pods in the current namespace.
But what if you want to focus on a specific subset? That’s where label selectors come into play. Labels are like tags you attach to your Pods, and they work as a powerful filtering mechanism. By using the -l option with kubectl describe, you can specify a label selector to get information about Pods that match certain criteria. For instance, kubectl describe pods -l app=myApp would give you details about all Pods with the label ‘app’ set to ‘myApp’.
Deciphering the Describe Output
Once you run the describe command, you’ll be greeted with a wealth of information. But what does it all mean? Let’s break it down.
Parsing Essential Pod Information
At the top of the output, you’ll see some general information about the Pod: its name, namespace, and whether it’s ready to serve traffic. You’ll also see the node it’s running on – that’s the worker machine in your Kubernetes cluster. Below that, you’ll find the Pod’s IP address and the details about the containers inside the Pod, including the container image name and current running state.
Here’s an example of what you might see:
Name: my-pod
Namespace: default
Node: kubernetes-node-emt8.c.myproject.internal
Start Time: Thu, 13 Feb 2023 08:24:33 +0000
Labels: app=myApp
IP: 10.36.0.1
Containers:
container-name:
Container ID: docker://8c2566e434f2
Image: my-container-image
State: Running
Unlocking Secrets of Pod Events and Conditions
Further down, you’ll find a section dedicated to events. Events are like a diary for your Pod – they tell you what’s happened over time, from scheduling to any restarts due to failures. If something’s gone wrong, this is where you’ll find clues. You’ll see entries like ‘Scheduled’, ‘Pulling’, ‘Pulled’, ‘Created’, and ‘Started’, each with a timestamp, giving you a timeline of the Pod’s life.
Conditions are another vital part of the output. They give you a quick snapshot of the Pod’s health and status. You’ll see conditions like ‘Ready’, ‘ContainersReady’, and ‘PodScheduled’, each with a status that tells you whether that condition is true.
Common Use Cases for the Describe Command
Debugging a Running Pod
When your application isn’t behaving as expected, the describe command is your first line of defense. It helps you quickly pinpoint issues with your Pod. For example, if a Pod is crashing, the events section will often reveal the culprit, whether it’s a misconfigured environment variable or a problem pulling the container image.
Monitoring Pod Status and Performance
Regularly describing your Pods can also help you keep an eye on their performance. You can check resource usage against the limits you’ve set, ensuring your application has the resources it needs without hogging the cluster’s shared resources. It’s a great way to make sure your Pods are not just up and running, but also performing well. For more in-depth insights, consider monitoring Kubernetes with Prometheus.
Best Practices for Pod Description Management
With great power comes great responsibility. Using the describe command effectively means following some best practices to manage your Pods efficiently.
Consistent Handling of Resource Names
Always use clear and consistent names for your Pods and other resources. This not only helps you to identify resources quickly but also makes automation and scripting more straightforward. Consistency is key when you’re working in a dynamic environment like Kubernetes.
Maintaining an Efficient Labeling System
Labels are incredibly powerful, but they can become confusing if not used wisely. Keep your labeling system simple and organized. Use labels to reflect the structure of your applications, such as ‘env’ for environment, ‘app’ for the application name, and ‘tier’ for the layer of the application stack. This approach will make it easier to manage and query your resources.
Advanced kubectl Describe Queries
Once you’re comfortable with the basics, you can start to explore more advanced queries to gain additional information. For instance, you can describe Pods across different namespaces by adding the --namespace flag. Or you can output the information in a specific format, such as JSON or YAML, which can be useful for automation or when feeding data into other tools.
Remember, the goal here is to empower you with the knowledge to manage your Kubernetes environment effectively. With these tools and techniques at your disposal, you’re well on your way to becoming a Kubernetes detective, unraveling the mysteries of your Pods with confidence and expertise.
Describing Pods Across Different Namespaces
Think of namespaces like different rooms in a house. Each room can have its own set of Pods, just like each room can have its own furniture. If you want to describe Pods in a specific room, you just need to tell kubectl which room you’re interested in. You do this with the --namespace flag. For example, kubectl describe pods --namespace=dev will give you details about Pods in the ‘dev’ namespace.
Use
kubectl describe pods --namespace=<namespace>to target a specific namespace.Remember that if you don’t specify a namespace, kubectl uses the default namespace.
To see Pods across all namespaces, you can use
kubectl describe pods --all-namespaces.
By using namespaces effectively, you can organize and manage your resources much better. It’s like keeping your house tidy by putting things where they belong.
Now, let’s address some common questions you might have when working with Kubernetes and the kubectl tool.
FAQ
How do I install the kubectl command line tool?
Installing kubectl is like getting a new game for your console. You just need to download it and set it up. The easiest way is to visit the official Kubernetes website and follow the instructions for your operating system. Whether you’re on Windows, macOS, or Linux, you’ll find a step-by-step guide to get you started. Once installed, open your terminal and type kubectl version to make sure it’s ready for action.
What is the difference between ‘kubectl get pods’ and ‘kubectl describe pods’?
Here’s the scoop: kubectl get pods is like taking a quick glance at your Pods, while kubectl describe pods is like reading their full biography. get gives you a summary – names, status, age, while describe gives you all the juicy details – Kubernetes events, conditions, configuration, and more. It’s the difference between a quick summary and the whole story.
When you just want to check if your Pods are up and running, get is your go-to. But when you need to dive deep and find out why a Pod is misbehaving, describe is the command you need.
How do I check the logs of a specific pod?
For example, to check the logs of a Pod named ‘my-pod’, you would use the following command:
kubectl logs my-pod
Logs are like a diary for your Pod. They tell you what’s happening inside, and they’re crucial when you’re trying to figure out why something isn’t working. To check the logs, use the kubectl logs command followed by the name of the Pod. If your Pod has more than one container, you’ll also need to specify the container name with the -c flag.
It’s as easy as that. Now you can see exactly what’s been going on inside your Pod and get to the bottom of any issues.
Can I use kubectl to describe other Kubernetes resources?
Yes, you can! kubectl is not just for Pods. You can describe a whole bunch of different resources like services, deployments, and nodes. Just replace ‘pod’ with the type of resource you’re interested in. For example, kubectl describe service my-service will tell you all about a service named ‘my-service’.
It’s like having a key to every door in your Kubernetes house. Each command opens up a new room full of information for you to explore.
Services:
kubectl describe service <service-name>Deployments:
kubectl describe deployment <deployment-name>Nodes:
kubectl describe node <node-name>
What should I do if ‘kubectl describe pod’ does not show the pod I’m looking for?
If you’ve run kubectl describe pod and can’t find your Pod, don’t worry. It’s like looking for your keys and not finding them where you thought they were. First, make sure you’re in the right namespace. If you’re not sure, you can list all Pods in all namespaces with kubectl get pods --all-namespaces to find your Pod’s namespace.
If you still can’t find it, the Pod might not be running. Check for recently deleted Pods with kubectl get pods --all-namespaces --field-selector=status.phase=Terminated. This will show you Pods that have been shut down, which might include the one you’re looking for.
Lastly, remember that Pods are ephemeral. If a Pod is gone and not part of a ReplicaSet or Deployment, it might be gone for good. In that case, check the events of the ReplicaSet or Deployment to find out what happened.
By following these steps, you’ll be a master at managing and troubleshooting your Kubernetes Pods. Keep exploring, keep learning, and you’ll find that Kubernetes is a powerful ally in your development adventures.
Understanding the core elements of Kubernetes is crucial for anyone looking to manage containerized applications effectively. One such fundamental element is a Kubernetes Pod, which is the smallest deployable unit created and managed by Kubernetes. A Pod is a group of one or more containers, with shared storage/network resources, and a specification for how to run the containers. A deeper understanding of Pods can help in efficiently using Kubernetes for your deployment needs.