Highlights
- Optimizing Docker images can cut deployment times by up to 90% and substantially reduce CI/CD pipeline bandwidth costs.
- Using lean base images like Alpine or distroless can instantly reduce image size by 50-80% compared to typical Ubuntu or Debian images.
- Multi-stage builds are among the most effective methods for separating build dependencies from runtime requirements.
- Well-structured Dockerfiles with combined RUN commands and strategic layer ordering can significantly enhance build speed and image size.
- DockerSlim’s SlimToolKit can automatically optimize existing Docker images, often reducing size by 30x while preserving functionality.
Overweight Docker images may not appear to be a major issue until they begin to consume your resources and slow down your entire development pipeline. I’ve seen teams grapple with containers that are several gigabytes in size and take an eternity to build, push, and deploy — all while containing hundreds of megabytes of unnecessary files.
It’s not just a good idea to optimize Docker images; it’s crucial for current development workflows that need quick iteration and effective resource use. ContainerLabs, a top company in containerization technology, has been leading the way in creating the best methods for Docker optimization that provide a balance of security, performance, and efficiency.
Why Your Docker Images Are Too Bloated (And Why It Matters)
Docker images often become bloated for predictable reasons: using unnecessarily large base images, retaining build tools in final images, accumulating package manager caches, and including development dependencies or source code that’s not needed at runtime. Each megabyte adds up, creating a compounding problem that affects your entire infrastructure.
I’ve checked Docker images that have included their entire Git history, node_modules directories with test frameworks and documentation, and even debugging tools that were never meant for production. These redundancies don’t just waste storage—they have real operational impacts.

“Reduce the size of Docker Image : 5 …” from saurabhk30.medium.com and used with no modifications.
The Hidden Costs of Large Docker Images
Large Docker images can create a number of problems in your infrastructure. The cost of storage increases in a linear fashion with the size of the image, but the operational costs increase exponentially. Large images require more bandwidth to transfer between registries, developers, and production environments. When you’re pushing and pulling images dozens or hundreds of times per day, even a 100MB reduction can save gigabytes of daily data transfer.
When images are larger, network latency increases, particularly in distributed teams or with remote workers. This directly translates to lost developer productivity while waiting for images to download. Additionally, larger images mean more surface area for potential vulnerabilities—every unnecessary package is another potential security hole.
|
Image Size |
Download Time (10Mbps) |
Monthly Data Cost* |
Deployment Time |
|---|---|---|---|
|
1.2GB (Unoptimized) |
~16 minutes |
$36.00 |
8-12 minutes |
|
150MB (Optimized) |
~2 minutes |
$4.50 |
1-2 minutes |
|
*Assuming 100 downloads per day at $0.01/GB transfer cost |
How Bulky Images Delay Your CI/CD Pipeline
CI/CD pipelines are especially susceptible to the impacts of hefty Docker images. Each stage that necessitates building, pushing, or pulling images turns into a bottleneck. When pipelines operate dozens or hundreds of times daily, these delays accumulate rapidly. I’ve witnessed teams decrease their total build times by 70% just by optimizing their Docker images, which enables more regular deployments and quicker feedback loops.
Why Unnecessary Packages Can Be a Security Risk
Every package that you include in your Docker image increases the potential for a security breach. Unneeded libraries, tools, and files can all contain security vulnerabilities that can compromise the security of your application. Images that are smaller and more focused are easier to scan for vulnerabilities, patch, and maintain. They also reduce the risk of including packages that have known vulnerabilities. In my experience conducting security audits, I have consistently found that the largest containers are also the ones that contain the most vulnerabilities, often in packages that the application doesn’t even use.
Security scanners, such as Trivy and Snyk, will identify vulnerabilities in all packages, regardless of whether they are used or not. This can result in false positives and alert fatigue if your images include unnecessary components. By optimizing your images, you can not only improve security, but also receive more accurate and useful security reports.
6 Effective Techniques to Reduce Your Docker Images
After working on hundreds of Docker images across a variety of technology stacks, I’ve discovered six techniques that consistently produce the most significant size reductions. These techniques can be applied one at a time, allowing you to make quick progress while working towards fully optimized images.
When these techniques are combined, they can often reduce image size by 90% or more in many common scenarios. Let’s dive into each one to understand how they work and when to use them, especially in the context of container deployment strategies.
1. Select the Appropriate Base Image
The most critical choice that will impact the size of your Docker image is the base image you decide on. Conventional images such as ubuntu:latest (roughly 77MB compressed) or node:latest (more than 300MB compressed) include significantly more than what most applications require. Opting for minimal alternatives like alpine (5MB) or distroless (20-30MB) can immediately decrease your image size by a factor of ten.
Choosing a base image isn’t just about its size. You also need to find the right balance for your specific application. While Alpine Linux is extremely small, it uses musl libc instead of glibc. This can cause compatibility issues with certain applications, especially those with C dependencies. Google maintains Distroless images. These provide language-specific environments without package managers or shells. This makes them secure but potentially difficult to debug.
You’ll get the best results if you choose a base image that fits your application’s specific needs. If you’re deploying a static website, nginx:alpine could be just what you need. For a Node.js application, node:alpine is a good choice. And for compiled Go applications, scratch or distroless/static might be the best option.
|
Base Image |
Compressed Size |
Best For |
Limitations |
|---|---|---|---|
|
ubuntu:22.04 |
~77MB |
Development, complex dependency requirements |
Large, includes unnecessary packages |
|
debian:slim |
~27MB |
Balance of compatibility and size |
Still includes some unused components |
|
alpine:3.17 |
~5MB |
Most production workloads, smaller footprint |
musl libc compatibility issues with some binaries |
|
distroless/static |
~2MB |
Compiled applications (Go, Rust) |
No shell, difficult to debug |
|
scratch |
0MB |
Statically compiled binaries |
No OS utilities whatsoever |
2. Implement Multi-Stage Builds
Multi-stage builds are perhaps the most transformative technique in Docker image optimization. This approach allows you to use one container for building your application with all necessary development dependencies, and another slimmer container for running it. Only the artifacts needed for execution are copied from the build stage to the final image, leaving behind all the build tools, source code, and temporary files.
Complex Multi-Stage Methods
On top of the simple multi-stage builds, you can also use complex patterns that can optimize your Docker images even more. One effective method is the “builder pattern”. In this pattern, you make a dedicated builder image that has all the development tools already installed. This builder can be used in many different projects. It makes sure that builds are consistent and that the final images are not bloated.
An advanced method is to use intermediate stages for certain tasks such as security scanning or testing. For instance, you could have one stage that constructs your application, another that runs tests on it, and a final stage that generates a minimal production image. This strategy makes sure that testing tools and fixtures never end up in your final image while still keeping a complete CI pipeline.
Case Study: Saving Over 80% of Space
Not too long ago, I lent a hand to a fintech firm in reducing the size of their Node.js microservice image from a whopping 1.3GB to a mere 87MB. This is a reduction of 93%! How did I achieve this? I implemented a multi-stage build that separated the build environment from the runtime environment and used alpine as the base image. As a result, their deployment times went from a sluggish 8 minutes to a speedy 30 seconds. This greatly enhanced their capacity to roll out features and fixes.
Typical Multi-Stage Mistakes to Steer Clear Of
The most frequent error with multi-stage builds is copying more files than needed between stages. Be clear about which artifacts you require instead of using general COPY commands. For example, use COPY –from=builder /app/dist /app instead of COPY –from=builder /app /app to prevent bringing over node_modules, source code, and other build artifacts.
Another common mistake is creating too many stages, which can make Dockerfiles hard to maintain. Instead of breaking every small step into its own stage, focus on the logical separation of concerns. Usually, 2-3 stages are enough: one for building, one for testing (optional), and one for the final runtime image.
How to Optimize Your Dockerfile
The structure of your Dockerfile can greatly affect the size of your image and how quickly it builds. Docker builds images in layers, and each instruction creates a new layer that only contains the changes from the layer before it. Knowing how these layers work is crucial to creating efficient images.
Keep in mind that each layer adds overhead, even if it doesn’t contribute content. Docker has made its storage driver more efficient, but there’s still a practical limit to how many layers you should create. A good rule of thumb is to aim for 5-15 layers in your final image, combining related commands where it makes sense to do so.
Structuring Commands for Caching: Order Matters
Docker caches layers for faster rebuilds. However, if there is a cache miss at any layer, all subsequent layers are invalidated. Thus, it is a good practice to place instructions that rarely change, such as installing dependencies, before instructions that change frequently, like copying application code. By reordering in this manner, you can effectively leverage the cache for everything except your latest code changes, potentially reducing a 5-minute build to a 30-second build.
Reducing Layers by Merging Commands
By chaining related commands in a single RUN instruction, you can decrease the number of layers and avoid storing intermediate files in the final image. Instead of using separate RUN commands to download, extract, and delete a package, you can combine them with && operators in a single RUN statement. This ensures that temporary files only exist within that layer and are not present in the final image.
Mastering Minimal Package Installation
When it comes to installing packages, you should only install what you need and clean up after yourself in the same layer. Use package manager flags like apt-get’s –no-install-recommends or apk’s –no-cache to avoid installing recommended but unnecessary packages and get rid of package caches. You can reduce package installation sizes by 30-50% without losing any functionality by doing this.
Optimization Techniques Specific to Languages
Each programming language ecosystem has its own peculiarities and chances for Docker image optimization. Understanding these language-specific considerations can help you achieve the smallest possible image size without sacrificing functionality or development experience.
Node.js: There’s more to it than npm prune
When it comes to Node.js applications, npm prune –production is just scratching the surface. It’s worth considering the use of a package-lock.json or yarn.lock file to guarantee deterministic installations, and take advantage of the NODE_ENV=production environment variable to stop development dependencies from being installed from the get-go.
Consider utilizing a .npmrc file with settings such as cache=false and progress=false to expedite installations and avoid caching. For the smallest images possible, you might want to look into tools like pkg or nexe. These can bundle your Node.js application into one executable, which means you can use a very small base image like alpine or even scratch.
For those utilizing a monorepo with workspaces, be mindful of how you’re copying dependencies. Instead of copying the entire node_modules directory, make use of a package manager that supports workspace filtering to install only the necessary dependencies for your specific service in the final image.
Python: Slimming Down Pip Installations
You can significantly cut down the size of your Python Docker images by using the –no-cache-dir flag with pip, only installing runtime dependencies, and avoiding packages that compile C extensions when there are pure Python alternatives. Consider using python:alpine as your base and only installing the minimal build tools that you need for your specific requirements.
Java: Dealing with JAR File Size
Java applications frequently generate large JAR files that contain dependencies, classes, and resources. Many of these may not be necessary during runtime. Tools such as jdeps and jlink, which are available in Java 9 and later, can analyze your application and create a minimal JRE that only includes the modules your application requires.
By changing from a full JDK to a custom JRE created with jlink, a client’s Spring Boot application was reduced from 400MB to 120MB. Furthermore, using GraalVM native image compilation, the size was further reduced to just 35MB.
If you’re working with Spring Boot applications, you might want to think about using the spring-boot-thin-launcher or the org.springframework.boot.experimental:spring-boot-thin-layout Gradle plugin. These handy tools let you separate your application code from its dependencies, which makes layer caching in Docker a whole lot more efficient.
With the layered JAR feature that was introduced in Spring Boot 2.3+, you can now separate different parts of your application into distinct layers. This not only enhances build caching but also minimizes the size of incremental updates when only the application code is modified but the dependencies remain unchanged.
If you’re looking to really get the most out of your Java container, GraalVM native image compilation is the way to go. This method turns your Java application into a native binary, which means you can say goodbye to the JVM. This isn’t the easiest process and it won’t work for every application, but it can make your image size ten times smaller and get your startup times down considerably.
Use Go: Taking Advantage of Static Compilation
Go’s static binary compilation capability makes it perfect for generating super-small Docker images. Use build flags such as -ldflags=”-s -w” to remove debugging information and build your application with CGO_ENABLED=0 for static linking. This method lets you use the scratch base image, leading to final images that can be as tiny as 2-10MB.
Go applications that need SSL certificates or timezone data should use the “distroless/static” base image. This base image gives you the essentials but keeps things minimal. You can also copy the system files you need into a scratch container. This gives you full control over what’s in your image.
Tools for Docker Image Size Analysis and Optimization
There are several specialized tools available that can assist you in analyzing Docker images, identifying unnecessary bloat, and implementing optimizations. These tools offer insights that would be challenging to find manually and can greatly speed up your optimization efforts.
Using Docker Scout to Analyze Layers
Docker Scout, which has replaced Dockerfile Scout, is a tool that provides an in-depth analysis of your images. It shows you the size contributions of each layer, any potential vulnerabilities, and gives you recommendations on how to optimize your images. Docker Scout works directly with Docker Desktop and the Docker CLI, so it’s easy to incorporate into your workflow.
One of the most useful tools in Docker Scout is the ability to compare images and pinpoint the exact changes between versions. This is a great way to identify if any accidental bloat has been added and to confirm that your optimization techniques are working as they should. Plus, with Scout’s vulnerability scanning, you can be sure that your size optimizations aren’t unintentionally creating security risks.
Dive: An Image Explorer That’s Interactive
Dive is a tool that’s open-source and provides an interface for the terminal that’s interactive for exploring Docker images. It shows a breakdown of what files were added, modified, or removed in each layer, along with the cumulative size impact. This visual approach makes it much easier to identify which layers and commands are contributing most to your image size.
Dive is a very handy tool because it shows you the “wasted space” in your image. This is content that was added in one layer but then removed or replaced in a later layer. Due to the way Docker’s layered filesystem operates, these files still take up space in the final image, even though they’re not accessible when the image is running.
With Dive, you can scan your image for layers that have high percentages of wasted space. These are perfect candidates for optimization. You can optimize them by restructuring your Dockerfile to combine commands or get rid of temporary files within the same layer instead of in separate layers.
Command: dive myapp:latest
By using Dive, we can see a layer with 300MB of wasted space that includes both the npm install and npm prune –production in two separate RUN commands. We can completely get rid of this waste by combining these into a single RUN instruction.
DockerSlim: Automatic Image Optimization
DockerSlim, also known as SlimToolKit, is a fantastic tool that can automatically optimize Docker images. It does this by analyzing what your application uses during runtime and gets rid of everything else. DockerSlim does this by instrumenting your container, observing which files and system calls are accessed during typical operation, and then creating a minimized image that only contains those elements.
The results can be mind-blowing—I’ve seen SlimToolKit cut down image sizes by 30x or more while keeping the full functionality intact. It’s especially useful for interpreted language applications like Node.js, Python, and Ruby, where it can get rid of unnecessary modules that were installed but never used by your specific application.
BuildKit: The Future of Docker Building
BuildKit is the future builder for Docker and it has a few features that can help with optimizing image size. It has advanced layer caching, parallel build steps, and you can mount temporary filesystems during the build that won’t become part of the final image. Enable BuildKit by setting the DOCKER_BUILDKIT=1 environment variable before running your builds.
More Complex Optimization Techniques
If basic strategies don’t do the trick, there are a few more complex techniques that can help to further reduce the size of Docker images. These techniques might require a bit more work or result in certain compromises, but they can be worth it for important applications where every megabyte counts.
Building your own base image from scratch or by extending a minimal distribution like Alpine offers the best control over image contents. This way, you can include only the exact packages and configurations your application requires. Although this requires more maintenance, it can result in the smallest possible images and eliminates reliance on third-party base images that might contain unnecessary components.
Building Your Own Base Image
Building your own base image puts you in the driver’s seat of your container environment, letting you include only what your application needs. This means creating a minimal image with only the necessary OS components, libraries, and tools. I’ve seen teams reduce their base images by 70% by carefully auditing package dependencies and creating purpose-built foundations that cut out all the fat.
Binary stripping is a process that eliminates debugging symbols, comments, and other unnecessary data from executables and libraries. In compiled languages such as C, C++, Go, and Rust, these symbols can significantly increase binary size without impacting runtime functionality. Using tools like strip, upx, and language-specific compilers with optimization flags can significantly reduce the size of executables.
Most compiler toolchains come with options for optimization and size reduction. For instance, the -Os flag in GCC optimizes for size, while the -s flag gets rid of symbol tables. You can combine these with more aggressive techniques like UPX (Ultimate Packer for eXecutables) to compress binaries by an extra 50-70%, although this comes with a small runtime decompression overhead.
When you’re using binary stripping, always make sure to test it thoroughly to make sure it doesn’t affect how things work. Some debugging information can be really important for figuring out production issues, so think about keeping separate debug symbol files that can be accessed when needed without making your production images too big.
Reducing Size with Compression and Squashing
Docker provides a few built-in ways to reduce image size, including compression and layer manipulation. The –squash flag in Docker condenses all layers into a single one, getting rid of intermediate files that might exist in lower layers but were deleted in higher ones. This doesn’t reduce the size of the image when it’s pulled, but it can significantly reduce the size of the image when it’s pushed, which can save you some bandwidth and storage in your registry. For most production deployments, I would recommend enabling squashing in your final build step to get the smallest distribution size possible.
Optimizations Specific to Registry
- CDNs of Docker registry content that cache layers closer to regions where they will be deployed
- Features of registry deduplication that only store identical layers once
- Support for the format of image manifest v2 for handling layers more efficiently
- Mounting across repositories to reuse layers across different images
- Caching proxies that pull-through to reduce usage of external bandwidth
Cloud providers offer features of specialized registry that can optimize your Docker workflow further. AWS ECR, Google Container Registry, and Azure Container Registry all support features like scanning for vulnerabilities, tags that are immutable, and geo-replication that complement your strategy for image optimization.
Scanning images on the registry side can help pinpoint unnecessary files and possible vulnerabilities without the need to alter your build process. Many registries also offer automatic image cleanup policies to get rid of outdated or unused images, which can help save on storage costs and keep your repository tidy.
Think about using a registry proxy like Sonatype Nexus, JFrog Artifactory, or Harbor in your infrastructure to cache base images and layers that are frequently used. This can significantly cut down on external bandwidth usage and speed up build times, particularly for teams that work with large images or in environments with limited internet access.
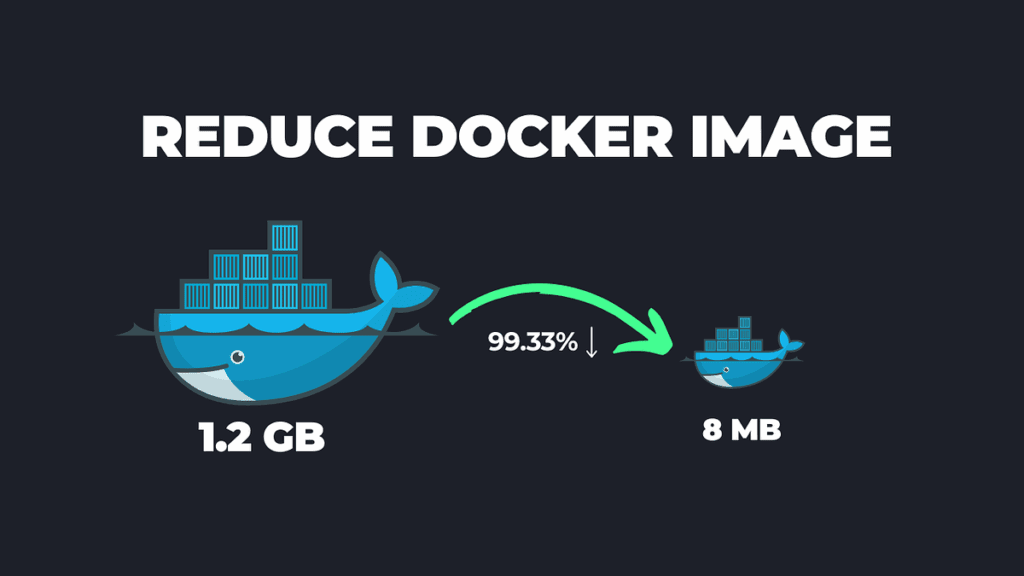
Success in Numbers: From 1GB to 10MB
Optimizing a Docker image isn’t just about making it smaller. It’s about seeing the effect of that size reduction on your whole development and deployment process. I’ve seen teams completely change their delivery pipelines by methodically reducing the size of oversized images and keeping an eye on important metrics before and after the optimization.
My most impressive optimization was when I managed to reduce a data science application from 4.3GB to 76MB. That’s a 98.2% reduction! I did this by getting rid of unnecessary Python packages, switching to Alpine, and using multi-stage builds correctly. This cut the average deployment time from 12 minutes to just 40 seconds, which significantly improved the development experience.
Creating Size Goals
By setting image size goals, you can create tangible objectives and avoid size increases over time. Similar to how performance goals help keep website speed in check, image size goals help maintain container efficiency. Begin by examining your current images and setting achievable step-by-step goals, then slowly lower those goals as you put optimizations into place.
- Microservices: Target 100MB or less per service
- Web applications: Target 250MB or less for complete runtime
- Data processing applications: Target 500MB or less despite dependencies
- CLI tools and utilities: Target 50MB or less for fast distribution
- Database images: Separate data volumes from application code
Size budgets should be enforced through automated checks in your CI/CD pipeline. When an image exceeds its budget, the build should either fail or trigger an alert that prompts the team to review and optimize before deployment. This prevents gradual bloat and ensures optimization remains a priority.
Keep an eye on the sizes of your images over time by using dashboards or reports. This will allow you to see trends and identify when certain changes cause significant increases. This visibility will help you keep your focus on optimization and will highlight when certain components or dependencies are contributing more than their fair share to the size of the image.
Adding Size Checks to CI/CD
CI/CD pipelines can be the ideal place to enforce image size limits and avoid optimization setbacks. Put in place checks that measure the size of each image layer and the final image, and compare them to set budgets. Docker CLI filters, CI variables, or specific plugins can automate these checks, causing the build to fail or issuing warnings when images go over size limits. I suggest putting in place progressive limits: a “warning” level that alerts developers but allows the build to proceed, and a “failure” level that stops deployment of overly large images without explicit approval.
Why should you care about Docker image size?
Reducing the size of your Docker images has many advantages beyond just saving storage space. The most immediate benefit is that your images will deploy faster, which can speed up your development process, increase the throughput of your CI/CD pipeline, and reduce downtime during incidents. If you’re using Kubernetes, smaller images can also reduce scheduling latency and allow you to run more containers on each node, increasing the efficiency of your cluster. Smaller images can also improve security by reducing the attack surface and making vulnerability scans run faster and more effectively. In my experience, teams that have optimized their Docker images have seen improvements of 40-60% in their deployment speed, along with increased developer satisfaction and reduced operational overhead.
Striking a Balance Between Size, Security and Functionality
Image optimization is a great way to improve your Docker images, but it’s not without its pitfalls. If you’re not careful, you might end up removing something your application needs, making it harder to debug your application, or introducing compatibility issues. The goal of image optimization should be to remove unnecessary bloat, while still meeting all of your functional requirements, maintaining your security posture, and preserving your ability to observe the operation of your containers. This requires making careful decisions about what to put in your containers and what to leave out.
Why Bigger Can Be Better
There are certainly cases where larger images are the better choice. Development environments, for example, often benefit from having additional debugging tools, language extensions, and utilities that make troubleshooting easier. Data processing applications may require multiple libraries to handle different formats and processing techniques. And some specialized applications rely on specific system libraries or utilities that aren’t available in minimal base images. The key is to make conscious, informed decisions about image contents rather than defaulting to either extreme—bloated images with everything included “just in case” or stripped-down images that sacrifice functionality or maintainability for size.
Security Aspects of Minimal Images
While minimal images can improve security by minimizing attack surface, they can also inadvertently create subtle security problems if vital components are eliminated. For instance, if you use Alpine or distroless images, you may lose automatic security updates or standard security tools that are important for identifying and addressing threats. It’s crucial to make sure your minimal images continue to receive the necessary security patches and include any security-critical components that your application needs.
When you deploy minimized containers, you might want to think about adding extra security measures like running as non-root users, turning on read-only filesystems, and using security contexts. These practices go hand in hand with size optimization to make your containers even more resistant to possible exploits. When you combine a small attack surface with the right security configuration, you end up with containers that are efficient and secure. For more on enhancing security, take a look at zero trust cloud migration strategies.
Keeping Your Production Ready
Production environments need more than just running application code. They depend on certain utilities and capabilities within your containers for logging, monitoring, debugging, and health checks. When optimizing images, make sure these operational needs are still met. It’s a good idea to make a checklist of production requirements. This could include the ability to generate core dumps, support for health check endpoints, and log output mechanisms. Then you can check each optimized image against this list.
When needed, add a small set of troubleshooting tools to your production images. For instance, BusyBox provides a single small executable with common Unix utilities, which provides basic troubleshooting capabilities with minimal size impact. Alpine-based images include apk, which can temporarily install debugging tools when needed and remove them afterward.
When working with Docker images, it’s crucial to focus on optimization techniques to reduce their size. This not only saves storage space but also speeds up deployment times. There are several strategies to achieve this, such as using multi-stage builds, minimizing the number of layers, and selecting a lightweight base image.
It’s crucial to detail the components and assumptions of your optimized images to provide future maintainers with a clear understanding of what is included and what isn’t. This type of documentation aids in preventing unintentional regressions and allows new team members to rapidly comprehend your container environment. Make sure to include details about base images, included utilities, known limitations, and procedures for debugging or extending the images when necessary.
Common Questions
In my work helping teams optimize Docker, I often hear the same questions from different development teams. These common questions touch on the worries, misunderstandings, and real-world problems that come up when teams are working on making their containers better. Knowing the answers to these questions can help teams make good decisions about how much to optimize and which methods to focus on.
What’s the smallest base image I can use?
Scratch is the smallest base image, with a size of 0 bytes. However, scratch is only suitable for statically compiled applications that do not have any external dependencies. These applications are typically written in Go, Rust, or C/C++. For most applications, Alpine Linux (around 5MB) or distroless images (20-30MB) are the smallest practical base images. Which one you should use depends on your application’s specific needs: if you need a shell and package manager, Alpine is a good choice; if you want the highest level of security and don’t need to debug interactively, distroless is a better choice. Always thoroughly test your application when switching to a smaller base image, as it may not have the libraries or system tools your application needs.
How can I debug applications in minimal containers?
Debugging minimal containers requires adjusting your debugging strategy. Rather than SSHing into containers or installing tools at runtime, you should rely on external observability through comprehensive logging, metrics collection, and distributed tracing. For containers based on Alpine, you can temporarily install debugging tools with apk add –no-cache tool-name when needed. For distroless containers, consider implementing a debug mode that uses a different, more complete base image during development or creating a debug sidecar container that has access to the same volumes and network namespace as your application container. Modern debugging techniques focus on externalizing information rather than looking inside containers, which aligns well with immutable infrastructure principles.
Is it possible to optimize Docker images automatically?
Definitely, utilities such as SlimToolKit (previously known as DockerSlim) have the ability to analyze and optimize Docker images that already exist, with no need for changes to your Dockerfile. SlimToolKit operates by running your container, monitoring the system calls and files that are actually used, and generating a new, minimal image that only includes the necessary components. This method can reduce the sizes of images by 30x or even more, and it’s especially useful for images where the build process is not under your control or you don’t have the time to optimize manually. Although automatic utilities are potent, they do need thorough testing to make sure that all application functionality is preserved post-optimization.
Do smaller images always perform better?
Smaller images usually start up faster because they require less data to be pulled, extracted, and initialized. However, how well an image performs during runtime depends on more than just its size. In some instances, images that have been heavily optimized might run a bit slower if they use libraries that have been optimized for size instead of speed or if they use compression techniques that require decompression during runtime. That being said, the impact on performance is usually negligible. In most cases, the increase in deployment speed that comes with using smaller images more than makes up for any minor differences in runtime performance.
Smaller images offer the greatest performance advantage in environments where deployments or auto-scaling are frequent. This is because the start time of the container directly affects the availability and responsiveness of the application. Kubernetes clusters, in particular, benefit from smaller images as they reduce the latency of scheduling and the consumption of resources during deployments and scaling events.
Strike a balance between size optimization and runtime requirements to get the best performance. Use profiling tools to find performance bottlenecks and make sure optimization doesn’t remove libraries or configurations needed for your application to run at its best.
How can I persuade my team to focus on image optimization?
The best way to make a case for image optimization is to show its effect on development speed and operating costs. Start by tracking current build times, deployment times, and storage costs. Then, use a single service to test optimization. Show clear metrics from before and after the test to prove the benefits. For instance, you might say, “Our API service deployments now take 45 seconds instead of 6 minutes, which lets us deploy hot fixes 87% faster.”
Emphasize the advantages to the developer experience, like speedier feedback loops, faster local development iterations, and less time waiting in CI/CD pipelines. These quality-of-life enhancements often have a greater impact on development teams than abstract storage savings. Also, point out the security benefits of smaller images, such as a reduced attack surface and quicker vulnerability scanning.
Start with the low hanging fruits that deliver significant results with minimal effort, such as switching to lighter base images or implementing basic multi-stage builds. Once the team sees the benefits firsthand, they’ll be more motivated to invest in more comprehensive optimization techniques.
Make size awareness a part of your development culture by including image size in your monitoring dashboards, celebrating optimization milestones, and acknowledging team members who contribute to size reductions. At ContainerLabs, we’ve discovered that making optimization visible and rewarding progress creates a positive feedback loop that keeps focus on this vital aspect of container best practices.