Key Takeaways
Backstage integrates seamlessly with Kubernetes to simplify application deployment.
Minikube is an excellent tool for setting up a local Kubernetes environment.
Kubectl is essential for managing Kubernetes clusters effectively.
A PostgreSQL database is necessary for Backstage deployment on Kubernetes.
Proper configuration of Kubernetes Service and Ingress ensures smooth operation of Backstage.
Jumping into Backstage Deployments on Kubernetes
Deploying Backstage on Kubernetes is a game-changer for developers and DevOps professionals. This process streamlines application deployment, making it more efficient and less error-prone. But what exactly is Backstage, and why should we use Kubernetes for it?
Backstage is an open-source developer portal created by Spotify.
Kubernetes is a powerful system for managing containerized applications.
Together, they enhance the developer experience by automating complex processes.
By using Backstage with Kubernetes, you can deploy and monitor software without needing in-depth knowledge of Kubernetes itself. This guide will walk you through the steps to set up your environment, deploy Backstage, and enhance it with plugins for optimal performance.
Why Choose Kubernetes for Backstage?
Kubernetes is a robust platform for managing containerized applications, and it complements Backstage perfectly. With Kubernetes, you can scale applications effortlessly, manage deployments, and ensure high availability. Let’s explore why Kubernetes is the ideal choice for Backstage.
First, Kubernetes provides automatic load balancing and scaling, which ensures that your Backstage applications can handle varying levels of traffic without manual intervention. This is crucial for maintaining performance and reliability.
Kubernetes offers self-healing capabilities, automatically restarting failed containers.
It supports rolling updates, allowing you to update applications without downtime.
Integration with cloud providers makes it easy to deploy Backstage in various environments.
Besides that, Kubernetes’ extensive ecosystem of tools and plugins enhances Backstage’s functionality, providing developers with a seamless experience. Now that we understand the benefits, let’s dive into the essential tools needed for deployment.
Essential Tools for Deployment Setup
Before deploying Backstage on Kubernetes, you’ll need to gather a few essential tools. These tools will help you set up your environment, manage your clusters, and ensure everything runs smoothly.
First on the list is Minikube, a tool that allows you to run Kubernetes locally. It’s perfect for development and testing purposes, providing a local Kubernetes cluster that you can use to experiment and learn.
Next, you’ll need kubectl, the command-line tool for interacting with your Kubernetes clusters. Kubectl lets you manage your applications, view logs, and execute commands in your clusters. It’s an indispensable tool for any Kubernetes deployment.
Additionally, you’ll need Docker to build and package your Backstage application as a container image. Docker simplifies the process of creating containerized applications, making it easier to deploy them on Kubernetes.
With these tools in hand, you’re ready to set up your Kubernetes environment and start deploying Backstage. Let’s move on to the next section to get started with the setup.
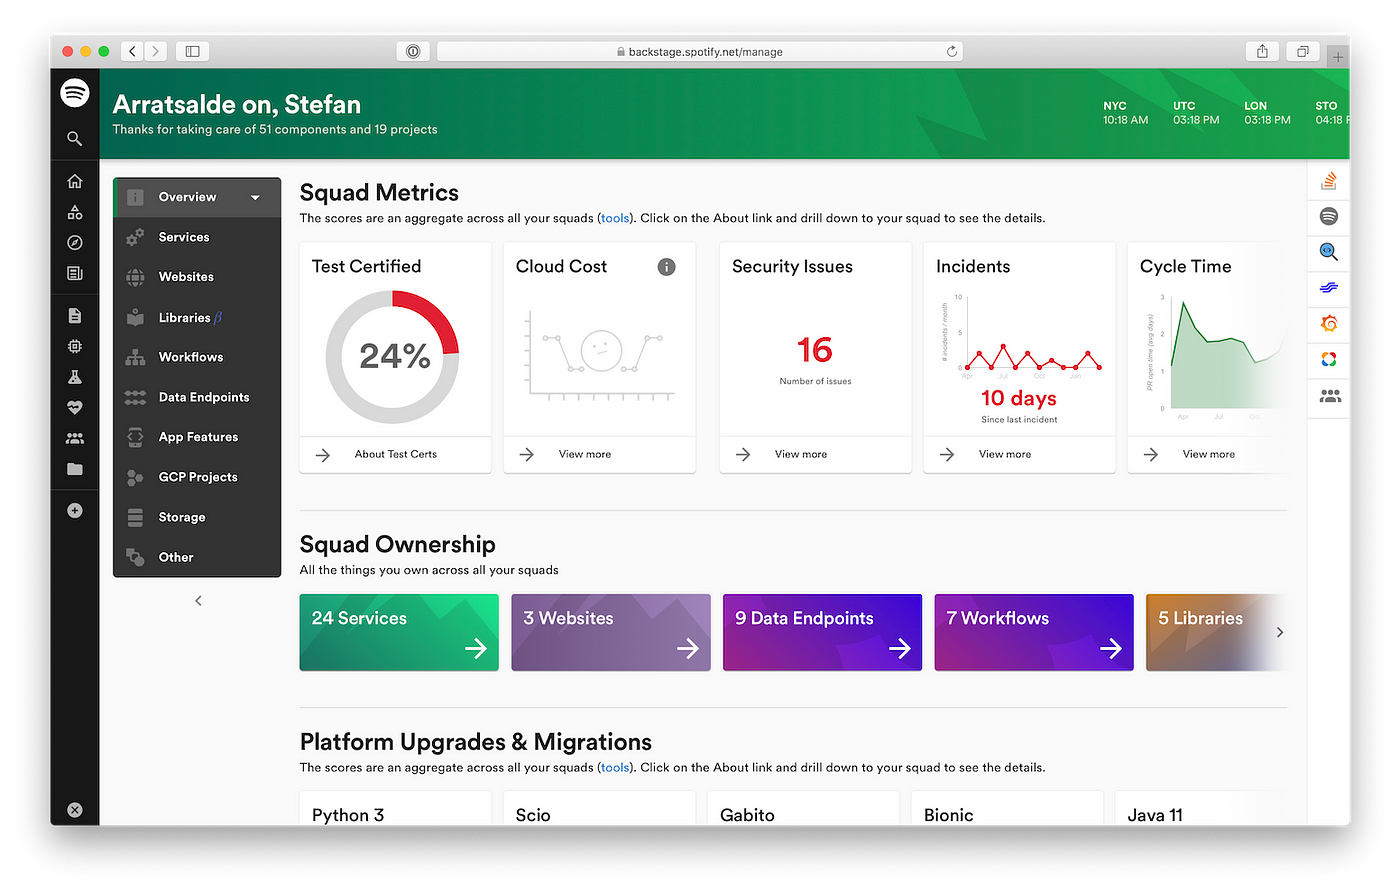
“Build a developer portal with Backstage …” from medium.com and used with no modifications.
Setting Up Your Kubernetes Environment
Setting up your Kubernetes environment is the first step towards deploying Backstage. By following these instructions, you’ll have a local Kubernetes cluster ready for development and testing in no time.
Installing Kubernetes Locally with Minikube
To install Kubernetes locally, we’ll use Minikube. This tool simplifies the process by creating a virtual machine on your local machine that runs a Kubernetes cluster. Here’s how to get started:
Download and install Minikube from the official website.
Once installed, open your terminal and run the command:
minikube start.Minikube will create a local Kubernetes cluster for you to use.
With Minikube running, you now have a local Kubernetes cluster environment. This setup is perfect for testing and development purposes, allowing you to experiment with Kubernetes features without affecting a live production environment.
Configuring kubectl for Cluster Management
Now that your Kubernetes cluster is up and running, it’s time to configure kubectl to manage it. Kubectl is the command-line interface for Kubernetes, and it’s essential for interacting with your clusters.
To configure kubectl, follow these steps:
Ensure kubectl is installed on your machine. You can download it from the Kubernetes website.
Verify your kubectl installation by running:
kubectl version --client.To connect kubectl to your Minikube cluster, run: kubectl config use-context minikube.
With kubectl configured, you can now manage your Kubernetes cluster, deploy applications, and monitor their status. This setup is crucial for deploying Backstage and ensuring everything runs smoothly.
Deploying Backstage on Kubernetes
With your Kubernetes environment set up, it’s time to deploy Backstage. This process involves creating deployment resources, configuring a PostgreSQL database, and setting up Kubernetes services. Let’s dive into the details.
First, package your Backstage application as a Docker container.
Next, create a Kubernetes deployment resource for Backstage.
Configure a PostgreSQL database for persistent storage.
By following these steps, you’ll have Backstage running on Kubernetes in no time. In the next section, we’ll explore how to create a deployment resource for Backstage.
Creating a Deployment Resource for Backstage
Start by creating a Docker image of your Backstage application.
Push the Docker image to a container registry, such as Docker Hub.
Create a Kubernetes deployment YAML file for Backstage.
Here’s an example of what your Kubernetes deployment YAML file might look like:
  apiVersion: apps/v1  kind: Deployment
  metadata:
    name: backstage
  spec:
    replicas: 1
    selector:
      matchLabels:
        app: backstage
    template:
      metadata:
        labels:
          app: backstage
      spec:
        containers:
        - name: backstage
          image: your-docker-image
          ports:
          - containerPort: 7000
This YAML file defines a deployment resource for your Backstage application, specifying the Docker image to use and the port to expose. Once your deployment resource is ready, apply it to your Kubernetes cluster using kubectl.
Run the following command to apply your Kubernetes pod deployment:
kubectl apply -f backstage-deployment.yaml
With your deployment resource applied, your Backstage application will be up and running on Kubernetes. In the next section, we’ll configure a PostgreSQL database for persistent storage.
Configuring a PostgreSQL Database
A PostgreSQL database is essential for Backstage, providing the persistent storage needed for your applications. Configuring this database on Kubernetes involves creating a separate deployment resource for PostgreSQL. This ensures that your database remains isolated from the Backstage application, enhancing stability and performance.
To set up PostgreSQL, start by creating a Docker image for the database. You can use an existing PostgreSQL image from Docker Hub or build your own if you have specific requirements. Once you have your image, create a Kubernetes deployment YAML file for PostgreSQL.
Here’s a basic example of a PostgreSQL deployment YAML:
  apiVersion: apps/v1
  kind: Deployment
  metadata:
    name: postgres
  spec:
    replicas: 1
    selector:
      matchLabels:
        app: postgres
    template:
      metadata:
        labels:
          app: postgres
      spec:
        containers:
        - name: postgres
          image: postgres:latest
          env:
          - name: POSTGRES_DB
            value: backstage
          - name: POSTGRES_USER
            value: postgres
          - name: POSTGRES_PASSWORD
            value: yourpassword
          ports:
          - containerPort: 5432
Apply this configuration using kubectl to deploy PostgreSQL to your Kubernetes cluster. This setup provides a reliable database for your Backstage application, ensuring data persistence and integrity.
Setting Up Kubernetes Service and Ingress
With your Backstage and PostgreSQL deployments in place, the next step is to set up a Kubernetes Service and Ingress. These components manage how your applications receive traffic and communicate within the cluster.
First, create a Kubernetes Service for your Backstage application. This service exposes your application to the network, allowing it to receive external traffic. Here’s an example YAML configuration for a Backstage service:
  apiVersion: v1
  kind: Service
  metadata:
    name: backstage-service
  spec:
    selector:
      app: backstage
    ports:
    - protocol: TCP
      port: 80
      targetPort: 7000
    type: LoadBalancer
Apply this configuration to your cluster using kubectl. Once the service is up, configure an Ingress resource to manage external access to your application. The Ingress resource routes external HTTP/S traffic to your Backstage service, providing a single point of entry.
Here’s an example of an Ingress resource configuration:
  apiVersion: networking.k8s.io/v1
  kind: Ingress
  metadata:
    name: backstage-ingress
  spec:
    rules:
    - host: your-domain.com
      http:
        paths:
        - path: /
          pathType: Prefix
          backend:
            service:
              name: backstage-service
              port:
                number: 80
With the Ingress configured, your Backstage application is now accessible from outside the Kubernetes cluster, ready to serve your developers and users.
Enhancing Backstage with Kubernetes Plugins
To fully leverage the capabilities of Backstage on Kubernetes, integrating Kubernetes plugins is essential. These plugins enhance Backstage’s functionality, providing insights into your Kubernetes environment directly within the Backstage interface.
Installing the Frontend Plugin for Backstage
The frontend plugin is a vital component that enables Backstage to display Kubernetes cluster information. Installing this plugin involves adding it to your Backstage application and configuring it to connect to your Kubernetes cluster.
Start by adding the Kubernetes frontend plugin to your Backstage project. This typically involves updating your project’s dependencies and configuration files to include the plugin.
Once added, configure the plugin to connect to your Kubernetes cluster. This involves setting up the necessary API access and authentication, ensuring that Backstage can query your cluster for data. For detailed instructions, refer to the Configuring Kubernetes integration guide.
Integrating the Backend Kubernetes Plugin
In addition to the frontend plugin, the backend plugin is crucial for fetching data from your Kubernetes clusters. This plugin runs on the server side of your Backstage application, connecting to your clusters and retrieving information.
To integrate the backend plugin, update your Backstage backend configuration to include the plugin. This typically involves modifying configuration files and setting up API access credentials.
Once configured, the backend plugin enables Backstage to display real-time data from your Kubernetes clusters, such as pod status and application health. This integration provides developers with valuable insights, enhancing their ability to manage and monitor applications.
Best Practices for Managing Backstage Deployments
Successfully deploying Backstage on Kubernetes is just the beginning. Managing and maintaining your deployment requires adherence to best practices to ensure reliability, performance, and scalability.
Monitoring Application Health and Performance
Monitoring is a critical aspect of managing Backstage deployments. By keeping an eye on application health and performance, you can identify issues early and take corrective action before they impact users.
Utilize Kubernetes’ built-in monitoring tools, such as Prometheus and Grafana, to track key metrics. These tools provide insights into resource usage, application performance, and overall cluster health.
Scaling and Updating Backstage Efficiently
Scalability is one of Kubernetes’ core strengths, and it’s essential for managing Backstage deployments. By configuring your deployments to scale automatically, you can handle varying traffic loads without manual intervention.
To scale Backstage efficiently, configure horizontal pod autoscaling in your Kubernetes deployment. This feature automatically adjusts the number of pods based on CPU or memory usage, ensuring optimal performance.
Updating Backstage is another crucial aspect of management. Use Kubernetes’ rolling update feature to deploy new versions of Backstage without downtime. This feature gradually replaces old pods with new ones, maintaining availability throughout the update process.
Final Thoughts and Recommendations
Deploying Backstage on Kubernetes is a powerful way to streamline application management and enhance developer productivity. By leveraging Kubernetes’ capabilities, Backstage provides a seamless interface for deploying, monitoring, and scaling applications. Following best practices for deployment and management ensures that your Backstage environment remains reliable, secure, and efficient.
Ensuring Security and Compliance
Security is paramount when deploying applications on Kubernetes. To ensure your Backstage deployment is secure, implement role-based access control (RBAC) to manage permissions and restrict access to sensitive resources. Additionally, use network policies to control traffic flow within your cluster, preventing unauthorized access. Regularly update your Kubernetes and Backstage installations to patch vulnerabilities and maintain compliance with security standards.
Future Proofing Your Deployment Strategy
As your organization grows, your Backstage deployment needs to scale and adapt to new requirements. To future-proof your deployment strategy, consider adopting a microservices architecture, which allows for greater flexibility and scalability. Additionally, explore the use of service meshes, such as Istio, to enhance observability, security, and traffic management within your Kubernetes environment. Stay informed about new features and best practices in the Kubernetes and Backstage communities to continuously improve your deployment strategy.
Frequently Asked Questions (FAQ)
Navigating the deployment of Backstage on Kubernetes can raise questions. Here, we address some common queries to help you get the most out of your deployment.
What Is Backstage?
Backstage is an open-source developer portal created by Spotify. It serves as a centralized hub for managing software development, integrating various tools and services into a single interface. Backstage simplifies the developer experience by providing a unified view of projects, documentation, and infrastructure, enabling teams to collaborate more effectively.
By offering a customizable platform, Backstage allows organizations to tailor the developer experience to their specific needs, improving productivity and reducing cognitive load.
What are the key benefits of deploying Backstage on Kubernetes?
Deploying Backstage on Kubernetes offers several advantages. First, it provides a scalable and resilient environment for your applications, ensuring high availability and performance. Kubernetes’ self-healing capabilities automatically restart failed containers, minimizing downtime and maintaining application stability.
Additionally, Kubernetes’ extensive ecosystem of tools and plugins enhances Backstage’s functionality, enabling seamless integration with monitoring, logging, and security solutions. By deploying Backstage on Kubernetes, you can leverage these benefits to streamline application management and improve the developer experience.
Do I need a specific Kubernetes version to run Backstage?
Backstage is designed to run on most modern Kubernetes versions. However, it’s recommended to use a version that is actively supported by the Kubernetes community to ensure compatibility and access to the latest features and security patches.
When deploying Backstage, verify that your Kubernetes version meets the minimum requirements specified in the Backstage documentation. Keeping your Kubernetes environment up-to-date is crucial for maintaining compatibility and security.
“It’s essential to test your Backstage deployment in a development environment before rolling it out to production. This allows you to identify and resolve potential issues, ensuring a smooth deployment process.”
How can I ensure my Backstage deployment is scalable?
Ensuring scalability in your Backstage deployment involves configuring Kubernetes’ horizontal pod autoscaling feature. This feature automatically adjusts the number of pods based on resource usage, such as CPU and memory, allowing your deployment to handle varying traffic loads efficiently.
To implement horizontal pod autoscaling, define resource requests and limits in your Backstage deployment configuration. This ensures that Kubernetes can accurately assess resource usage and scale your deployment accordingly.