Key Takeaways
Jaeger is an open-source tool that helps trace and analyze the flow of requests in a distributed system, especially useful for Kubernetes environments.
Kubernetes Network Policies are crucial for defining how pods communicate with each other and with other network endpoints.
Common network policy issues include misconfigurations, which can lead to unexpected connectivity problems.
Setting up Jaeger on Kubernetes involves installing the Jaeger Operator and deploying Jaeger components like the collector and UI.
Jaeger helps pinpoint network policy failures by providing detailed traces that highlight where requests are getting blocked or delayed.
How to Use Jaeger for Root Cause Analysis of Kubernetes Network Policy Failures
Kubernetes Network Policies: Brief Overview
Kubernetes Network Policies are like traffic rules for your cluster. They define how pods are allowed to communicate with each other and with other network endpoints. Think of them as a way to control which pods can talk to which, and under what conditions. This is crucial for security and performance.
Network policies use selectors to specify which pods the policy applies to, and they can define rules for both ingress (incoming) and egress (outgoing) traffic. Without these policies, pods can freely communicate with each other, which isn’t always desirable.
Common Network Policy Issues
Even though network policies are powerful, they can also be tricky to get right. Here are some common issues:
Misconfigurations: A typo or incorrect selector can block legitimate traffic.
Overly Permissive Policies: Allowing too much traffic can expose your system to security risks.
Complexity: As the number of policies grows, it becomes harder to manage and troubleshoot them.
These issues can lead to unexpected connectivity problems, making it difficult to understand why certain pods can’t communicate. For more insights on how to address these issues, check out this guide on diagnosing network policy issues in Kubernetes clusters.
Why Jaeger Helps Pinpoint Network Policy Failures
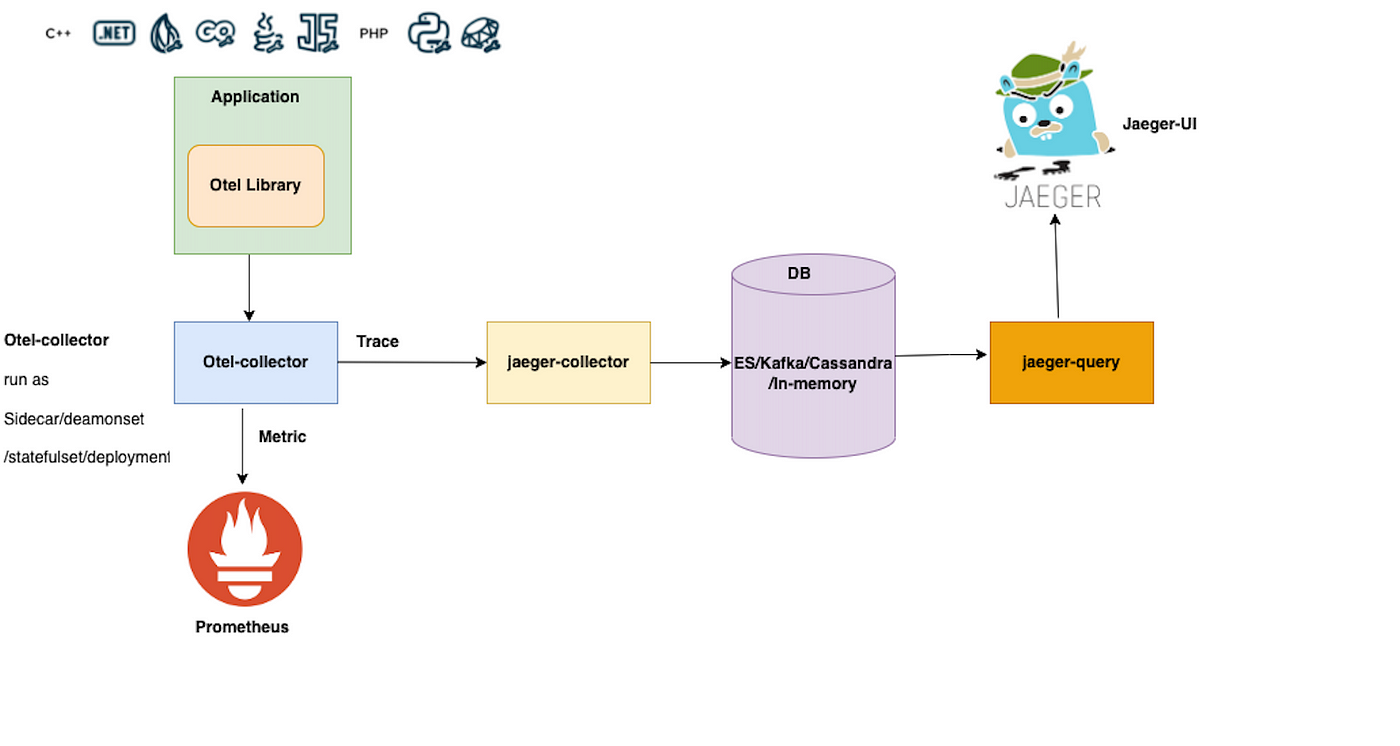
Jaeger is an open-source, end-to-end distributed tracing tool that helps you understand how requests flow through your system. When it comes to Kubernetes network policies, Jaeger can be invaluable. It provides detailed traces that show where requests are getting blocked or delayed.
“Jaeger’s tracing capabilities allow developers to see the flow of requests and data as they traverse a distributed system, making it easier to identify issues and optimize system performance.”
By visualizing these traces, you can quickly identify where a network policy might be misconfigured. This makes Jaeger an essential tool for root cause analysis in Kubernetes environments.

“Jaeger & Opentelemetry on Kubernetes …” from medium.com and used with no modifications.
Setting Up Jaeger on Kubernetes
Now that we understand the importance of Jaeger, let’s go through the steps to set it up on Kubernetes.
Prerequisites
Before we start, make sure you have the following: .
A Kubernetes cluster up and running.
kubectl installed and configured to interact with your cluster.
Helm installed for easier deployment of Jaeger components.
Installing Jaeger Operator
The Jaeger Operator simplifies the deployment and management of Jaeger components in Kubernetes. Here’s how to install it:
First, add the Jaeger Helm repository:
helm repo add jaegertracing https://jaegertracing.github.io/helm-charts
Update your Helm repositories:
helm repo update
Install the Jaeger Operator:
helm install jaeger-operator jaegertracing/jaeger-operator
This will deploy the Jaeger Operator in your Kubernetes cluster, making it easier to manage Jaeger instances.
Deploying Jaeger Collector and UI
With the Jaeger Operator installed, the next step is to deploy the Jaeger Collector and UI. The Collector receives traces, while the UI allows you to visualize them.
Create a Jaeger instance by applying a custom resource definition (CRD):
kubectl apply -f - <apiVersion: jaegertracing.io/v1
kind: Jaeger
metadata:
name: simplest
spec:
strategy: allInOne
EOF
This command creates a simple Jaeger instance with all components (collector, query, and agent) in one deployment.
Once the Jaeger instance is up and running, you can start using it to trace and analyze network policies in your Kubernetes environment. Let’s move on to enabling tracing in your Kubernetes applications.
Enabling Tracing in Kubernetes
Adding Instrumentation to Your Application
To get meaningful traces, you need to add instrumentation to your application. This involves adding tracing code to your services so they can send trace data to Jaeger. Most programming languages have libraries that support OpenTelemetry, which Jaeger uses for tracing.
For example, if you’re using Python, you can add OpenTelemetry with the following commands:
pip install opentelemetry-api
pip install opentelemetry-sdk
pip install opentelemetry-instrumentation-flask
Next, initialize OpenTelemetry in your application:
from opentelemetry import trace
from opentelemetry.sdk.trace import TracerProvider
from opentelemetry.sdk.trace.export import BatchSpanProcessor, ConsoleSpanExporter
from opentelemetry.instrumentation.flask import FlaskInstrumentor
trace.set_tracer_provider(TracerProvider())span_processor = BatchSpanProcessor(ConsoleSpanExporter())trace.get_tracer_provider().add_span_processor(span_processor)
app = Flask(__name__)FlaskInstrumentor().instrument_app(app)
This code sets up OpenTelemetry to trace your Flask application and export traces to the console. You can configure it to send traces to Jaeger by using a Jaeger exporter.
Configuring Jaeger Sidecars
In Kubernetes, you can use sidecars to add tracing capabilities to your pods without modifying the application code. A sidecar is a separate container that runs alongside your main application container in the same pod.
To add a Jaeger sidecar, modify your pod’s YAML file to include the Jaeger agent container:
apiVersion: v1
kind: Pod
metadata:
name: myapp-pod
spec:
containers:
- name: myapp-container
image: myapp:latest
- name: jaeger-agent
image: jaegertracing/jaeger-agent:1.22
args: ["--collector.host-port=jaeger-collector:14268"]
This configuration adds a Jaeger agent to your pod, which will collect and forward traces to the Jaeger collector.
Generating and Collecting Traces
Simulating Network Issues
To effectively use Jaeger for root cause analysis, you need to generate some network traffic and simulate network issues. This helps you see how Jaeger captures and visualizes these issues.
One way to simulate network issues is by introducing delays or faults in your services. For example, you can use a tool like Chaos Mesh to inject network latency or drop packets.
Port-Forwarding for Jaeger and Your Application
To access the Jaeger UI and your application from your local machine, you can use port-forwarding. This allows you to forward a port from your local machine to a port on a pod in your Kubernetes cluster.
For Jaeger, use the following command:
kubectl port-forward svc/jaeger-query 16686:16686
For your application, use a similar command:
kubectl port-forward svc/myapp-service 8080:80
These commands forward port 16686 for Jaeger and port 8080 for your application, allowing you to access them via http://localhost:16686 and http://localhost:8080 respectively.
Sending HTTP Requests for Trace Generation
Now that everything is set up, you can start sending HTTP requests to your application to generate traces. Use a tool like cURL or Postman to send requests and observe how Jaeger captures these traces.
curl http://localhost:8080/api/resource
This command sends a GET request to your application’s /api/resource endpoint. If your application is properly instrumented, this request will generate a trace that you can view in the Jaeger UI.
Analyzing Jaeger Traces
Once you’ve generated some traces, the next step is to analyze them to identify any network policy issues.
Accessing Jaeger UI
Open your browser and navigate to http://localhost:16686. This will take you to the Jaeger UI, where you can search for traces and visualize the flow of requests through your system.
Interpreting Trace Visualizations
In the Jaeger UI, you can search for traces by service name, operation name, or trace ID. Once you find a trace, you’ll see a detailed visualization of the request flow, including each span (operation) and its duration.
Look for spans with long durations or errors, as these can indicate where network policies might be causing issues. For example, if a span for a database query takes longer than expected, it could be due to a network policy blocking or delaying traffic.
Identifying Latency and Bottlenecks
Jaeger traces can help you identify latency and bottlenecks in your system. By examining the duration of each span, you can pinpoint where delays are occurring and investigate further.
For example, if you notice that requests to a specific service are consistently slow, you can check the network policies for that service to see if they are causing the delay. You might find that a policy is blocking traffic from certain pods, leading to increased latency.
Case Study: A Real-World Example
To illustrate how Jaeger can be used for root cause analysis of Kubernetes network policy failures, let’s look at a real-world example.
Scenario Setup
In this scenario, we have a microservices application deployed on Kubernetes. The application consists of several services, including a frontend, backend, and database. Network policies are in place to control traffic between these services. For more insights on monitoring, you can refer to monitoring Kubernetes with Prometheus and Grafana.
Recently, users have been reporting slow response times and intermittent connectivity issues. We suspect that a misconfigured network policy might be the cause.
Steps Undertaken
Here are the steps we took to diagnose and resolve the issue:
Deployed Jaeger in the Kubernetes cluster using the Jaeger Operator.
Instrumented the application services with OpenTelemetry to capture traces.
Simulated network issues by introducing latency and packet loss using Chaos Mesh.
Generated traces by sending HTTP requests to the application.
Analyzed the traces in the Jaeger UI to identify where delays and errors were occurring.
Results and Solutions
By analyzing the Jaeger traces, we discovered that requests to the backend service were being delayed due to a network policy blocking traffic from the frontend service. The policy had an incorrect selector, which was causing legitimate traffic to be blocked.
We updated the network policy to use the correct selector, and the connectivity issues were resolved. Response times improved, and users reported a better experience.
Best Practices and Tips
Optimizing Jaeger Deployment
To get the most out of Jaeger, consider the following best practices:
Deploy Jaeger in a highly available configuration: Use multiple replicas of the Jaeger components to ensure availability and reliability.
Use persistent storage: Store traces in a persistent backend like Elasticsearch or Cassandra to retain trace data for longer periods.
Monitor Jaeger performance: Use monitoring tools to keep an eye on Jaeger’s resource usage and performance.
Maintaining Detailed Trace Logs
Keeping detailed trace logs is essential for effective root cause analysis. Here are some tips for maintaining comprehensive trace logs:
Instrument all critical paths: Ensure that all important services and operations are instrumented to capture traces.
Log additional context: Include relevant metadata in your traces, such as user IDs, request IDs, and error codes, to provide more context for analysis.
Set appropriate sampling rates: Adjust the sampling rate to balance the amount of trace data collected with the storage and performance overhead.
Collaborating Across Teams
Effective troubleshooting often requires collaboration across different teams. Here are some strategies to foster collaboration:
Share trace data: Make trace data accessible to all relevant teams, including developers, operations, and security.
Use a common language: Establish a common terminology for discussing traces and performance issues to avoid misunderstandings.
Conduct joint analysis sessions: Schedule regular meetings to review trace data and discuss potential issues and solutions collaboratively.
Key Findings
Improved Troubleshooting Efficiency
Using Jaeger for root cause analysis significantly improves troubleshooting efficiency. By providing detailed traces of request flows, Jaeger helps quickly identify where issues are occurring, reducing the time needed to diagnose and resolve problems.
Enhanced Team Collaboration
Jaeger’s comprehensive trace data facilitates better collaboration across teams. By making trace data accessible and using a common language for discussing issues, teams can work together more effectively to identify and resolve performance bottlenecks and network policy failures.
Frequently Asked Questions (FAQ)
What is Jaeger?
Jaeger is an open-source, end-to-end distributed tracing system developed by Uber. It helps monitor and troubleshoot complex microservices-based applications by providing detailed traces of request flows. For more insights on troubleshooting, you can read about diagnosing network policy issues in Kubernetes clusters.
How does Jaeger integrate with Kubernetes?
Jaeger integrates with Kubernetes through the Jaeger Operator, which simplifies the deployment and management of Jaeger components. You can deploy Jaeger in your Kubernetes cluster and configure your applications to send trace data to Jaeger.
What are common reasons for Kubernetes network policy failures?
Common reasons for Kubernetes network policy failures include misconfigurations, overly permissive policies, and complexity. These issues can lead to unexpected connectivity problems and make it difficult to understand why certain pods can’t communicate.
How do you interpret Jaeger traces?
In the Jaeger UI, you can search for traces by service name, operation name, or trace ID. Once you find a trace, you’ll see a detailed visualization of the request flow, including each span (operation) and its duration. Look for spans with long durations or errors to identify where network policies might be causing issues.
By following these guidelines and best practices, you can effectively use Jaeger to perform root cause analysis of Kubernetes network policy failures, improving the reliability and performance of your microservices applications.
Jaeger is an open-source, end-to-end distributed tracing tool that is used for monitoring and troubleshooting microservices-based distributed systems. It is particularly useful for identifying performance bottlenecks and understanding service dependencies. For those looking to implement distributed tracing, Jaeger on Kubernetes is a great starting point.


